Quick tip: improving the flash-on-camera photo.
1. Open an icky flash photo; Make a copy of the background layer by choosing
Duplicate Layer from the flyout menu at right of the Layers palette.
2. With that layer still selected, in the Layers palette, choose Multiply (instead
of Normal). All is now darkened, including the blown out highlight area.
3. Well, you don't want the background darker, for sure. So holding down the
Option key (Alt key on a PC), click on the Layer Mask at the bottom of the Layers
palette--that's the second option. Hover over options if you're not sure; the
name will pop up to help you. The black layer mask will cover up the dark stuff
you added before.

 4. Switch your foreground color to white, if not already. To do that, click
on the two overlapping boxes at the bottom of the toolbox. The one to the left
should be highlighted, and white. If it's black, click on the little curved
arrow to switch 'em. Or forget all that, and just type "d." (no quote
marks).
4. Switch your foreground color to white, if not already. To do that, click
on the two overlapping boxes at the bottom of the toolbox. The one to the left
should be highlighted, and white. If it's black, click on the little curved
arrow to switch 'em. Or forget all that, and just type "d." (no quote
marks).
5. Choose the Paint Tool from the toolbox, and a soft-edged brush from the
top menu. Paint over the areas of the face you want to darken again. Tah-dah.
A bit involved, but worth it.
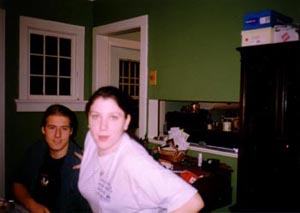
(At right: blown highlights from flash before and after Photoshop treatment.)