

ERROR: Content Element with uid "84818" and type "menu_30" has no rendering definition!
Update template
Parts of the template are configurable by the site authors using specially-named content elements located in the Storage page of your site's Pagetree.
Do not delete the Storage page from your site. Doing so will break those template parts as soon as the delete is published and re-creating a new page called Storage will not repair the template. If this occurs, you should submit a help request to have the site template re-created.
Update footer content
To update the footer content of a site,
- Locate the storage folder in the Pagetree (a page called Storage)
- Locate the footer content element (FOOTER1). If the content element has been deleted, you can create a new Regular Text element with Header set to FOOTER1 and it will be automatically detected as the footer content element
- Edit and save the content element Text as needed
- Publish content element or send to review
- Once published, Clear branch cache
The site now uses the updated footer content.
Footer format
Per University Relations guidelines, footers for NDSU department sites should use the following format. A Web footer generator tool is available to facilitate your use of the suggested format.
FORMAT:
North Dakota State University
Phone: +1 (701) 231-NNNN
Campus address: BuildingRoom#
Physical/delivery address: Complete address, Fargo, ND 58102
Mailing address: NDSU Dept. NNNN / PO Box 6050 / Fargo, ND 58108-6050
Page manager: Department (link)
For example, see the footers of this page.
Considerations
- Please use complete 10-digit phone numbers, including the country code
- This provides mobile visitors with easy one-tap access to call your department (most mobile devices automatically translate text phone numbers into clickable links that launch their phone dialer, avoiding the need to manually key in the phone number)
- Not all visitors to your page know the off-campus meaning of "1-8998" but will understand (701) 231-8998
- If you need to present multiple contact points, consider providing a primary contact point in your Web footers, and utilize the Contact link to provide more verbose detail
Update banner title
Each department page is labeled with a " banner title." If the text is incorrect, or if your unit's name changes, you should update the text by
- Edit the Page Properties of the main page for the department
- Set the Pagetitle field to the correct text
- Save and publish the page
- Clear branch cache
Pagetitle guidelines
- "And" should be spelled out, never an ampersand (&)
- Do not include "Department of ..." and " ... Department" and "... Program"
- Do not include "NDSU" prefix
- Keep "Center for ..." prefix where applicable
- No abbreviations; spell out full name
- No comma before "and"
Example, "... Equity, Diversity and Global ..." - Use title case style (capitalization of all words except for articles, prepositions, conjunctions, and forms of "to be" except if they are the first word)
Update link to main page
A  link to the department main page is automatically inserted at the top of the department navigation list. To change the text that displays
- <link cms kb edit internal-link>Edit the Page Properties of the main page for the department
- Assuming the template banner text (above) is correct, set the Navigation title field to the text that should appear in the navigation menu as the main page link
- Save and publish the page
- <link cms kb cache internal-link>Clear branch cache
Update photo banner
- In the Storage folder, edit the PHOTOBANNER content element.
If there is no PHOTOBANNER content element you should create an "Images Only" content element and set the Header field to PHOTOBANNER.
Creating the PHOTOBANNER content element and completing all of the remaining steps (below) will automatically enable photo banners on the main page of the site you are editing. - In the Images tab, select the images that should be included in the photo banner
- Selected photos must be large enough to fill the banner area; photos that are too small will be ignored
- Do not add any borders or text to the selected images
- Save and publish the content element as usual
- Clear the page cache for the main page
The appearance and behavior of the photo banner will vary:
Colleges - Single photos) If 1 to 5 photos are selected, each photo will be scaled and cropped to fit the banner area. Photos will be randomly ordered for each visitor. Selected photos must be 700px by 266px or greater.
Colleges - Composite images) If 6, 9, or 12 photos are selected, the photos will be cropped and combined by groups of 3 into composite images and scaled to fit the banner area. Any excess photos will be ignored. The order of image selection in the Images tab will be followed for creation of the composite images. The same groups of 3 will be created for all visitors, though the order of the composite images will be random for each visitor. Selected photos must be 230px by 266px or greater.
Departments - Single photos) If one photo is selected, it photo will be scaled and cropped to fit the banner area. The selected photo must be 940px by 266px or greater.
Departments - Composite images) If 3, 6, 9, or 12 photos are selected, the photos will be cropped and combined by groups of 3 into composite images and scaled to fit the banner area. Any excess photos will be ignored. The order of image selection in the Images tab will be followed for creation of the composite images. The same groups of 3 will be created for all visitors, though the order of the composite images will be random for each visitor. Selected photos must be 310px by 266px or greater.
Select a different page template
This applies to www.ndsu.edu/faculty pages only.
- Edit page properties of the page that should use a different template
- Click the Extended tab
- Under the Select template heading, choose a template
- Save, close and publish as normal
- Clear branch cache
Update top navigation
To update top navigation links with custom navigation (not all templates are configured with this feature!)
- Locate the storage folder in the Pagetree (a page called Storage)
- Locate the content element named TOPNAV.
If a TOPNAV content element does not exist, create a new Sitemap element with header TOPNAV 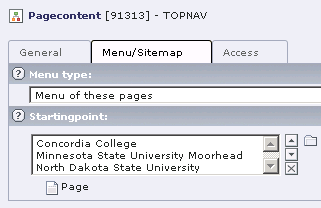 In the Menu/Sitemap tab, set the Menu type drop-down to Menu of these pages.
- Under the Startingpoint heading, click the page browser to select pages that should be included in the navigation menu
- Save as normal, remembering to preview the site in the TYPO3 backend to verify changes are as expected
- Publish or send to review as normal
- Once published, Clear Branch Cache
To revert to the default template navigation links, hide or delete the TOPNAV content element in the Storage folder.
TOPNAV format
Link styles, such as internal-link, external-link and pdf-link, do not display in the top navigation.