Propagation of Cacti and Succulents

Penny Neisen
Undergraduate of Horticulture and Chemistry
PrefaceThis web site is dedicated to the propagation techniques of cacti and succulents. This site is complete with a step by step explanation and pictorial guide of the Techniques of Cactus and Succulent Propagation. For those of us who are not fortunate enough to have cacti and succulents among the natural habitat of our local neighborhoods, or are just beginning, sometimes it is difficult to recognize what growth habit represents a family or genera, much less to know what plant represents a scientific name. Luckily, a host of showy cacti and succulents are available in local plant markets and superstores; however, they are often unclassified. Without knowing the scientific name, or at least the genera of a species, it would be difficult for a beginner to make use of much of the literature available on cacti and succulent propagation. For this reason, I have included a brief Pictorial Reference to Representative Genera and Species complete with specific scientific names and References To Other Photo Galleries, as well as general recommendations for which propagation method to use for what growth habit. By no means does this web site attempt to be an authority
on botanical classification, or plant propagation principles; nor does it
attempt to simplify concepts to the point of insult. Rather, this web site attempts to provide
enough accurate information to get a novice started on the right track, and
to provide a reference and opportunity for peer review among
enthusiasts. This is a web-based
academic review of applied propagation techniques, completed as a course
requirement for an undergraduate horticulture course in plant propagation at Table of Contents: Which Method for What
Species? A Pictorial Reference to Representative
Genera and Species Index Of
Recommended Propagation Techniques For Specific Genera Links To Other
Photo Galleries And Indexes Techniques of
Cacti and Succulent Propagation |
||||||||||||||||||||||||||||||||||||||||||||||||||||||||||||||||||||||||||||||||||||||||||||||||||||||||||||||||||||||||||||||||||||||||||||||||||||||||||||||||||||||||||||||||||||||||||||||||||||||||||||||||||||||||||||||||||||||||||||||||||||||||||||||||||||||||||||||||||||||||||||||||||||||||||||||||||||||||||||||||||||||||||||||||||||||||||||||||||||||||||||||||||||||||||||||||||||||||||||||||||||||||||||||||||||||||||||||||||||||||||||||||||||||||||||||||||||||||||||||||||||||||||||||||||||||||||||||||||||||||
Which Method for What Species? |
||||||||||||||||||||||||||||||||||||||||||||||||||||||||||||||||||||||||||||||||||||||||||||||||||||||||||||||||||||||||||||||||||||||||||||||||||||||||||||||||||||||||||||||||||||||||||||||||||||||||||||||||||||||||||||||||||||||||||||||||||||||||||||||||||||||||||||||||||||||||||||||||||||||||||||||||||||||||||||||||||||||||||||||||||||||||||||||||||||||||||||||||||||||||||||||||||||||||||||||||||||||||||||||||||||||||||||||||||||||||||||||||||||||||||||||||||||||||||||||||||||||||||||||||||||||||||||||||||||||||
|
IntroductionSometimes it is very easy to identify the best was to propagate a cactus or succulent, and other times it is not as obvious. However before you start, the first thing to ask yourself is: What kind of plant do I have? If you don’t know the easiest way to learn is to organize the information you know about your plant into categories. How is it shaped? Is it tall and thin, short and round, or does it have many little leaves? How does it grow? Does it grow all by itself, are there many braches, or are there similar tiny plants that poke up out of the soil near it? Does it flower? Questions like these are the first ones to ask your self when considering propagation. The next thing to think about is how to propagate your cactus or succulent. Done in the reverse order, you might not have as high of a plant propagation success rate. The web site does not help you identify exactly what kind of cactus or succulent you have. What it does do is help you generalize your plant into a category with a brief Pictorial Reference to Representative Genera and Species complete with specific scientific names and References To Other Photo Galleries. This web site then shows you recommended Techniques of Cactus and Succulent Propagation for each category. For the quickest reference, see the Index Of Recommended Propagation Techniques For Specific Genera. Seeds
Most cacti can be propagated by seed; however due to the slow growth of some species, sometimes other methods are more practical. Cacti with solitary growth habits are usually propagated by seed. Several species grow in this manner including: § Notocactus spp. § Neoporteria spp. Stem CuttingsPropagation by stem cuttings is easy and practical. Many cacti and succulents can be propagated by stem cuttings. In general, if the plant has an elongated stem region that is actively growing, propagation by stem cuttings should be a successful route. Some recommendations are: § Prickly Pears and Chollas: Opuntia spp. § Columnar Cacti: Cereus spp. Trichocereus spp § Pincushion and Globular Cacti: Echinopsis spp. Mammillaria spp §
Euphorbia
spp. §
Stapeliads §
Bryophyllum
spp. §
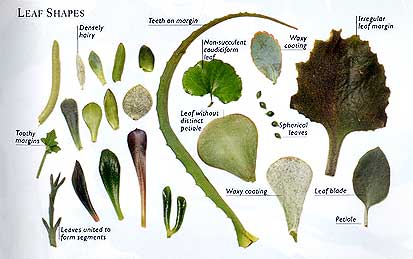
Kalanchoe spp. § Graptopetalum spp. How to Propagate Stem Cuttings Leaf CuttingsMost succulents are usually propagated by leaf cuttings. An image containing various succulent leaf shapes found is shown below: If your succulent has a leaf shape similar to one of these, your best bet is to try propagating with a leaf cutting. Genera typically propagated by leaf cuttings include but are not limited to: §
Gasteria
spp. §
Haworthia,
Sansevieria § Crassulaceae Family (Kalanchoe, Sedum, Graptopetalum, etc.) GraftingGrafting requires a hardy rootstock which is compatible with the desired propagation candidate. This compatibility is very important. Without it, success in grafting in unlikely. For cacti and succulents the following rules and some successful grafts have been reported and are shown below:
Bulbils, Tubers, Plantlets, and OffsetsMany succulents asexually propagate been means of underground lateral shoots. These shoots give rise to offsets or plantlets which can be severed in the spring or summer from the parent lateral shoot to produce a self-sustaining new plant. Aloe spp. and some Agave spp. form plantlets or bulbils on their flowing stalks. These plantlets and bulbils can be removed and planted as well. Kalanchoe spp. produce small plantlets on the scalloped edges of their leaves. These plantlets can also be potted in warm conditions to produce self-sustaining plants. Bulbils and
Plantlets §
Agave
murpheyi §
Agave
vilmoriniana §
Agave
fourcryodes § Kalanchoe spp. §
Aloe spp. Offsets § Echinopsis spp. § Mammillaria spp. § Agave spp. § Aloe spp. § Haworthia spp. § Crassulaceae Family § Kalanchoe sp § Sedum spp. § Graptopetalum spp. Tubers §
Ceropegia
spp. Index of Recommended Propagation
Techniques For Specific Genera
|
|||||||||||||||||||||||||||||||||||||||||||||||||||||||||||||||||||||||||||||||||||||||||||||||||||||||||||||||||||||||||||||||||||||||||||||||||||||||||||||||||||||||||||||||||||||||||||||||||||||||||||||||||||||||||||||||||||||||||||||||||||||||||||||||||||||||||||||||||||||||||||||||||||||||||||||||||||||||||||||||||||||||||||||||||||||||||||||||||||||||||||||||||||||||||||||||||||||||||||||||||||||||||||||||||||||||||||||||||||||||||||||||||||||||||||||||||||||||||||||||||||||||||||||||||||||||||||||||||||||||


Propagation of Stem Cuttings |
|||||||||||||||||||||||||||||||||||||||||||||||||||||||||||||||||
|
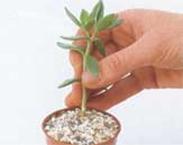
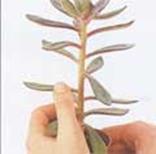
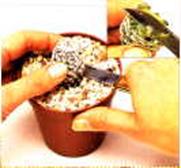
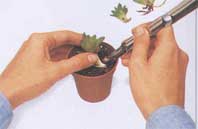
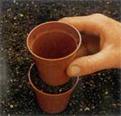
Stem Cuttings should normally be taken at the end of the dormant period or at the very beginning of active growth in the spring, but can also be done in the summer. Although the techniques for propagation are essentially the same, because the growth habits of cacti and succulents are so different, I have included images representative of three major growth habits. Step 1: Protect your fingers, if necessary, by wearing gloves, or wrapping them with tape. Using a sharp, razor blade or knife sterilized with alcohol, remove a stem cutting off of the parent plant. It is important to make a clean cut. Pruning shears crush tissues and a simple tear gives jagged edges. Both usually do not heal fast enough for the cutting to survive without water during the callusing stage. Avoid taking long stem cuttings. They don’t root out well. It is best it take shorter cuttings from new, active growing, vigorous shoots. Remove the lower leaves, leaving two to four inches of bare stem exposed. Dip the stem of the cutting in a rooting hormone, and let it sit out in warm air so that it can form a callus. This should take a few days to a week. Columnar cacti should be sustained in an upright position during callus formation, to prevent stem arching toward light sources. Step 2: Fill a small pot to the brim with specialty cactus soil with extra grit added, or mix your own from scratch. Gently press the soil down to level it off. Inorganic grit, sand, or pumice gives the soil the appropriate drainage and aeration. This type of soil composition is mandatory for cactus and succulent growth. Step 3: Again, protect your fingers if necessary, and plant the callused stem cutting in the prepared potting mix and top dress to prevent soil loss. Water succulents immediately, and wait a few days before watering cacti. Place the potted cutting in a warm, bright, airy, location and keep moderately moist. A NOTE ABOUT WATERING: The use of distilled or fresh water is imperative, as to help prevent bacterial and algal growth during step four. If your tap water tastes of chlorine, it is too chlorinated for your plants and you should consider using distilled water. The chlorine will burn the tender young roots and can cause iron chlorosis, adversely affecting or terminating growth. Careful watering can be done by either by letting the pot stand in half it’s height of tepid water for a few minutes, or by gently watering from the top, taking care not to wash away the top dressing. In both cases, allow the pot to drain completely. Step 4: After several weeks, the cutting should have established a good root system and can be transferred into a larger container filled with specialty cacti potting soil, or 3 parts inorganic grit to 1 part fully decomposed garden loam, and top-dress. Water succulents immediately, and wait a few days before watering cacti. Transfer the newly potted plant to a warm, bright, airy, location. |
||||||||||||||||||||||||||||||||||||||||||||||||||||||||||||||||


Propagation of Leaf Cuttings |
|||||||||||||||||||||||||||||||||||||||||||||||||||||||||||||||||||||||||||||||||
|
Just like stem cuttings, leaf cuttings should normally be taken at the end of the dormant period or at the very beginning of active growth in the spring. Although the techniques for propagation are essentially the same, because the growth habits of cacti and succulents are so different, I have included images representative of three major growth habits. Step 1: Using a sharp, razor blade or knife sterilized with alcohol, remove a single leaf cutting off of the parent plant. It is important to make a clean cut. Pruning shears crush tissues and a simple tear gives jagged edges. Both usually do not heal fast enough for the cutting to survive without water during the callusing stage. Avoid taking leaves from the base of the plant. They don’t root out well. It is best it take leaf cuttings from new, active growing, vigorous shoots. Dip the base of the leaf cutting in a rooting hormone, and let it sit out in warm air so that it can form a callus. This should take a few days to a week. It has been my experience that if a leaf cutting begins to wilt during callus formation, it doesn’t root very easily. Allow the leaf to sit just long enough for the cutting wound to heal or scab over. Step 2: Fill a small pot to the brim with specialty cactus soil, or mix your own from scratch. Gently press the soil down to level it off. Inorganic grit, sand, or pumice gives the soil the appropriate drainage and aeration. This type of soil composition is mandatory for healthy cactus and succulent growth. Step 3: Plant the callused leaf cutting in the prepared potting mix and top dress to prevent soil loss. Water your succulent leaf cuttings immediately and allow the pot to drain completely. Place the potted cutting in a warm, airy, location with at least 8 hours of bright indirect light and keep moderately moist. Consider misting the cutting with a squirt bottle filled with distilled water once a day. A NOTE ABOUT WATERING: The use of distilled or fresh water is imperative, as to help prevent bacterial and algal growth during step four. If your tap water tastes of chlorine, it is too chlorinated for your plants and you should consider using distilled water. The chlorine will burn the tender young roots and can cause iron chlorosis, adversely affecting or terminating growth. Careful watering can be done by either by letting the pot stand in half it’s height of tepid water for a few minutes, or by gently watering from the top, taking care not to wash away the top dressing. In both cases, allow the pot to drain completely. Step 4: After several weeks, the cutting should have established a good root system and can be transferred into a larger container filled with specialty cacti potting soil, or you can mix your own, and top-dress. Water succulents immediately upon replanting. Transfer the newly potted plant to a warm, bright, airy, location. |
||||||||||||||||||||||||||||||||||||||||||||||||||||||||||||||||||||||||||||||||


Propagation by Grafting |
||||||||||||||||||||||||||||||||||||||||||||||||||||||||||||||||||||||||||||||||||||||||||||
|
Grafting is a technique that unites
the cambium, or vascular systems, of two related species, a rootstock and a
scion, to create one plant. Grafting
is also done to provide finicky ornamental plant varieties (scions) with a
more established, hardy, and vigorous root system (rootstock) fsso that they
can survive a greater variety of environmental conditions. Also, grafting can increase the growth rate
of the scion species by nearly ten-fold!
Therefore, grafting is often done in industry to rapidly increase
stock of a slow growing and finicky varieties. There are entire factories in
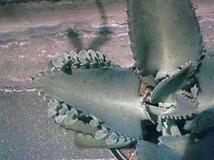
Grafting requires a hardy rootstock which is compatible with the desired propagation candidate. This compatibility is very important. Without it, success in grafting in unlikely. For cacti and succulents the following rules and successful grafts have been reported in a table to the left. Grafting is most successful when performed at the brink of an active growing season. Work with clean hands and in a clean work space. It is imperative to work quickly. These precautions will help to prevent bacterial and fungal contamination. Don’t know technique of grafting to use? Cleft grafts are typically used for scions with a flat or stem-like body shape. Flat grafts on the other hand, are used for more globular or columnar-shaped scions. |
|||||||||||||||||||||||||||||||||||||||||||||||||||||||||||||||||||||||||||||||||||||||||||
|
The Flat GraftStep 1: Protect your fingers, if necessary, by wearing gloves, or wrapping them with tape. Using a sharp knife sterilized with alcohol, make a level cut across the entire diameter of the root stock. It is important to make a quick and clean cut. Pruning shears crush tissues and product jagged edges that do not allow for proper cambium contact and will not callus. Step 2: Quickly cut a 45 degree angle bevel at the perimeter edge of the previous cut on the rootstock. This cut facilitates proper cambium contact, and callus formation. Make sure the center is still flat. Do not cut the top to a point. Step 3: Using a sharp knife sterilized with alcohol, make a level cut across the entire diameter of the scion in the same manner as done on the root stock. It is important that the rootstock and scion cuts are of nearly the same diameter. Otherwise, the cambium vascular systems will not line up and your graft will not succeed. Step 4: Quickly cut a 45 degree bevel on the base of scion in the same manner as done on the rootstock. This cut facilitates proper cambium contact, and callus formation. Make sure the center is still flat. Do not cut the base to a point. Step 5: Now that the initial incisions have been made. Make one final thin slice across the flat center of both pieces to expose fresh flesh. Place the freshly cut scion on top of the fresh cut rootstock, and line up the pieces so that the center diameters of each piece match. Step 6: Use a couple of rubber bands to hold the scion and the rootstock together secure. Do not use plastic tape, and it is best to not use pins. Transfer bright, warm, dry location, free of direct sun. Do not water until the pieces grow together and a callus has formed. This should happen within a couple of weeks. Step 7: The pieces should grow together within a couple of weeks. At this point it is safe to carefully remove the rubber bands and it is now okay to water, but do so sparingly. A NOTE ABOUT WATERING: The use of distilled or fresh water is imperative, as to help prevent bacterial and algal growth during step four. If your tap water tastes of chlorine, it is too chlorinated for your plants and you should consider using distilled water. The chlorine will burn the tender young roots and can cause iron chlorosis, adversely affecting or terminating growth. Careful watering can be done by either by letting the pot stand in half it’s height of tepid water for a few minutes, or by gently watering from the top, taking care not to wash away the top dressing. In both cases, allow the pot to drain completely. |
|||||||||||||||||||||||||||||||||||||||||||||||||||||||||||||||||||||||||||||||||||||||||||
|
The Cleft GraftStep 1: Protect your fingers, if necessary, by wearing gloves, or wrapping them with tape. Using a sharp knife or razor blade sterilized with alcohol, make a level cut across the entire diameter of the root stock, and then make a cleft incision into the leveled top, directly through the diameter. It is important to make a quick and clean cut. Pruning shears crush tissues and product jagged edges that do not allow for proper cambium contact and will not callus. Step 2: Make a ½ inch cleft incision (varies depending on the size of scion and root stock) into the leveled top, directly through the diameter. Again, it is important to make a quick and clean cut. Step 3: Remove section of vigorous growing stem, with a leaf or two, from a scion plant just above a stem joint. Avoid taking stems from the base of the plant. They don’t root out well. It is best it take short cuttings from new, active growing, vigorous shoots. Step 4: Taper the cut on both sides of the base of the scion so that it is angled and wedge shaped and no more than ½ inch, or the depth of your cleft, of flesh is showing. Both flat sides of the scion should have flesh exposed, but one lateral edge should be thicker than the other. These cuts facilitate proper cambium contact, and callus formation with the root stock. Step 5: Insert the tapered and wedge shaped scion into the cleft incision on the root stock until all of the flesh on the scion is covered up, and so that the thicker lateral edge is lined up with the outer edge of the rootstock and the thinner scion edge is oriented inward toward center of the rootstock. Step 6: Cut a thick rubber band so that you have one long strip of rubber. Wrap the graft union to secure and cover completely to protect from infection. Careful not to wrap too tightly, as this can damage tissue and cause vascular strangulation. Transfer to a dry and shaded location. Peak under the rubber bands once a week to see if a callus has formed. When the callus has formed, gently remove the rubber bandage, and acclimate to brighter light conditions slowly. |
|||||||||||||||||||||||||||||||||||||||||||||||||||||||||||||||||||||||||||||||||||||||||||


Propagation by Division: Bulbils, Tubers, Plantlets, and Offsets |
|||||||||||||||||||||||||||||||||||||||||||||||||||||||||||||||||||||||||||||||||||||||||||||||||||||||||||||||||||||||||||||||||||||||||||||||||||||||||||||||||||||||||||||||||||||||||||||||||||||||||||||||||||
|
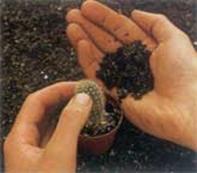
Many succulents asexually propagate been means of underground lateral shoots. These shoots give rise to offsets or plantlets which can be severed in the spring or summer from the parent lateral shoot to produce a self-sustaining new plant. Aloe spp. and some Agave spp. form plantlets or bulbils on their flowing stalks. These plantlets and bulbils can be removed and planted as well. Kalanchoe spp. produce small plantlets on the scalloped edges of their leaves. These plantlets can also be potted in warm conditions to produce self-sustaining plants. Images shown to the left differ slightly in step order for each species. In general, the methodology is the same. Step 1: Protect your fingers by wearing gloves, or wrapping them with tape, and gently remove each offspring from the parent plant. This is much easier if the soil is moist. Step 2: Allow the offspring and the parent plant to callus Step 3: Fill a small pot to the brim with specialty cactus soil with extra grit added, or mix your own from scratch. Gently press the soil down to level it off. Inorganic grit, sand, or pumice gives the soil the appropriate drainage and aeration. This type of soil composition is mandatory for cactus and succulent growth. Step 4: Protect your fingers by wearing gloves, or wrapping them with tape, and repot the seedling, and top dress with sand, gravel, or pumice. Water three or four days later. Transfer to a warm, dry, location with bright indirect light. |
||||||||||||||||||||||||||||||||||||||||||||||||||||||||||||||||||||||||||||||||||||||||||||||||||||||||||||||||||||||||||||||||||||||||||||||||||||||||||||||||||||||||||||||||||||||||||||||||||||||||||||||||||


Source Reference List
|
Image
or Information |
Source |
|
ABC Farms cactus factory: Grafted Gymncalyciums Photos, and
Rootstock-Scion Compatibility |
|
|
Agave ghiesbrechtii |
www.members.tripod.com/Rovsek/CactusBase/z_seznam_kartic_a.html |
|
Agave gypsophila |
|
|
Agave victoria reginae |
www.members.tripod.com/Rovsek/CactusBase/z_seznam_kartic_a.html |
|
Aloe barbadensis |
|
|
Aporocactus flagelliformis |
|
|
Asclepiadaceae spp. |
|
|
Botany, Classification, and General Reference and
Propagation How to Photos |
Anderson, Miles. Illustrated Encyclopedia of Cacti and
Succulents. Anness Publishing
Ltd., |
|
Cereus spp. |
|
|
Ceropegia spp. |
|
|
Crassula argentea |
http://www.desert-tropicals.com/Plants/Crassulaceae/Crassula_argentea.html |
|
Cymnocalycium spp. |
|
|
Echinopsis obrepanda v. purpurea |
www.members.tripod.com/Rovsek/CactusBase/z_seznam_kartic_e.html |
|
Euphorbia ingens |
|
|
Euphorbia millii var. tenuispina |
|
|
Gasteria nigrans |
www.members.tripod.com/Rovsek/CactusBase/z_seznam_kartic_g.html |
|
General Reference |
Hartmann, H.T; Kester, D.E.; Davies Jr., F.T; Geneve,
R.L.. Plant Propagation: Principles and Practices 6th Ed. Prentice-Hall, Inc., |
|
General Reference And Propagation How to Photos |
Hewitt, Terry. 101
Essential Tips: Cacti and Succulents.
DK Publishing, Inc., |
|
General Reference and Rootstock-Scion Compatibility |
Pizzetti, Mariella.
Simon an Schuster's Guide to Cacti and Succulents. Simon and Schuster Inc., |
|
Graft-Final Stage |
|
|
Grafting Step 1- Rootstock-Scion compatibility |
http://www.desertcacti.com/flatgraft.html |
|
Grafting Step 2 |
http://www.desertcacti.com/flatgraft.html |
|
Grafting Step 3 |
http://www.desertcacti.com/flatgraft.html |
|
Grafting Step 4 |
http://www.desertcacti.com/flatgraft.html |
|
Graptopetalum parauayense |
www.members.tripod.com/Rovsek/CactusBase/z_seznam_kartic_g.html |
|
Haworthia attenuata v. caepitosa |
www.members.tripod.com/Rovsek/CactusBase/z_seznam_kartic_h.html |
|
Haworthia truncata |
www.members.tripod.com/Rovsek/CactusBase/z_seznam_kartic_h.html |
|
Kalanchoe 'Crenatodaigremontianum' aka Brylophyllum spp. |
http://www.geocities.com/RainForest/Canopy/6400/kalanchoe/kalanchoe.html |
|
Kalanchoe daigremontian |
http://www.desert-tropicals.com/Plants/Crassulaceae/Kalanchoe_daigremontiana.html |
|
Kalanchoe tomentosa |
http://www.geocities.com/RainForest/Canopy/6400/kalanchoe/kalanchoe.html |
|
Mammillaria albilanata |
|
|
Mammillaria cruigera |
www.members.tripod.com/Rovsek/CactusBase/z_seznam_kartic_m.html |
|
Myrtillocactus spp. |
http://www.cactuscollection.net/cacti/myrtillocactus/mgeometrizans/mgeometrizans.htm |
|
Notocactus haselbergii |
|
|
Opuntia rufida |
|
|
Other Information |
|
|
Other Information |
|
|
Seedling Establishment Photo Step 5 |
|
|
Seedling Wet house Photo Step 6 |
|
|
Yucca spp. |
http://www.overthegardengate.net/garden/archives/template.asp?linkid=381 |