COMM 260, Intro to Web Design
Ross Collins, instructor
Dreamweaver Exercise Four (CS3): CSS AP Divs
 Most of the time you'll want to design a web page by dividing your space into separate areas to place elements. For example, you usually want to include a menu bar at the top or left side, and space for your content below or to the right. Traditionally web designers have used HTML table tags to set up these divisions, and Dreamweaver can do that for you (see exercise three). But with Dreamweaver CS3, I think it's better to get away from the rather cumbersome table model, and move to the css box model.
CSS looks at your web page divisions as a series of boxes, set up using the <div> tag. It calls this feature the AP Div object. AP stands for Absolute Placement, meaning you place boxes on your site measured from the top and from the left, and sized to width and height. You can style these boxes as you wish, and insert content into each separate box. You can even draw boxes inside other boxes (as you can insert tables inside other tables, called nested tables). Because css offers more options and flexibility, I think it's the better choice for setting up new web sites. If you're working on one of the probably millions of web sites set up using tables, however, instead of converting it's probably better to stick with the table model (see exercise three).
Let's see how Dreamweaver sets up css boxes.
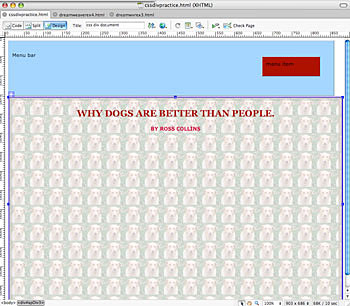
1. Open a new HTML document, title, save as usual.
2. Choose the Layout tab from the Insert menu bar at top of workspace.
3. You see your cursor changes to a crosshair. Draw a box, whatever size, by dragging with mouse. Release mouse button.
4. Change the size of the box by bringing up the handle bars and dragging. To do this, hover over the edge of the box until the cursor turns into the cute li'l hand. Click.
Note: This seems counter-intuitive to me, as in most programs, the cute li'l hand is used to move things around, not choose things.
5. Note that the Property Inspector tells you the name of the box (apDiv#1) and gives you some style options. Try changing the background color, for starters.
6. For more style options, you need to go to the css panel. (Open from the Window pulldown, if it's not visible at right). From the CSS Styles tab, choose All, and double-click on apDiv#1.
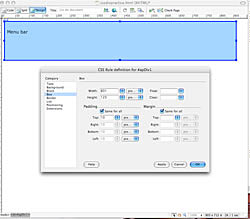 7. Note that the dialogue box gives you the same options as setting up any css rule, something you did for exercise three.
8. Add padding, at the least, from the Box category, about 10 pixels all around. Change other styles if you wish.
Note that you can also modify styles from the CSS Styles panel, at bottom.
9. Create a second box, if you haven't already. Make modifications as you wish. Add text, photos, etc.
10. If you think Dreamweaver is smarter than you are, choose from one of the many templates with boxes already created for you in common configurations. To do this:
- Choose New HTML from the File pulldown, as usual.
- In the New dialogue box, choose a Layout Style from the options at right. Among the many options surely you'll find something that pleases. But if you need to tweak it
- From the CSS Style panel, select the All tab to see the style sheet as someone else has set up for you.
- Edit a rule as you see fit. For example, to change the look of the entire page, what tag do you choose? <body>, of course. Try modifying other tags to see how closely you can match your needs.
Special effects
Okay, all this is pretty easy, but kind of blah. How about adding something more exciting? Go ahead, write the JavaScript, make us say "wow!" Or take the lazy person's short cut and let Dreamweaver do it for you.
1. With your document open as designed in the exercise above, choose Windows pulldown, and Behaviors. The panel appears to add your magic.
2. Click on one of your css boxes with the li'l hand tool to choose.
3. Choose the Effects option, and Appear/Fade.
4. From that dialogue box, select the effect to Fade (if not default). Choose the Toggle Effect at bottom to make sure the fade comes back when choose a second time.
5. Save your page. The effect is added to your page.
You can't see how this works directly. You need to bring it up in a browser. But you can do this virtually, from Dreamweaver's Preview in Browser function:
- Choose Preview in Browser from the Fill pulldown.
- Choose your favorite browser.
- Try clicking in the box in which you added the fade behavior. It should fade out. Click again. It should come back. Cool or what?
Assignment: Create a page with a nav bar at top, content box underneath, as you did handwriting css. Add background color, some text, a link. Add a special effect as described above. Attach to an email, send to me for grading.