COMM 260, Intro to Web Design
Ross Collins, instructor
Dreamweaver Exercise Three (CS3): Introduction to working with CSS.
As we noted before, Dreamweaver's more recent versions automatically write CSS code when you choose attributes from the Property Inspector box. For example, If you highlight text and choose the boldface icon (<strong> or <b> tag), Dreamweaver will automatically create an in-line CSS style with that property. But this is a somewhat inefficient way to use CSS for those of us who know how it works.
Recommended is to turn off the auto CSS feature, and define your own CSS rules. Here's how.
1. Create a new folder (root directory) on the desktop to hold your practice Dreamweaver work, if you haven't done it already for Exercise One.
2. Turn off the auto CSS feature by going to Preferences from the Dreamweaver pulldown (Macintosh), General, and toggle off "Use CSS instead of HTML tags." Now you're ready to take control of this yourself!
3. Open a new HTML document.
4. Type some stuff (or cut and paste some text). Add a headline. Save this document to your desktop folder.
5. Reassign a tag for CSS. Let's try the h1 tag. Drag over the headline to highlight.
6. Under Format in the Property Inspector, choose Heading One. Way ugly, right?
7. Open a New CSS Rule dialogue box. You can do this from the Text pulldown, but faster is to use the CSS panel at right. Choose New from the flyout menu at upper right, or click on the New CSS Rule icon at bottom, the page with + sign.
8. Choose the tag option. The tag you want to reassign, h1, should appear automatically in the window. You can choose to define this tag in your own document (header area), or as a separate css style sheet. Recall we did both of those when we hand-coded css. Now let's let Dreamweaver do it for us.
9. Choose the Define in: New Style Sheet File option. Ok.
10. You are creating an external style sheet to apply to your document. Give this a meaningful name, like exercise3style, and save to the folder you set up on the desktop.
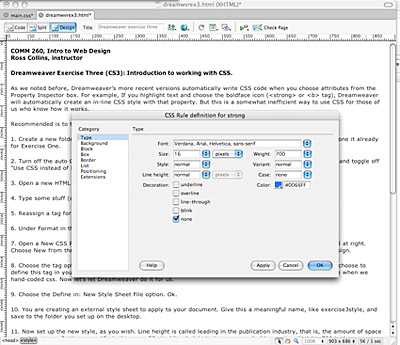 11. Now set up the new style, as you wish. Line height is called leading in the publication industry, that is, the amount of space around the type. Setting, say, 10 pixel type on 20 pixel line height is the same as double spacing. Weight: 700 is the same as standard boldface.
A note on fonts: If you don't like the default choices listed, you need to add your own. Choose Edit Font List at the bottom of fonts listed. Scroll in right-hand box to find the font you want, and Add to fonts. Always choose alternatives in case a user does not have your chosen font.
12. Click Apply. Repeat for other tags.
Creating a new Class style
We know that CSS classes can be created to apply different styles to the same tags. Just choose Class in the Selector Type toggles, and give it a meaningful name. Choose attributes.
To apply the class to a paragraph, place cursor anywhere in the text, and choose the Style you set up from the Property Inspector Style menu. Or choose part of a line of text by dragging to highlight.
Assignment: Create a page in Dreamweaver. Make some changes to the text using CSS. Email your assignment to me as a file attachment.