COMM 260, Principles of Internet Web-Based Design
Instructor: Ross Collins
Beginning Dreamweaver: Exercise One (Based on Dreamweaver CS3; NDSU Macintosh Clusters)
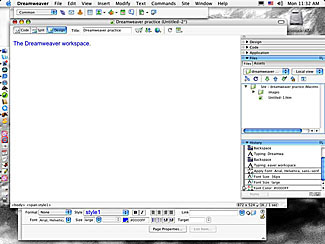
The workspace: Below is the Dreamweaver workspace. At top (below the pulldowns) is the Insert toolbar. This offers icons to make quick choices for common actions, including making links, email links, anchor links, inserting images, etc. You can also choose these from the pulldown menus. The Document toolbar, that is, right above your open document, gives you several options, including choosing to see the code as well as WYSIWYG view, title of the document (if you've given it one), and browser compatibility check. The Property Inspector at the bottom is contextual; depending on what object you are working on, it will give you different choices. At the right of the work space is the dock with panels offering more choices. Click on the arrow at top to expand.
Let's get started! You can just begin by choosing New and open a new page. But remember what we said about site organization? It's better to let Dreamweaver help you organize a new site, so let's begin with that.
1. Create a folder (root directory) to hold all your web site files. To do so (Macintosh), in the Finder, choose File, and New Folder. Click on folder name to highlight, and name the folder. If you wish, drag the folder onto your disk to save (Of course, if you were working on your own computer, you could drag the folder to wherever you want on the hard drive.) This will serve as container for your site.
2. In Dreamweaver, choose Site pulldown menu, and New Site.
3. Choose Basic tab at top left, and name your site. This name will appear on the Sites dialogue box so you can simply bring it up to work on it later. Move through the site "wizard" by choosing the Next buttons.
4. To answer "where on your computer do you want to store your files?", use the Browse button (little file folder) to locate the folder you set up above.
5. To answer "How do you connect to your remote server?" choose None for now. You can leave the rest as defaults for the time being. (Note: if you were to move this site to a server, choosing an FTP (File Transfer Protocol) location will enable you to do it automatically from Dreamweaver without using another FTP program.) Choose Done.
6. Once you've defined your site, you can begin marking up pages. Choose New from the File pulldown; Leave the defaults: Basic Page and HTML page. In the title box, write Navigating the web.
7. Now just start typing on the page. Write a headline: Tiny Ships on a Vast Sea. Fill in the title box at top; this is equivalent of the <title> HTML tag in the <head> area. Save your site to the folder you set up.
A word on file names: Dreamweaver lets you save a page with any name you'd like, even this is an excerpt from my instructor's stupid web site. (It will, however, automatically add the required .htm file extension.) Some computer operating systems are more sensitive than I am, however. Unix systems won't like file names with spaces, as Unix only allows the underscore, _. The system is also case-sensitive. Try to come up with names that mean something. Having a folder of five documents saved as stuff1.htm, stuff2.htm, stuff3.htm etc., will mean you'll have to open the file to see what's in there--and others who may work on your files will be clueless. Best practice is to name in all lower case letters, so you don't have to remember what you did, or did not, capitalize.
8. Style this headline using the Property Inspector (you may have to open this panel from the Window pull-down); drag over it just as you would in a word processor and style using Property Inspector Font choices. Note that if you're not sure what a particular panel choice is, hover your cursor over it for more information. Alternatively, you can change properties using the Text pull-down menu bar at top, or set up your own fonts by choosing Edit Font List. How cool is this compared with hand-coding HTML!
Note: changing text attributes using the Property Inspector actually writes CSS code, and not HTML. The Page Properties dialogue box changes properties for the entire page. It's similar to the <basefont> tag, although Dreamweaver also sets it up as CSS for this. (Styling individual pieces of text overrides the page properties CSS, that is, "cascades" from page to individual item.) To check this out, choose the Code at top left of the window. It's sometimes useful to check Dreamweaver's HTML, or to tweak it if necessary, from the Code display (or Split, showing both code and effect). Check the code to see how the CSS is set up by choosing the Code button at top left of window. Split displays both code and layout.
Automatic CSS is set up for beginners who don't understand how CSS works. It's okay, but tends to clutter the code with a lot of <span> tags. You can do better by choosing your own CSS. To turn off the automatic CSS feature, choose Dreamweaver pulldown (Macintosh), Preferences, General, and toggle off Use CSS instead of HTML Tags. Now Dreamweaver writes plain HTML. More on this later.
9. Drag over and Copy text of the file tinyships.htm. Paste into your Dreamweaver document. Run a spell check (Text pull-down menu).
10. Style: choose a font and size from property inspector or Page Properties dialogue box. Boldface headline, and choose a different color (the little square in the middle). Experiment a bit with the Property Inspector options. Indent the note at the end of the text, using the bottom left square icon. Save.
11. Add a link to this text at top: Go to COMM 260 web site. Size: one level smaller than text.
If you have not turned off the auto CSS feature, note that this sets up a CSS class called Style One (or Two, or Three, depending on how many you've set up). It's indicated in the Style box of the Property Inspector, with the Paragraph Format (HTML tag). You can change the name of your CSS style to whatever you'd like by clicking on the arrows, and change the HTML format from <p> (paragraph) to a header <h1>, <h2> etc., format, if you want.
12. Make an in-text link or two. Drag over text to select.
13. In the Property Inspector panel, the Link box at top right is used for external links. Type (or copy and paste): http://www.ndsu.edu/communication/collins/260webdesign/260resources.htm. Note: no spaces, no final period. Here you must include the http:// beginning, even though you don't need that for most browsers.
A word about links: Web site links may be relative or absolute. A relative link finds a page within your web site; it doesn't include the domain name or http:// beginning, such as classresources.htm. This tells your browser to look within your own root directory (folder) for the file. Always save your document in Dreamweaver before making relative links, so that the software knows where your file will be stored. Concerning the HTML, if the relative link begins with ../ it means you want the browser to back out of the folder (subdirectory) it's currently in, and go into the one with the link. This should be set up automatically in Dreamweaver, but sometimes you have to tweak the URL manually.
To make a relative link, select the text, and choose the folder icon at far right of the Property Inspector, or choose Make Link from the Modify pulldown.
Absolute links, as you made above, links to a site outside your own root directory.
14. Add two more absolute links as you think will offer a reader options enhancing the text. You might choose Google as a link to the search engine (www.google.com) and Magellan for a quick history lesson (www.fordham.edu/halsall/mod/1519magellan.html) Don't forget to add the http:// to absolute links.
15. What's a web site nowadays without a nice picture? Let's insert one. To begin with, create a folder on your web site root directory (folder) named images. Many webmasters store all their pictures and graphics in one folder for convenience, so why not get into good habits? (Unlike my "Notre Dame Cathedral" web site, which stores images all over the place. Hey, do as I say, not as I...etc.) Remember how to create folders on the Macintosh: Go to the Finder, Choose New Folder from the File menu, click on legend to label it, and drag to your web site folder.
16. Download this image (Macintosh Control-Click on image) to your images folder.
17. Insert the image on your web page. Click your cursor in the text generally where you want the image to appear. From the Insert toolbar at top (or pull-down menu), choose Image. Navigate to your images folder. If a dialogue box comes up asking you for alternate (alt) text, type something like A photo of a sailboat. You can also add alt text of exiting photos in the Property Inspector, or at the dialogue box prompt. All images should have alt text so that web text readers can decipher them.
18. Now consider the image attributes in the Property Inspector. With the image selected, Choose Align Left (or Right) icon to make text run around photo. Insert some blank space (padding) to the left and right of the photo with the H Space (Horizontal Space) attribute. Put a nice 2 pixel border around it (typing a number into the Properties Inspector box assumes you want pixels).
A note on image size: You can drag edges of your image to change size, or change size in the Properties Inspector. Many webmasters used to recommend changing image size in Adobe Photoshop before inserting, but CS3 gives you a lot more control over resolution, as noted below.
A note on photo editing: Dreamweaver CS 3 has expanded its photo editing tools, shown as icons in the Property Inspector. You can:
19. Want a search engine to find your page? Don't forget a META tag. Choose Insert pull-down menu, HTML, Head Tags, and Keywords. Add keywords you think will help crawlers find your page, separated by commas and spaces.
20. CS 3 gives you expanded opportunities to check your pages for compatibility problems with other browsers. Recall that different browsers, or different versions of the same browser, may have problems with some of your code. Check for these automatically by clicking the Check Page icon from the Document toolbar.
20. Let's finish this first exercise by Saving, and opening your file in a browser. Check all links. Working? Print your page, hand in for grading.
21. Okay, you want to know what it should look like? Well, something like this, although you'll have different fonts and links, I presume?