COMM 260, Principles of Internet Web-Based Design
Instructor: Ross Collins
Dreamweaver Exercise Two
(Revised for Dreamweaver 8, 2006)
Introduction
You've probably already become frustrated trying to drag the picture around your web site, and finding that it just doesn't work that way using HTML. In fact, design constraints of the web's base mark-up language can't be overcome without relying on companion or extended languages, such as XML, DHTML, or of course, CSS.
Using basic HTML code, however, you can trick a browser into thinking you're more in control than you really are. The key: tables.
I've you've ever used the text frame idea in pagination software such as PageMaker or InDesign, you've got the concept of tables in HTML. It's true that HTML was written to use tables as, well, tables--that is, to present tabular information. But clever designers realized pretty quickly that if you merge cells and delete borders, you can make your tables into placeholders for content, much like, say, an InDesign text frame. Yeah, it's not as flexible, and yeah, it doesn't behave as well as InDesign content--but it's a lot better than working in just the basic page. And while CSS often can provide superior placement options, millions of webmasters still rely on tables, at least some of the time.
Tables, for those of you who haven't used spreadsheet software, consist of three elements: columns, rows and cells. A column goes up and down. A row goes back and forth. A cell contains Saddam Hussein. (Lame joke du jour.) A cell contains information. The key to making tables work for you is knowing how to merge and split cells so that they display contents in an organized, easily navigable fashion. We could have done this with raw HTML code, but if you've ever tried to set up all those <TD> and <TR> tags, well, no wonder early web sites were crude. This exercise gives you the opportunity to practice setting up tables, and filling them with the wonderful, compelling content--that you write, of course.
Here's a sample of what this simple project might look like when you're done.
1. Open a new HTML document in Dreamweaver. Save to the same folder you set up for the first exercise. By now in that folder you should have your first exercise, along with the URLJig you did in raw HTML. What, you threw them out? Tsk-tsk. You'll need at least one document there to practice a relative link, so I'd re-do that URLJig, at least. Or set up a quick second HTML page with some basic content.
2. Open Insert and Properties panels from the Window pull-down menu, if not open already.
3. Switch to Layout View. To do that, from the Insert panel, choose Layout from the drop-down menu at left of Insert panel (it's the thin panel at the top). Click on the Layout button to the right of that. You might get a dialogue box explaining how to draw tables.
A word on the layout view: While you can set up tables in the Standard view, Layout lets you do it as you'd draw text frames in a pagination program. That's much more intuitive, and you'll almost feel as if you have total control over these boxes, just like in InDesign. Hardly. But you can draw boxes which, in effect, are table cells of differing sizes.
5. You might drag your document window (lower right corner) to about 800 pixels wide by about 600 pixels deep (the measurement is at lower right corner). This gives you about the right amount of space to work with; many web designers recommend making tables able to accommodate about 800 x 600 screen resolution, still the most common size on home monitors. Try to make your table a little smaller than this.
6. Click on the Draw Layout Cell button (the one on the right) from the Layout Bar. (The icon looks like, um, SpongeBob SquarePants? Sheesh, just hover your cursor over the icons until the right one comes up.) The cursor turns into a crosshair. Draw a fat horizontal cell across the top of your 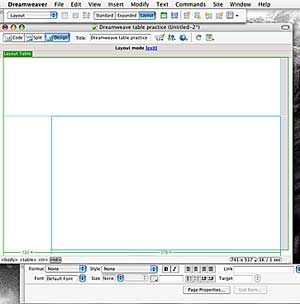 page. Click on the icon again. Draw a fairly skinny cell going down the left, about two-thirds of the way down. The top cell will be your banner. The left cell will be your menu bar (check the sample for reference). Again choosing Mr. SquarePants, drag the crosshair below and to the right to draw a third table for your content. Check out the illustration at right to see about how they might look. Oops. Make a mistake? Choose Undo from the Edit pull-down, or the keystroke shortcut Command + z.
7. Wrong size cells? No problem; in Layout view, click on cell to bring up "handlebars." Drag cell to proper size. (Be sure you have the correct cell's handlebars showing.)
- Note: The cells you draw snap to each other. Tables will automatically be generated in blank areas so that the placement of your drawn tables will stay put. You can do some keyboarding in table cells using Layout view, or do more in Standard view (recommended).
- You can't actually "delete" cells. But you can merge two (or more) cells. In the Standard view, choose the cells you wish to merge by holding down Apple (Command) key and clicking on borders. Go to Modify pull-down, Table, and Merge Cells.
- Note that choosing a cell gives you other options from the Property Inspector at bottom. Horiz and Vert change the placement of text within that cell. Try some of the other options.
You can now see that tables give you more flexibility to insert separate elements such as text, of course, and backgrounds, pictures, Flash files, and pretty much whatever.
8. Return to the Standard View, if not already there. Click anywhere in a cell. Take another look at the Property Inspector: Top half deals with text, bottom half deals with the cell you've chosen. If you choose the entire table (not just a cell; click somewhere above the table to select everything), you also can choose CellPad, the amount of space between cell contents and border, and CellSpace, amount of space between table cells.
- Note: Observe that some of these, such as CellPad and CellSpace, are available only for the entire table, and not for an individual cell. The W and H boxes allow you to specify the Width and Height of the entire table (NOT individual cells), either in pixels, or in percentages of the size of the browser window the user has open. That means the table will grow or shrink depending on how big the user makes the window.
9. Save this image into your folder with a .jpg file extension. (To save a web image on Macintosh: click on image holding Control key down. Be sure to add the .jpg file extension.)
10. Click in the top banner cell. Place the background image: Still back in Standard Image, from the Property Inspector panel, choose the folder icon to the right of bg (Background Image) at lower center of panel to find the image you just saved.
11. If this cell isn't quite the right size to accommodate the image, drag up or down until it looks right. (You can also try this in Layout 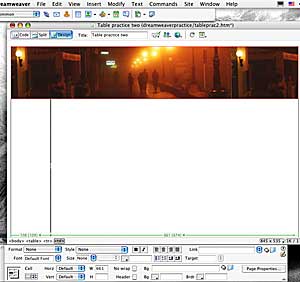 view.) This will push other cells down or pull them up to accommodate the image.
- Note: Dragging cells around to change size appears to be as easy as dragging text boxes in a pagination program. But it's not--Dreamweaver may add new cells as spacers, so in effect you're adding (or subtracting) cells of your table to accommodate your content, quite different from the pagination concept graphic artists use. You won't have the kind of control you might as a graphic artist; get used to this and you'll be able to keep your cool when Dreamweaver writes the HTML to make things look sort of not so close to what your dragging cursor is asking of it.
12. Click in the cell with the background image. Write something like "My COMM 260 Web Site." Highlight the text, or click to choose the cell--note that some text attributes work even if not highlighted. All you have to do is choose the cell. You'll probably want to choose a light text color to contrast with the background image. If you choose some placement options, the text will be uncomfortably close to the border unless you add cellpadding, which, remember, you must do by choosing the whole table.
13. Add your menu bar options. Begin by splitting the left cell into four. Command+click somewhere in the cell to choose, then either click on the Split Cells icon in the left lower section of the Property Inspector, or choose the Modify pull-down menu, and Table. Choose 4 rows.
14. Make each row about 75 pixels in height: click somewhere in the cell, enter 75 in the H box in the Property Inspector.
15. Here's how it might look so far. I'm not vouching for my color harmony--not my greatest skill, 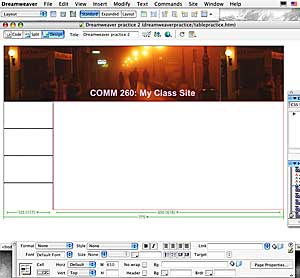 as anyone who's seen my tie choices will claim. Hope you can do better.
16. Add the index headings. Click in each cell to add an index heading. Index headings might be Class Documents, My URLJig, Class Resources, or add one of your own.
- Note: Yes, you can just make a list of index link items without splitting the cell. But you won't be able to treat each item separately, such as adding a background mouseover. I give you the cell split assignment as good practice.
17. Style each heading text as you'd like.
- A note about fonts: while the font family defaults are chosen for their widespread use on various computer platforms, and web-friendly design, you can choose Edit Fonts and take on any old font your computer happens to have rattling around the hard drive. Just realize a user's computer may not have, say, dragonwick, and will substitute something invariably ugly.
Don't set the font color yet--because you're going to make these links. Link color is set separately.
18. Make links. Drag over text and link Class Resources to the Collins class resources page: http://www.ndsu.edu/communication/collins/resources.htm. Or wherever. This will make an absolute link.
19. Make a relative link to your URLJig; using the Make Link command from the Modify pull-down (or from the Image panel, left icon), 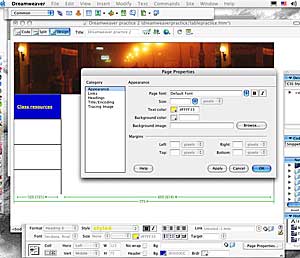 find your link.
20. Change link color: Choose Page Properties from the right bottom of the Property Inspector. Change as necessary. See illustration on right.
Note that this automtically sets up the CSS link pseudo-class (Dreamweaver 8), and so, unlike in HTML, you can also add a rollover color.
21. Add introductory text to the empty cell you have left. You can write whatever you want, or copy and paste the text below from our lecture synopses. Style as you think necessary.
The role of a webmaster
People with all kinds of backgrounds end up as webmasters, but mostly they fall into three areas: computer programmers, mass communication professionals (design, photography, writing), and marketing-business specialists. In the early days of the web (1994-97), when web sites were curiosities but not critical to business success, one person often took on all roles, from site design to site maintenance. While this still occurs today, it is less true; the web has become integral to many businesses and organizations, so webmaster teams have been established reflecting several specialties.
- Note on design: Generally we limit font choices to two, one for index and one for the rest of the text. You might choose a third for a banner head. Index and body text fonts often use contrasting colors or font styles, say a sans serif and serif font.
22. Put a colored border (Brdr color window) around cells or the table, if you want. Choose width of border (in pixels) in the Border window.Save, check the look and links in a browser. Hand in printed copy from browser for grading, or better yet, make a PDF file, and send it to me as a file attachment. If you try doing this in Dreamweaver, you end up with a PDF of the code. But to save it in design mode, open in Safari (or another browser), choose Print, and PDF. Save as PDF.
- A final note: It's hard to find a decent Dreamweaver tutorial on the web. Macromedia's web site is mostly into the SELL, SELL, SELL mode, not much for user guidance. For more information, try a Dummies Guide or Teach Yourself Visually guide. They're relatively inexpensive, and for us beginners, much more user-friendly than some of those massive Dreamweaver tomes out there.
Copyright 2004 by Ross F. Collins <http://www.ndsu.edu/communication/collins>