 Optimizing a JPEG
1. Download this photo, or another photo onto the desktop/flash drive. Open in Photoshop.
COMM 260, Principles of Internet Web-Based Design
Instructor: Ross Collins
Photoshop Basics (for the Macintosh, Version CS3)
Lesson Three: Optimizing files for the net
Web designers need to keep web-destined image files as small as possible, so that a web pages download quickly. People get impatient waiting more than 10 seconds for a download, and generally we can blame the pictures for those slow times. To make your images as small as possible, you need to optimize them. Photoshop, or its companion software ImageReady, does this based on your specifications. Let's give it a try using Photoshop.
Optimizing a JPEG
1. Download this photo, or another photo onto the desktop/flash drive. Open in Photoshop.
2. Let's presume the image has already been gussied up, based on Lesson Two.
HIstorical note: "Gussied up" was a very in term in the 1940s.
Now it's time to optimize for the web. From the File pull-down, choose Save for Web & Devices....
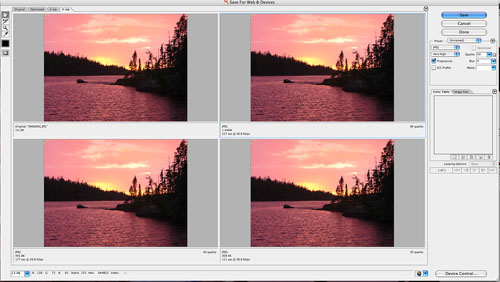
3. The big flashy Optimize dialogue box explodes onto your long-suffering monitor. First we'll consider views, based on the tabs at upper left corner. Original displays your, well, original. Optimized is Photoshop's automatic optimized view of your picture, depending on file format you choose. The 2-Up and 4-Up tabs give you two or four images so that you can compare different optimizations to the original. Let's choose the 4-Up option tab.
4. From the right dialogue box, choose the JPEG file format. As we know, JPEG works best for continuous tone (con-tone) photos, as this one. (For a review of file formats, check out Lecture Synopsis Twelve.) Another option is PNG-24, that is, PNG format with 24-bit color. PNG is a "lossless" format, however, so will create a bigger file than JPG. PNG still is not supported by some browsers, so they say. Sheesh, don't these people ever upgrade?
5. From the flyout menu on the right edge (tiny sideways triangle), choose Repopulate Views. Each time you make an optimization change in the dialogue box, you choose this to see the effect.
6. If the whole image isn't showing, you can click on an optimized view (outlined in Cambridge blue--Go Light Blues!), and hover the cursor. It should change into the li'l hand so you can drag the image about. Or change view size at Zoom Level, bottom left.
Note: If your view is, like, huge, and you forgot to en-small it (as opposed to enlarging it) in Photoshop, you can do it now from the optimization box. Choose Image Size tab at right of bottom box.
7. Select compression quality. The selections on the left under JPEG format allow you to choose a name; on the right the slider gives you precise options between 1 and 100, 100 being maximum. Note the differences; you want the lowest quality (and smallest file) possible without sacrificing image quality.
Note: Generally you probably won't notice much difference on screen between, say, a rating of 80 and 40. But you will notice that a very low rating, say 10 or below, is clearly not as snappy as the higher numbers.
The Preset option allows you to save settings to apply automatically to other photos, a time saver. After making changes, choose Save Settings in the right flyout menu.
8. Choose the Optimized toggle, if you want a slightly smaller file size, but a format not supported by some older browsers. Or toggle Progressive if you want the photo downloaded to a browser in fuzzy-to-focused passes. (Optimized toggle greys out when Progressive is chosen).
8. The Blur option smooths rough edges of an optimized image. Or blurs the whole image into melted pixel-wax, should you feel a bit beastly.
9. ICC profiles are color correction options some browsers use. You have to set it up right in Photoshop first using color management. I wouldn't worry about it.
10. As we know, JPEG's don't support image transparency. But you can fool a browser by making transparent parts of your image (if you have any) the same color as the web page background, the matte color. Hence that option.
11. Note the handy opportunity to predict download times for various compression formats. The flyout menu at upper right above the optimize boxes give you opportunity to see expected download time at various download rates. The rate is indicated at the lower left corner of each view. Remember a lot of people out there still work with 56k dial-up!
12. Save.
 Optimizing a GIF or PNG-8
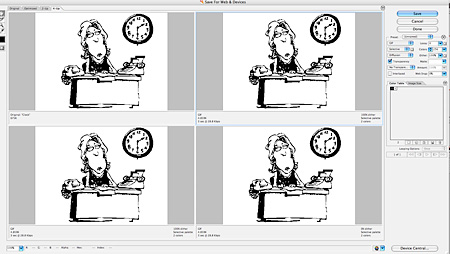
1. Download this handsome picture, or another drawing with "flat color," that is, not a photo.
2. Open in Photoshop. Choose Save for Web & Devices. and from the upcoming dialogue box change the file format to GIF. Choose Repopulate Views to generate new views.
Note: You can also save flat color graphics as PNG-8 (8-bit color). Some browsers still don't support PNG format, however, or so I hear.
3. Set the Lossy Value (GIFs only) to increase compression, and reduce file size. Usually you can get by with a value of 5-10 without losing much image quality. Sometimes you can crank it up to 50, thereby squishing the heck out of your file size. Here, little people rock!
4. Toggle the Interlaced option, if you wish. Note: Lossy Value doesn't work if you choose the Interlaced option. Why was not explained to me.
5. Select Color Reduction Algorithm (below format box), to decrease colors you're not using, and so reduce file size and avoid browser dithering. "Selective" is default; it produces greater color integrity, but if you absolutely need to avoid dithering, choose Web (web-safe colors, the 216). Most of the time, I'll admit, I don't fool with this; default option seems perfectly fine.
6. Whether you want dithering (box at right) depends on if you want some two-bit, 8-bit browser out there to guess at colors not accessible to its meager palette. I usually leave it at the 100% dither default, presuming not much real dithering is going on anyway among mostly 24-bit monitors in the real world.
7. Choose Transparency (defaulted) to preserve transparent pixels in an image; deselect to fill them with the matte color. (Advanced options beyond scope of this class, or my general work routine, for that matter.)
8. The Snap slider will change tolerance level for colors to automatically snap to the closest palette equivalents on a web browser, and allow less dithering. Higher value shifts more colors. I tend not to worry to much about this either, based on my optimistic assessment in Step 6.
9. Save away. And remember: if you forget any of these, just hover cursor over to see name of tool appear.
Assignment: None, but practice with the Save for Web... dialogue box. There WILL be questions covering this on the final exam!