COMM 313, Editorial Processes
Organizing photos using Bridge (Version CS 3 for Macintosh), and basic photo manipulation
I. Using Bridge
Photo editors or art directors often organize and choose photos for editors. But more and more in this age of convergence media, editors or multimedia producers need enough knowledge to organize and select photos themslves. Many digital organizing tools are available, but media professionals often select Adobe Bridge, because it is bundled with Adobe Photoshop, and so works well with this professional photo-editing softeware industry standard. You should know how to use it, at least at its basic level.
You can use Bridge to organize your work in any of the CS Suite, including Photoshop, InDesign, Illustrator and Dreamweaver. Let's get started. using the collection of images you saved for the basic scaling assignment.
1. Open Bridge, directly, or just open Photoshop, and open Bridge from the Photoshop top menu bar (purple PS icon in Adobe applications). Choose the Go to Bridge icon at center of menu bar.
On the left side of Bridge you'll see a tabbed menu, Favorites and Folders. Navigate down to the folder with your photos, presumably on the desktop, and choose. Note the photos will automatically appear on the Bridge screen at right for you to review. Click on each for a larger image to appear in the Preview box. Double click to open in Photoshop.
Note that every other document appears as well. Bridge offers a master control to regulate workflow for photographers and graphic artists working on several kinds of documents.
If you have not renamed images from a digital camera, each will be identified by meaningless default names like E0X2643.jpg. You can change these to names that make sense using Batch Rename.
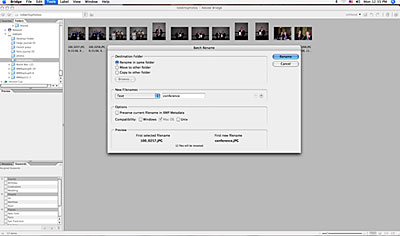 2. From the Tools pull-down, choose Batch Rename.... The dialogue box gives you several options. You can put your photos in a new folder, but why not Rename in Same Folder? For names, you can choose Text and type a name that makes sense to you. This will rename all your photos and include numbers in order. Now when you later want to find a photo in Photoshop, you can call up "basketball6.jpg" instead of "EP0X2643," like you'd remember what that is.
3. Further organizing: The Keyword tab at right gives you the option of tagging photos you want to work with later. Presuming not every photo you take is super-duper ready for publication, you can set up your own key words in the default categories (choose the flyout menu using the tiny right-facing triangle at top right) or set up your own categories and keywords.
4. From the Edit pull-down, choose Find, and keyword, to gather together the images based on your tagging. Finally we're gaining some order out of that digital chaos from your memory card! So let's begin considering an image in Photoshop.
5. You can also organize by filter at bottom left, choosing organizing themes such as Date Created, or from the Sort By pulldown. Another in the embarrassment of choice that defines Photoshop.
6. Clicking once on a photo brings it to the preview box at right. Clicking twice brings it into Photoshop for you to work on.
 II. Photo manipulation
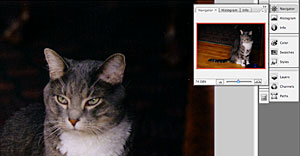
Note: You can enlarge or reduce a photo in Photoshop several ways. Change the percentage window at lower right; Choose the Zoom Tool at bottom of tool box (hold down Option key to reduce), or drag the slider in the Navigator palette, see illustration at right.
Editors usually don't spend much time dealing with image quality issues--that's a photographer's or designer's job. In a convergent world, however, editors likely will need to know some basic photo enhancement tools. Here we briefly cover three:
- cropping;
- exposure (dark or light);
- sharpness;
- saving.
 Cropping.
Most photos taken by photojournalists need cropping. The nature of photojournalism makes it difficult to carefully compose a photo. Editors need to crop empty space or confusing background that detracts from the strong center of interest ("poster effect") of photos destined for media use. To crop
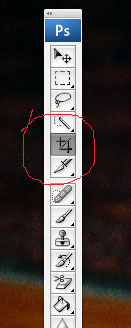
1. Choose the Crop Tool from the Tool Box (see illustration at left).
Note: Hover over icons to see what they are. Some tools are under other tools; hold down the mouse key on the tool to see what is under it.
2. Drag over photo you wish to crop. Adjust by dragging on handlebars (squares on the crop lines.)
3. Choose Crop from Image pulldown menu. Or, if you don't want to crop after all, choose the Esc key, top right of keyboard.
4. If you don't like your cropped photo, step back by choosing Undo or Step Backward from the Edit pulldown.
Exposure.
Your photo may be too dark or too light. You can adjust in a number of ways, but the easiest is to use Levels. From the Image pulldown choose Adjustments, and Auto Levels. Usually Photoshop is smarter than you are. If you don't like the effect, adjust from the Levels dialogue box, based on the Input sliders below the histogram. The middle-tone slider has most effect.
Sharpness.
Most digitalized photos pick up some fuzziness, either in a scanner or when transferring from a camera to a computer. To sharpen a photo, choose Sharpen from the Filter pulldown, and Sharpen. If you don't like the effect, try the Unsharp Mask dialogue box, and do it yourself. Leave the Radius slider at about 1.0 pixels for starters, and the Threshold at about 2. Slide the Amount to about 50 percent to view the effect, but avoid oversharpening, which can leave a grainy look.
 Saving.
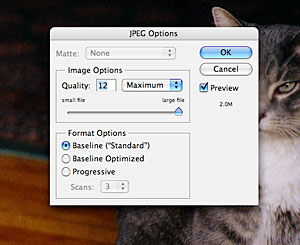
Editors using photos desined for print prefer the quality of TIFF files (Tag Image File Format), although will accept JPGs (Joint Photographers Experts Group). Most photos from digital cameras will arrive as TIFFs. To save an image in a different format, choose Save As from the File pulldown, and from the Format box, choose TIF or JPG. If you choose JPG and plan to use it for printed material, the file size is not as much of a consideration, so choose Maximum quality (see illlustration at right).
Note: drawings and illustrations (clip art or flat color) are often saved in the EPS (Encapsulated PostScript) format, and should be saved that way for print. For the web they usually are saved as GIFs (Graphics Interface Format).