Instructor: Ross Collins
1. From File pulldown open New and Document, default 51 x 66 picas, Facing Pages toggled off, landscape orientation.
2. With rectangle tool, draw border around margins. Remember to Save document!
3. From the Stroke panel, change rectangle style to thin-thick-thin, weight about 10 pts.
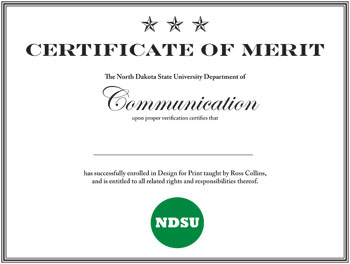
4. Draw text frame. Type "Certificate of Merit" (no quote marks), style in Engravers, Bodoni or other formal-looking typeface, about 36 pts, all caps, centered. Note you can choose style features such as All Caps or Small Caps from the flyout menu at the top right of the Character panel.
Advice: Be sure to keep your text frames fitting snugly around your text. Avoid large overlapping text frames, causes confusion.
5. Draw second text frame. Type (or copy and paste) The North Dakota State University Department of. Set 14 pt Adobe Caslon bf (boldface) or similar, centered. (Check spelling if necessary.)
6. Draw third text fame. Type Communication. Set about 60-72 pt Edwardian or Brush script, or equivalent, centered.
7 Draw fourth text frame. Type upon proper verification certifies that. Set Caslon or similar semibold 14 pt centered.
 8. Choose Line tool. Leave some space, draw a 1 pt. line (stroke), centered. Pull down guidelines, if necessary.
9. Draw fifth text frame.Type or copy has successfully enrolled in Design for Media taught by Ross Collins, and is entitled to all related rights and responsibilities thereof. Caslon semibold 14 pt, or equivalent serif font, centered. (If overlapping rectagle redirects text cursor to top, choose rectangle with Selection tool, cut, make text frame, and then re-paste rectangle.)
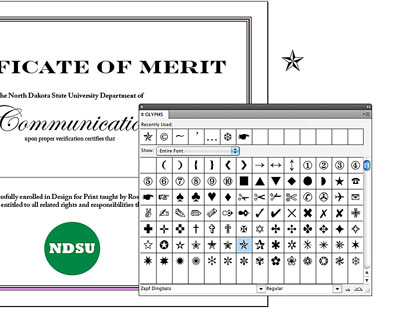
Note: if the frame edges become bothersome (see illlustration at right), you can turn them off. Choose View pulldown, Extras, and Hide Frame Edges.
10. In the pasteboard draw a circle (ellipse tool; find under rectangle tool) about 10p in diameter. While drawing, hold down Shift key to constrain shape to a perfect circle, and not an ellipse. With circle still selected, open color panel at right. From the Color panel, if necessary, choose RGB from right top flyout menu From the color ramp choose a green to fill the circle. Drag and center circle on document. (Altneratively you can choose green from Swatches panel.)
11. Delete black circle border to leave just the green fill: go to stroke panel, choose 0 pts.
12. Again in the pasteboard, Draw a text frame; type NDSU, all caps. Choose a fat typeface, such as Rockwell bf, about 30 pt, and center.
13. Reverse this text: with text highlighted, click on the white color on Color panel color ramp. If your pasteboard is white the text will seem to disappear, because it becomes the same color as the background.
 14. Drag this text into your green circle. It will reappear. Center. With Selection tool, drag around both elements. From Object pulldown choose Group. Drag into document at bottom center.
15. Draw another text frame in pasteboard. Open the Glyphs panel, under Type pulldown menu. At bottom of panel, change typeface to Zapf dingbats.
16. Choose a dingbat as appropriate for the top of your document. Drag over it in text frame, increase to about 48 pt, centered.
17. Drag dingbat into your document at top. Center.
18. Type your name on the line, any typeface, centered.
19. Proofread! Everything perfect? Save, export as pdf: Choose Export from pulldown, pdf.