Instructor: Ross Collins
Exercise Number Four: Build your own

(using InDesign CC 2017 for Macintosh)
This is your first opportunity to call on your own creative skills in an actual design using computerized pagination software (InDesign). Use your imagination to work up a flyer publicizing a series of fitness classes for the Wallman Wellness Center. Choose a theme, a typeface, a layout strategy that promotes the fun of exercise. Be sure to consider concepts we've discussed recently: emphasis, balance, (avoid centering everything, please!) alignment and contrast. Refer to your text, if necessary,the PowerPoints, or other sources for ideas. Procedure is described below. Carefully consider needs of your client and your client's audience: just because you can come up with a clever design doesn't mean it will work for a particular client.
What you'll learn: Drawing a shape with Pen Tool; adding text on a path; building a gradient; using leadered tabs; using dingbats (glyphs) as clip art; filling shape or text with photo or pattern.
Note that you have some creative flexibility to design the flyer as you wish, but two things are required:
 Both procedures are described below, plus procedures for using glyphs and applying a gradient, optional. At right I give you some idea of how a flyer might look, but I did not fill in the actual schedule of classes. (The copy also is somewhat different.) You can choose to base your design on my idea, or work up your own (probably much better!) idea.
1. Client's specifications: standard 8 1/2 x 11 flyer to promote new fitness programs. One or two spot colors (solid color) okay.
Note: If you choose to use them, illustrations should be at least 150 dpi, and not copyrighted, so don't just download whatever from the net. You may download from Creative Commons material. Note creative commons is an agreement among creators of art and music to share their work for (usually) non-commercial use. The runner in the sample flyer is from Creative Commons. Photoshop lesson nine explains how to extract an image from a background.
The flyer should attract experienced fitness enthusiasts who want to move their workout to the next level, but have fun doing it. You may adjust copy, although keep in mind graphic artists don't do much writing. Be sure to proofread, and run a spell check!
Copy for the flyer (cut and paste, change as indicated):
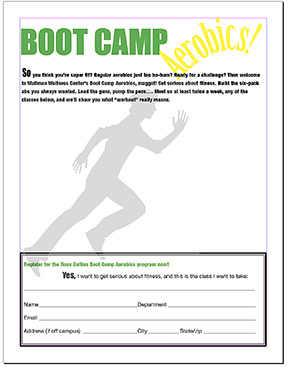
Boot camp aerobics!
So you think you're super fit? Regular aerobics just too ho-hum? Ready for a challenge? Then welcome to the Wallman Wellness Center's High Intensity Interval Training! Get serious about fitness. Build the six-pack abs you always wanted. Get ready for swimsuit season. Load the guns, pump the pecs.... Meet us at least twice a week, any of the classes below, and we'll show you what "workout" really means.
Class schedule
Tuesday Evening, 5:00
High intensity yoga (Ashtanga style), Studio A.
High intensity interval training, Studio B.
Beginning tae kwon do, Studio A.
Cardio Kickboxing, Studio B.Wednesday Evening, 5:30
High intensity aerobics (step/weights), Studio A.
Intermediate tae kwon do, Studio B.
High intensity interval training, Studio A.Thursday Morning, 8:00
High intensity yoga (Ashtanga style), Studio A.
High intensity interval training, Studio B.
Advanced boot camp (plyometrics/sprints), Studio A.Thursday Noon
Beginners' boot camp, Studio A.
Cardio kickboxing, Studio B.
Black-belt tae kwon do, Studio A.PTSD counseling available after all classes, Room 166.
Register for the [Your name] Boot Camp Aerobics program now!
Yes, I want to get serious about fitness, and these are the classes I want to take:
Name and email
Department
Address (if off campus)
State/zip
2. Set up a one-page standard document, Facing Pages off. Margins should be at least 3p. Under Preferences, choose Use Typographer's Quotes and measurement in picas, if not already default.
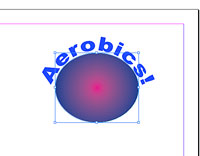
3. Consider your focal point. At least some text should be typed on a path. This means your text follows curved lines or shapes. You can learn this from a YouTube video, or follow the directions below.
Note: you don't have to use the path tool to type text on a path. Alternatively, you can draw a shape (circle or square) using that tool, then choose the Type on a Path tool (under the Type tool), and type text around that. Delete the stroke on the shape to leave the text on the curve.
Making shapes with the Pen tool.
The Pen tool draws freehand straight or curved lines or paths.
To draw straight lines or shapes:
a. Click with the Pen tool (seventh icon from top in toolbox; might be under another tool) in your document where you want the line to begin, to set an anchor point. Don't drag.
b. Now click in the area where you'd like to draw a straight line. The line will be added.
c. To draw shapes with straight lines, keep adding anchor points.When you hover the tool over the original anchor point, it will show a hollow circle. Click to close the path.
d. See below to add type to the path. You can leave the path open by clicking outside the design while holding down Cmd+Shift, or just choosing another tool in the toolbox.
To draw curved lines or shapes:
a. Begin in the area you'd like the curve or shape to begin. Drag (don't click) with the Pen tool to select the slope with anchor point. Drag the slope upward for an upward curve.
b. Place Pen tool where you'd like curve to end.
c. Hold down shift key to constrain. Drag another slope line downward to adjust curve; straight slope line will give a regular C-shaped curve.
d. Or drag in the same direction to create an S-shape.
e. Click on another tool to finish the drawing.
f. If this doesn't give you enough control over shape of the curve, choose the Direct Selection tool (hollow arrow, second in the toolbox), and drag the curve to adjust. You can change the size of the entire drawing with the Selection (solids arrow) tool.
Adding type to a curved path.
a. Choose the Type on a Path tool, under the Type tool.
b. Hover over curve until small plus sign appears. Then drag to make a text frame along the curve.
c. Type and highlight text to style as necessary.
d. Adjust path text frame by hovering Selection tool (solid arrow, first in toolbox) over edge of text frame. When tiny plus sign appears, drag to adjust frame.
e. Delete the curved line using the Stoke panel (set Weight to 0). The curved text remains.
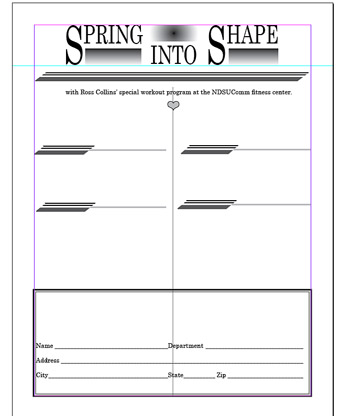 4. Paste and style the text to reflect your design decisions. At rightis a sample solution from a somewhat similar newsletter exercise. Note this design makes the boring list of classes more interesting, by including "racing stripes." The slant on the stripes is built by dragging an 8-pt. white angled rule (stroke) to mask the edges. (Remember masking from our newsletter exercise?) It also includes gradients. A gradient is a gradual tone change within an element, to add interest and a three-dimensional feel.
 To build a black-and-white gradient:
a. Draw a box or shape you would like to fill with a gradient.
b. Choose the shape (if not already) so that the handles appear. Check Swatch or Color panel to make certain the Fill box (upper left corner) is activated.
c. Double-click on Gradient Swatch tool in the toolbox to bring up Gradient panel. (Reminder: if you forget the names for these tools, you probably know by now that if you hover your cursor over them for a moment, the names magically appear.) Choose Linear or Radial.
d. To adjust, with Gradient Swatch tool drag over shape as desired.
e. To adjust gradient, bring up the Gradient panel (find it from Color in the Windows pulldown). Note the the slider adjusts the color (or gray) shifts. For type of gradient as shown in the areas under "Spring" and "Shape," choose linear. For angle, choose -90 degrees (minus 90), so the dark area is at the top. The gradient above "Into" is radial.
Added notes on gradients:
Some low-resolution printers won't print them well, and often photocopies either
"band" them (objectionable lines), or drop the gradient if it's somewhat
light. But if you plan to take your document to a printer, they'll be able to
do it right.
.jpg) Note a gradient will default to black and white unless you choose color. To add or change colors, first choose the colors you wish to have part of the gradient. Choose New Color Swatch in Swatch panel. These give you a variety of options depending on needs of your publication. Many graphic artists use the Pantone Matching System (PMS). To do that, choose Spot, and Pantone Coated. Add colors you plan to use. (If you change your mind you can always add colors later as well).
Note a gradient will default to black and white unless you choose color. To add or change colors, first choose the colors you wish to have part of the gradient. Choose New Color Swatch in Swatch panel. These give you a variety of options depending on needs of your publication. Many graphic artists use the Pantone Matching System (PMS). To do that, choose Spot, and Pantone Coated. Add colors you plan to use. (If you change your mind you can always add colors later as well).
a. Draw shape as needed. Make sure Fill box is activated at bottom of toolbox.
b. Double-click on Gradient Swatch Tool to bring up Gradient panel.
c. Call up the Swatches patel with the colors you just added.
d. Click on right color stop (To me it looks like a tiny house with white roof,) at bottom of Gradient ramp to highlight.
d. Drag chosen color from Swatches panel to this color stop. Alternatively, hold down Option key (Alt on PC) and click on color.
e. Choose the other color stop, same procedure. Note if you want more than two colors in your gradient, you can add more color stops by clicking on ramp. Delete stops by dragging out of the panel.
f. Slide color stops on slider as needed, or choose the Gradient Swatch tool in the toolbox and drag inside shape to change.
![]()
To make a type gradient, drag type to highlight, then follow same directions as above.
5. Create the name/address box at the bottom of the flyer. Begin by drawing a box, choosing border style to your design tastes.
6. Create leadered tabs for name/address box. This offers you the great opportunity to work with the Tabs dialogue box. Draw a text frame a little less than the width of the border. With the cursor in the text frame you wish to tab, choose Tabs.. from the Type pulldown. You'll find the box pops up right over the frame you just drew.
Note: Yes, you can laboriously draw small text frames and lines for each item in a form, but it's time-consuming and the possibility for crooked forms is high. InDesign pros love short-cuts!
Leadered tabs
The tabs ruler allows you to click anywhere to set tabs, which will correspond to the area of the text frame below the dialogue box. The little arrows on upper left are, in order, left justified tab, center justified tab, right justified tab, and decimal justified tab. You also can choose tab locations by measurement, in the X box. Default tabs are set every 3 p, but when you set a new tab, all tabs to the left of it automatically clear. At the left edge of the ruler are two sort-of triangles. The top one sets the first line indent; the bottom sets the left indent. Of course, you can also set these through the Paragraph panel.
 The leader box allows you to draw lines or dots between text, called (of course)
leadered tabs. Mostly you do this when you want to create tables of contents
or columns of numbers, with those dots between, but today we're going to create
a line. Here's the procedure:
The leader box allows you to draw lines or dots between text, called (of course)
leadered tabs. Mostly you do this when you want to create tables of contents
or columns of numbers, with those dots between, but today we're going to create
a line. Here's the procedure:
a. Put the type tool in the text frame in which you want to set tabs.
b. Bring up the Tabs ruler from the Type pulldown. Note it automatically aligns to your text frame.
c. Choose the left tab icon ("left justified tab"), if not default.
d. Click at the middle of the tab ruler to choose first tab for Department and State.
e. Choose a line for the Leader (Shift + hyphen).
f. Click about two-thirds of the way to the right of the tab ruler for the Zip code line. Again, make a tab, and again, choose the line in the Leader window.
g. Click near the end of the ruler for the final tab. Choose the line from the Leader window. You need this so your line reaches the end of your form.
h. Click back in text frame to return.
i. Type Name. Hit the Tab key. A leadered tab should extend to the text tab stop. Type Department. Hit the tab key. Hit return. Etc. (See illustration right.
j. Screw it up? I usually do. Start over by choosing Clear All from the flyout menu at right.
Creating dingbats (glyphs)
Interesting flourishes of small details can add an attractive contrast to page--if not overdone. Using a dingbat (small picture) is one way to do this. These are called glyphs in InDesign. We already did this for other assignments, but as a reminder, to choose a glyph:

a. Draw a small text frame where you want the glyph to appear.
b. Call up the glyph dialogue box from the Type pulldown. (Zapf dingbats illustrated at right).
c. From the type menu at bottom (or the bar at the top) find Zapf dingbats (designed by that doughty type designer Hermann Zapf of Switzerland). Or choose Wingdings, or another dingbat font.
d. Double click on a cute dingbat. It will appear in the text frame.I've used the li'l hand on left illustration, 72 pt.
e. Style as you would text, by dragging to highlight. If it's too dark, screen the glyph down to about 30 percent. To do this, you need to have the Fill (and not the Stroke) box activated in the Color panel. For stroke (around the glyph) choose zero.
Glyph note: Nearly every typeface includes a few glyphs. This is where you'll find ligatures and accents, as well as typographic flourishes not part of the standard font. Check it out.
Filling shape or text with photo or pattern
To fill a shape:
a. Draw and choose shape. Choose Place. Find your photo or art work. Place inside your chosen shape.
b. Change the size or proportion of placed art work by choosing Fitting from the Object pulldown. Fit as necessary, noting that if you choose Fit Content the Frame, the photo or pattern will be distorted to fit the object.
c. Choose Direct Selection tool (solid arrow) to move image around shape.
![]()
To fill text:
a. Draw text frame, type text. Style as you wish, although note slender text doesn't show patterns and photos well.
b. With text frame chosen, from Type pulldown, choose Create Outlines.
c. Place the image into the text.
d. Choose Fitting as above, and Direct Selection tool to adjust image.
e. If you wish, you can add an outline to the text. From the stroke panel or contextual menu above, choose the size of the outline as desired.
f. To change the color of the outline, from Swatches or color contextual menu at top choose the stroke box and color as desired.
6. Print proof copy, if you think necessary. Proofread, adjust and correct. Often you'll see problems on a printed copy that you miss on screen.
7. Export final copy as pdf, submit on class Blackboard site. Nice job, dude.