Learning ![]() Software (Version CS6; see below for version CC 2018)
Software (Version CS6; see below for version CC 2018)
A self-guided tutorial by Ross Collins, North Dakota State University
(And see below to create a Web photo gallery.)
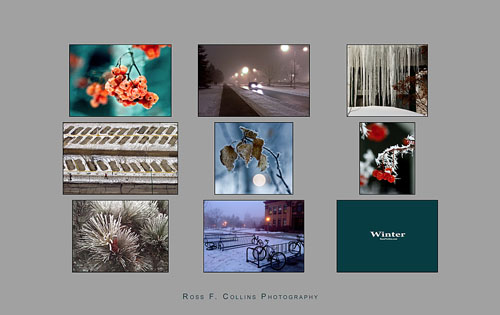
What self-respecting photographer wouldn't want a poster of her or his work? Fame and fortune will likely follow. Well, here's an easy way to make a professional-looking poster. It's based on a tutorial from the indefatigable Scott Kelby.
This poster uses both Bridge and Photoshop. It does work best with photos all in the same format, but if that doesn't work for you, feel free to use whatever you like best. An even number works best.
1. You may wish to make a title image for your poster collection, as used in the bottom right of the poster above. To do so
a. Open one of the photos you plan to use, so that your title image is the same size.
b. Change your foreground color to something that matches the rest of your photos. One option is to use the Eyedropper tool to sample from an actual photo, and save that to your swatches panel. To do that, with the Eyedropper tool click on the color, go to the Swatches panel, Choose New Color from the flyout menu at right.
c. Or choose a color from the Color Picker (click on the foreground icon at bottom of toolbox).
d. Choose the keystroke combination Option-Delete (PC: Alt-Backspace) to replace the background layer with the color.
e. Be sure to Save As to a new filename, so you don't wreck your picture!
f. Click the Type tool in the colored box. Choose a font and a color. (See Tutorial Five, Working with Type.) I wrote "Winter," and in a separate layer added my web URL underneath.
g. Save as... JPEG in the same folder as your other poster images. (If you have already saved it once, it will save as a copy.)
2. Open the folder of your poster photos in Bridge.
3. Drag to arrange photos. Title image is often last. Choose photos by highlighting: choose the first photo, hold down the Shift key, and click on the last to choose all. (Or choose Command+a)
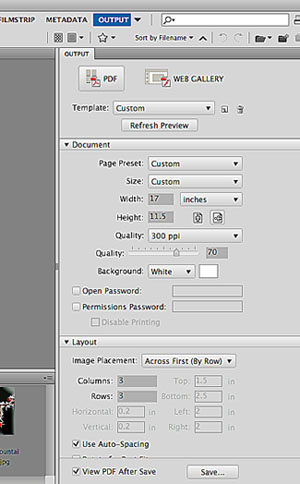 4. One you have everything ready, choose Output from the top right. Choose the PDF icon.
5. In the Document area (see right), choose a Width and Height as you need. Many posters are 12 inches by 18 inches. I choose 11.5 by 17 to leave some margin along the edge, but it depends on how you plan to output the poster. I leave everything else in the Document area as default.
6. In the Layout area, choose the number of rows and columns you'd like for your photos. As I have nine photos here, I decided to choose three columns and three rows.
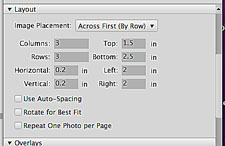 7. Toggle off Use Auto Spacing and space as you wish. You can try my numbers for starters, see left.
8. In the Overlays area, toggle off Filename. Otherwise your poster will include them. under each image.
9. Choose Refresh Preview to see what your poster will look like.
10. If you don't like the arrangement of your images, click on an image in the line below to deselect all, and drag images around in that bottom area until they work for you.
11. Select All again. Click Refresh Preview. You'll see your photos in pdf poster form. Adjust spacing etc. as necessary.
12. When everything's perfect, again Select All the images at bottom, and choose Save from the bottom of the Output panel. Toggle on View PDF After Save if you want to see how it looks.
13. You could stop here with your poster pdf. But we're going to do a little more tweaking in Photoshop.
14. Open your pdf in Photoshop. When the pdf dialogue box comes up, choose Media Box from the Crop To flyout, so that you retain your original poster measurement. The default Bounding Box crops the image.
15. You have no background layer, but you'll need one. To fill those transparent pixels, go to the Layers panel, and create a New Layer from the flyout menu at right, or the icon at bottom.
16. Drag that new layer in the Layers panel until it's second in line, after your image layer. This puts the new layer underneath your image layer.
17. Choose a color for your poster's background from your Swatches panel, or click on the small overlapped square icons at bottom of tool box to revert to the default black and white. You also can choose a gray tone from that slider.
18. Working in your new layer, fill with the background color or paint with the foreground color. To fill the background color, use the keystroke combination Command-Delete (PC: Alt-Backspace). To paint the foreground color, choose the Paint Bucket tool, and click in the layer.
 19. Add a polished look by putting a border around each of your photos. First, duplicate your image layer by choosing that layer in the panel and then choosing Duplicate Layer from the flyout or from the Layers pulldown at top.
20. Working on that Layer copy, go to the Edit pulldown. Choose Stroke.
21. In the dialogue box, change the width to around 6 pixels, and the color to your choice. I chose black.
22. When you OK, borders will automatically be added to each photo.
23. Now for your final flourish: your byline or title. Choose the Text tool. Click to add a new type layer. Type and style as necessary.
24. If you like the sort of sophisticated look of extra space between each letter, it's better to add that from the Character panel (Windows pulldown). Select the type. In the tracking icon window, stretch space to about 250. I've also selected Small Caps from the Character panel flyout menu to give it that oh-so-polished look.
 25. Save as a Photoshop pdf--or as a tiff, depending on how you'll output your poster.
26. Now ain't that cool.
Bonus! Create a web photo gallery (Flash file).
1. Begin as above, with your chosen photos in their own file.
2. As above, choose Output. But instead of PDF, choose Web Gallery.
3. In the Site Info dialogue box, change information as necessary. Most of these are pretty self-explanatory.
4. At bottom is the Save. Save to a separate folder. This folder can be burned to a CD or uploaded to a website.
5. Here's an example, using the same photos as for the poster above.
(Note Bridge CC has removed the web photo gallery feature described above).
Bridge can still create a poster in the CC version, but the technique is slightly different. Note Bridge calls this a "PDF contact sheet," but we'll use it as a poster.
1. In Bridge, find the images you want to be in the poster. (Choose Essentials option at top right if not default.)
2. Choose Output from top right (Or Window>Workspace>Output.
Note: if Output is not listed, open Preferences from Adobe Bridge pulldown (Mac) or File pulldown (PC). Choose Startup Scripts panel, and Adobe Output Module.
3. Drag photos to change photo order, if desired. Then Highlight the photos from the bottom of the Bridge workspace that you want to appear in your poster; to highlight more than one, hold down the Shift key and click, or choose the first one, hold the shift key, and choose the last one.
4. Drag all highlighted photos onto the Bridge workspace; note this is a change from CS6.
4. From the Document panel at right, choose Page Size: Custom.
5. Choose size. A common poster size is 12 inches by 18 inches. But choose a little smaller size so that you’ll have margins to work with in Photoshop.
6. The rest of the directions for CS 2016 above are the same for CC 2018; begin with Step No. 5.
Assignment for grading: Create a poster of the best photos from your documentary assignment work. Try to tell a story through the poster, with long shots, medium shots and closeups. Add a block of text, if you wish. Submit on Blackboard.