COMM 260, Principles of Internet Web-Based Design
Instructor: Ross Collins
Photoshop Basics (for the Macintosh, Version CS3)
Introduction
Photoshop is the industry-standard picture editing software. For web design, Macintosh computers dominate as hardware. While Photoshop is popular among web page designers, although not the only choice. But everyone at all involved in building web sites should know at least a few basics, the goal of this tutorial. Note: Photoshop is what we call a "high learning curve" software. That means you won't learn it all in an hour (or a day, or a week...).
If you want to become a true Photoshop expert, you will have to learn more from a Photoshop textbook or two. And, to answer a common question, Photoshop for Macs for Dummies (IDG Books) isn't a bad start. Becoming comfortable teaching yourself computer software really is the only long-term solution to keeping up with this rapidly-changing industry; you just won't be able to enroll in another class every time a new program or software version comes out. But with a few basics from this class, you're better prepared to move ahead on your own.
I originally wrote this guide as a full tutorial for graphic design and photojournalism students, but basic principles easily apply to introductory web design students as well. It's set up to be self-guided. This guide is a brief version of the full tutorial I use for the COMM 242, photojournalism as well as for COMM 362, Design for Print. If you're interested in the whole she-bang, check out the class resources pages.
Before you start: getting your, um, stuff together.
Graphic artists usually have a collection of photos and illustrations to work with. But how do your organize those dozens of pictures? Without some way to claim order from the chaos on your memory card, you can never be sure which image really is best, or even which is which. Photoshop CS2 has the answer: Bridge, the companion program for organizing your photos. You can us Bridge to organize your work in any of the CS Suite, including Photoshop, InDesign, Illultrator, and Dreamweaver. Let's get started.
1. Save some photos in their own folder on the hard drive, or on a Flash/jump drive. Collect your photos from your own files, or choose some of my practice photos from the Comm 362 Class Resources page. Open Bridge, directly, or just open from Photoshop (purple PS icon in Adobe applications). Choose the Go to Bridge icon at center of top menu bar.
On the left side of Bridge you'll see a tabbed menu, Favorites and Folders. Navigate down to the folder with your photos, and choose. Note the photos will automatically appear on the Bridge screen at right for you to review. Click on each for a larger image to appear in the Preview box. Double click to open in Photoshop.
Note that every other document appears as well. Bridge offers a master control to regulate workflow for webmasters working on several kinds of documents.
If you have not renamed images from a digital camera, each will be identified by meaningless default names like E0X2643.jpg. First step is to change these to names that make sense using Batch Rename.
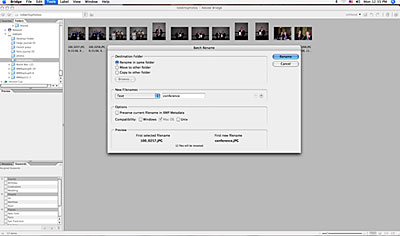 2. From the Tools pull-down, choose Batch Rename.... The dialogue box gives you several options. You can put your photos in a new folder, but why not Rename in Same Folder? For names, you can choose Text and type a name that makes sense to you. This will rename all your photos and include numbers in order. Now when you later want to find a photo in Photoshop, you can call up "basketball6.jpg" instead of "EP0X2643," like you'd remember what that is.
3. Further organizing: The Keyword tab at bottom left gives you the option of tagging photos you want to work with later. Presuming not every photo you take is super-duper ready for publication, you can set up your own key words in the default categories (choose the flyout menu using the tiny right-facing triangle at top right) or set up your own categories and keywords.
4. From the Edit pull-down, choose Find, and keyword, to gather together the images based on your tagging. Finally we're gaining some order out of that digital chaos from your memory card! So let's begin considering an image in Photoshop.
Exercise One: big and small, controlling it all
1. If not open already open Photoshop by double-clicking on its icon, PS. Where is it? In the applications folder. I dunno, it seems to change every year in the student clusters. Mouse around. Soon you will see a Toolbox and one or several palettes. The Window pulldown menu will open and close some palettes that may not be showing.
Open a photo, if you haven't already from Bridge.
Note that Photoshop is different from most other programs: you seldom choose New document. Why? Because, unless you're really being creative today, you seldom begin drawing things from scratch in Photoshop. Normally you start with an existing image, hence the New pulldown choice just sits under the File pulldown, sad and lonely.
2. Phool around with the Photoshop Tool Box at left. Hover the arrow cursor over a
tool for a moment, and a window pops up telling you the tool's name. Holding
down the mouse button over some tools produces a flyout menu, showing other
tools hiding in that particular tool drawer. Clicking a tool drawer changes
your cursor to that tool. Some of these tools look like things familiar to you
from grade school art days: paintbrush, pencil, eraser, paint can, airbrush
(if you learned at a wealthy private school), even a rubber stamp for you stampers
out there. Other tools look rather strange for a grade school art class: lollipop
(dodge tool), funny square (marquee tool), water drop (blur tool; you may have
to choose a flyout menu to see some of these). Generally, however, the guiding
rule is this: as a photojournalist you'll use none of these tools in a way remotely
resembling their use in grade school--except you can still make a real pixelated
mess. Awright!
3. Phool around with the Photoshop palettes. These provide options which affect the Tools. Run them in and out from the dock using the double arrow at upper right. Click on a tab at the top to bring up that file (Layers, Channels or Paths, for instance). As you may note, most of the options are "dimmed," indicating they are not available until you open a file to work on. The Brushes palette (Open from the Window if not already) is particularly handy--it changes the size and nature of the mark you make with a tool.
Alternatively, Photoshop has a contextual menubar at the top of the workspace. When you choose something needing the brush palette, it will appear.
As a general rule, succeeding versions of Photoshop added new features without removing the old ones for those resistant to change. This means we now have two more more way to do almost everything, take your pick. It also makes the program more complicated, I think, but hey, who am I to argue with an embarrassment of choice?
Under Photoshop pull-down (in Macintosh), Preferences, and Cursors, you can change the look of a tool on-screen from something cute like a li'l paintbrush, to circle, or a no-nonsense crosshair. (This change won't show up until you have a photo open to work on, however.) Photoshop may start out looking phun and phamiliar, but if that insults your maturity, okay, no more Mr. Nice Guy....
4. We really need to find a photo to work on. For exercise one, let's mutilate some of my
photos. In subsequent exercises you can mutilate your own picks. Presuming you have some already in your folder, as you chose them above using Bridge. If you don't, download some now.
5. You now have a wonderful ©Ross photo in front of you. (Should you decide
later to sell this photo to National Geographic for $10,000, I reserve
the right to 10 percent.) Note the Image Window in which it rests. You can Zoom using the View pull-down menu. Or you can zoom using the Zoom Tool at right bottom (little magifying glass; hold down Option key to zoom back out). Or choose a percentage view from the bottom left corner of the workspace. Or choose the slider from the Navigation palette at right. See what I mean about options? Sheesh.
You can move the window itself around by dragging on its handle
bar at top. If only part of your photo is showing in the window, you can move
it around the window with the Scroll Bars, drag with the Hand Tool, from the
Tool Box, or drag at lower right to make it bigger. Tired of those distracting
icons in the background? Chick on the lower right option of the Toolbox to fill
the entire screen with your picture.
Note the crappy quality of the zoomed image. That's because I saved all these
practice photos as low-resolution jpg files for the net. Hm. Maybe you won't
be able to sell it for $10,000 after all....
6. A word about print size: The rulers tell you what size the photo was scanned at--in the sample,
about a standard 5-inch by 7-inch. Note you can magnify or reduce the screen
image, but the print size will still be the same, unless you adulterate the
pixels.
Pixels, short for "Picture Elements," are the wee building blocks of your
image. Actually they are little squares, either partially or totally filled
with color on a grid pattern, and measured in pixels per inch (ppi). Photoshop
merely manhandles (person-handles?) pixels--pushes 'em around, changes their
color, and shows the result on your screen. Because screen pixels measure about
1/72 of an inch or 72 ppi, many of us can't see them easily at normal screen
magnification. Try zooming, or choosing Actual Pixels under the View menu, giving you one
pixel in your photo for one pixel on your computer monitor (or 100 percent in
the Image window box at lower left). Now you see the
tell-tale pixel jaggies we call "pixellated."
About resolution
7. What does this have to do with anything? Something. Open the Image Size
dialogue box under Image. The file size is listed under Pixel Dimensions (usually
at least a megabyte or "meg" or more, but maybe less if small or saved in that Mr. Thrifty
jpg form), which is based on width times height in pixels. Resolution is in
ppi. The higher the resolution, the higher quality your image will print (given
limits of your printer), but also the larger your file size.
How should you choose resolution? General guidelines:
- Choose 225-300 ppi for high-quality magazine;
- Choose 120-180 for laser printer (600 dpi, or dots per inch);
- Choose 72 for web-bound;
- Choose 120-180 for high-quality black-and-white, and 90-120 for low-quality
black-and-white.
Resolution changes depending on how large or small your photo needs to be, compared with its original scanned or digital resolution. This means that if you wish to make your image larger, the pixels will be farther apart, and therefore the image quality will be lower. If you want to make it smaller, they will scrunch together, and your image will be higher--within reason. So the general rule is that you can make a picture smaller without sacrificing quality, but not (much) bigger, unless your original is ultra-high resolution to begin with (1000 ppi-ish), or you don't need a high quality image anyway (say, for the web).
The general rule is to begin with a high-res scan or digital original. That, of course, squats on a lot of memory, because the more pixels, the more megs. That can fill up your hard drive fairly quickly, and you may not be able to send large image files over the web. But so much in graphic arts requires a trade-off.
8. Okay, so let's assume you want to change the size of your image in print,
a common wish of graphic designers. Yeah, you can do it in InDesign, using scale. But particularly if you want to enlarge, the results won't be acceptable in most publications. Instead, change it in Photoshop.
Look again at that Image Size dialogue box.
Under Print Size, you'll see how big the picture will be in printed form. Looks
danged easy to just change that by dragging over a number, and introducing a
new figure. The danged problem is that if you make your image smaller, Photoshop
merely throws away all the extra pixels that no longer fit on your dinkier image.
Making it larger is worse--Photoshop dreams up new pixels based on what's already
there, called "resampling," but like many of us, it's not always so good at creating
something from nothing.
Okay I'll admit that Photoshop is getting better at resampling for acceptable results. But we generally want to avoid resampling. Try this: open the Image dialogue box for a photo. In Document Size, change the inches to a larger number. Note above in Pixel Dimensions that the number of pixels also goes up, meaning Photoshop is planning to manufacture (resample) pixels to fill in the difference. Now try entering a smaller number in Document Size. The number of pixels also goes down, meaning Photoshop is planning to throw away pixels.
A better way to hold the quality of your image while changing side is instead is to change the size and manipulate the resolution. Here's a procedure:
- Decide what resolution you need, based on chart above.
- Open photo, go to Image dialogue box.
- Toggle off Resample Image.
- Enter desired resolution in resolution box. The size will change to compensate for resolution change.
- Note the new Document Image size. This is the maximum size your image can be without losing quality.
- Toggle Resample Image back on to lock in desired resolution.
- In Document Size, enter the size of the picture you want, keeping in mind the maximum size for your chosen resolution.
It's obvious that depending on the original resolution, you may be unable to get to the size you want at the chosen resolution, particularly if it's much bigger, without major resampling. In that case, you have to rescan the photo at a higher resolution, if possible. Or settle for a compromise, if it's a digital image originally photographed at a low resolution.
Resolution can be misleading, because a photo that may look all right on screen at 72 ppi won't look good in printed form at that low resolution. Try it, if you don't believe me.
Still want to resample? Learn more.
Oh,
by the way: turning off Constrain Proportions makes it possible for you to distort
an image, stretching or squashing as necessary to make short people look tall,
fat people look thin. If you like the hall of mirrors at the fair, you'll like
working with  this, though it's not very useful in real graphic arts life.Or
maybe so. Check out Mr. Fat Guy at right.
this, though it's not very useful in real graphic arts life.Or
maybe so. Check out Mr. Fat Guy at right.
Assignment One: Print and Hand in three prints from your sample photo:
one at original size, one at 3 1/2 inches by 5 inches, and one at 8 x 10 inches. Keep the resolution at 150.
Exercise Two: Cropping
Graphic artists often need to crop pictures. While you can over-crop, most of the time beginning photojournalists
don't crop enough. Graphic artists might need to help them out. Fortunately Photoshop makes this easy-peasy.
Cropping before scanning. If your preview clearly shows you need to crop, you won't have to deal with enlarging a cropped image in Photoshop or pagination software (InDesign, PageMaker or QuarkXpress) and thereby losing quality, when you scan a cropped image to begin with. If you aren't so sure, however, better scan the entire image larger than you need and crop in Photoshop, as noted below.
1. Choose Crop Tool, the overlapping L's in the toolbox.
2. Drag a marquee ("marching ants") around the area you wish to retain. Adjust as necessary by dragging the "handles" (tiny squares around the crop lines).
3. Choose Crop from the Image pulldown. To cancel, press the Esc key.
4. Oops, Cropped too much? Choose Undo (Apple-z) from Edit menu.
5. Note that Photoshop actually throws away those cropped pixels. So if you
don't Undo Crop immediately, you lose the cropped area. Unless, of course, you've
saved the original first. Oh, okay, you're right. There's the history palette, better check that out:
- Choose History from the Window pulldown.
- Click to go back to any of the former states your photo was in, before you started mucking around.
- If only we could go back this easily in real life...sigh!
Assignment Two: hand in original photo and cropped version.
Exercise Three: File Formats
Did I say you ought to save your file before working on it? Maybe not enough. Save your file before working on it. Then, save backup copies of your files and assignments ("1Ass" "2Ass" "3Ass" "HalfAss," etc.) as you make changes, so you can get back to them if necessary. Or if you're satisfied with changes, just choose "Save" (Cmd-s) to update your file. Whatever, save often. I'd imagine you're like me in that you don't like to see possibly hours of work on a photo vanish into Hubble-telescope land at the next system crash.
Note I saved these practice images in the JPEG (pronounced "J-peg," short for
Joint Photographer Experts Group) file format, to save space. JPEG (.jpg file extension) traditionally is
the most common file format for photographs destined for the web, because files
are small and download quickly. Other formats save pixels in a different structure,
either to be read by a specific piece of software (Photoshop's native format,
for instance), to be read by other kinds of software, and/or to save space.
Photoshop will open any graphic format (including pdfs), and save to any other format. Here's what you need to know as a graphic artist:
1. TIFF ("Tiff," Tag Image File Format, file extension .tif) is standard for photos to be used
in publications. Save as a tiff file if you plan to import into a pagination
program such as InDesign. The dialogue box will ask for Byte Order (Mac unless
you plan to move to a PC). Toggle on LZW Compression: it saves space but loses no
data ("lossless compression").
Note on tiff files: Many publishers still require tif files, as they contain more data and so work better for published material. But many cameras shoot only the automatically compressed jpg files. High end cameras can shoot RAW format, but these produce large files. You can save jpgs as tifs in Photoshop, but as jpgs already are compressed, resaving as tiffs doesn't really produce higher quality files. Ask a printer if it's all right to use jpgs in your InDesign document.
2. JPG is a "lossy" compression, meaning it kills off pixels, like a trip
to Chub's Pub kills off brain cells. In both cases, however, you probably won't
notice the difference. It's still best for image quality to stick to tiff unless
you're space-poor or web-bound.
3. gif ("Jif" or "Gif," Graphic Interchange Format, .gif file extension)
is a jpg alternative usually used for crisper line shots, drawings, logos, and other illustrations. It works best for solid colors (spot colors), not well for continuous tone ("contone") photographs.
4. EPS (Encapsulated PostScript file, .eps file extension) offers high-end quality for graphic
designers making color separations. It's space-hungry, but necessary for high-end art work. Adobe Illustrator saves as EPS. It is space greedy, and not often used for photographs.
5. Photoshop (.psd file extension) format saves layers and other Photoshop-specific features, while other formats "flatten" them. So if you may want to work on your layers, you'll need to save in Photoshop. (We'll talk layers later.) Also, if you have no interest in saving space, or in importing your file to some other use, save as a Photoshop file. It's usually a good idea to save one Photoshop format as a backup.
 6. PNG (Portable Network Graphics, .png file extension) was designed as an alternative for JPG on the web. It's becoming more common, but still some browsers don't recognize it.
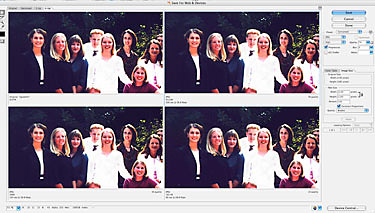
Optimizing for the web
Choosing the option Save for Web & Devices... from the File pulldown will give you the opportunity to optimize your photo for the web, saving as a jpeg, giff or png. You can choose compression amount (image quality), interlacing (gifs), LZW or other compresssion (gifs) and other features. Choosing the 2-Up or 4-Up tabs at top left gives you an idea of what your photo will look like at different compression settings. (See illustration.)
Last note on RAW files. Most good digital SLR cameras will save in either RAW or jpg format. Serious photographers prefer raw. It stores what the sensor actually recorded, without processing for color balance, noise reduction, compression, etc. This gives you the opportunity to better control that yourself in Photoshop, by converting it yourself to (usually) jpg. Drawback is it's time-consuming, and produces larger files. Jpg offers a shortcut for photographers in a hurry, but at the sacrifice of some image control. Photoshop CS3 offers advanced tools to process RAW images, more of interest to photographers than graphic artists or webmasters.
Assignment Three: "Save As" a photo three times (numbered one through three) as a Photoshop file, a tiff file and a jpg file. In the Finder (Macintosh), find and click once on each of the files to highlight. Choose Get Info from the File menu, and note the differences in file size for the three formats. Write down the space used for each file format, and hand in.
Exercise Four: Selecting stuff
Much of the time you'll want to deal with parts of images, to make adjustments, move around, change color, add an effect, etc. To work with part of an image, you need to choose it first. That might be easy if, say, it's a square rectangle. Just choose that with the Marquee tool, upper left of toolbox. Drag around to select ("marching ants" showing the choice). Apple + d keystroke cancels the selection.
 Add to your choice by dragging while holding down the Shift key.
- Subtract from your choice by dragging while holding down the Option key. Both these options work for all Photoshop's selection tools.
Marqueeing an object works fine, as long as it's nice and square. Not likely. For irregular shapes, Photoshop offers a plethora (gotta love that word) of selection tools to help you with an admittedly challenging task--including a new tool in CS3, the Quick Selection tool.
- Behind the square Marquee tool are tools to choose circles or lines.
- The Lasso tool (below Marquee) lets you trace around outline to choose. Note: you need to close the outlined shape to make the choice.
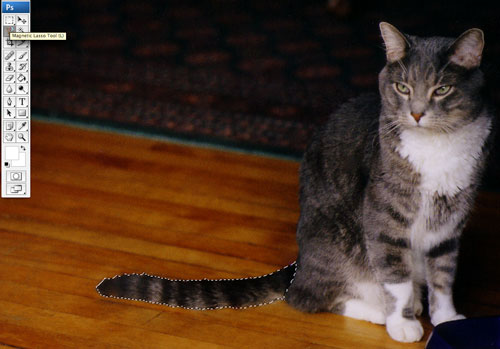
- The Magnetic Lasso tool (behind Lasso) allows you to do a more accurate tracing job by clicking to set points. The line tries to cling to a line as you trace around it. Again, you have to complete the shape before the selection appears. (Grab that tail! See illustration.)
- The Magic Wand tool (to the right of Lasso) allows you to click on an area and automatically select. Works best for large areas of mostly similar tones. From the Select pulldown choose Grow or Similar to modify the selection and better cover the area you want to select. Or change the Tolerance to select more or fewer pixels.
- The Quick Selection tool, new to CS3, allows you to "brush" (drag) over areas to select them. Change brush size to more accurately control tool, if necessary.
Assignment: None, but practice these important ways to select parts of your imgae.
All done? Choose Quit from the File menu to say Pharewell to Photoshop.