Learning
![]()
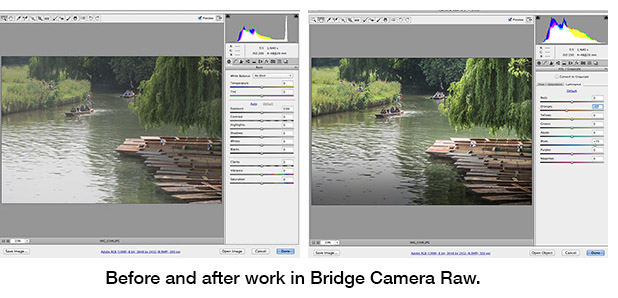
Tutorial Two(b): an alternative workflow for photojournalists
By Ross Collins, North Dakota State University, Fargo
Most photographers are aware that DSLR and other digital cameras can record images in basically two ways. The first, JPG format, is standard domain of compact, or point-and-shoot cameras for casual snapshots. These cameras automatically process the raw data provided by a sensor to produce and image that’s smaller (because it is a “lossy” format that throws out pixels), color-corrected, sharpened, and looks pretty good right out of the camera.
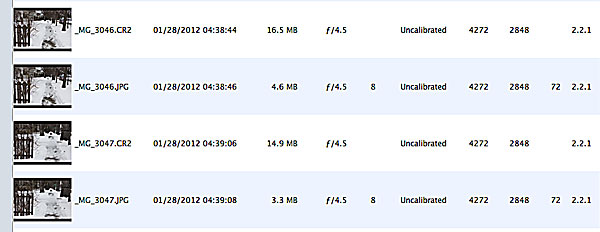 The second format, Camera Raw, often is not available on compact or smartphone cameras. But it is standard on Digital Single Lens Reflex (DSLR) cameras and many hybrids. Images obtained in Raw contain every pixel of sensor data unmassaged by software. But often they look uglier until pulled into an image editor such as Photoshop and “processed” into a form you can use. And they're a lot larger. How much? Take a look at my comparisons on left: CR2 is the Camera Raw format for Canon. Many professionals used to use Camera Raw only for critical images, because dealing with these take time and a lot of space on a camera’s memory card. Nowadays, though, we have a lot more computer space, and of course we can buy multiple large memory cards, so it's more common to shoot Raw for everything. It just gives you so much more to work with. But you can still shoot jpgs for less critical images, and you can still do a lot with that format as well. Or you can shoot both at the same time.
Camera Raw in Bridge
Both Photoshop and Bridge have options to bring photographs into the Camera Raw manipulation software. But here’s the thing a lot of people don’t know: you don’t have to use Camera Raw in Bridge (or Photoshop) only to edit RAW images! In fact, you can use it to edit JPG (or TIFF, for that matter, another common format), as an alternative to Photoshop’s standard photo editing options.
Why would you want to do this? Some photographers choose it because they think it's easier, faster, and does a better job. I don’t know about that last one, but I do happen to think it’s easier and faster, and so I nearly always begin my photo editing in Bridge Raw. Why not give it a try? Here's a workflow procedure I often use. (This is based on a variety of tutorials, including my new book Photocommunication Across Media (Routledge/Focal Press, 2018) and Adobe's helpful tutorial.)
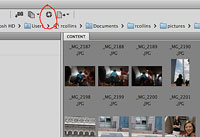 1. First you need to open your jpg (or other format) in Camera Raw. If you double-click on a Raw (In Canon a CR2 file extension, but will vary with manufacturer) image in Bridge, it will automatically open in Camera Raw. A jpg will not. An easy way to open a jpg in Raw is to choose the image in Bridge, and then under the File pulldown, choose Open in Camera Raw. Or even easier, you can merely click on the tiny aperture icon at top left of Bridge menu bar, as circled in the illustration (hover over tools for descriptions).
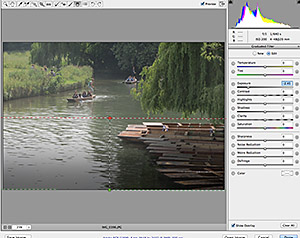
2. The sample photo below opened in Camera Raw is typical of those taken with the digital camera’s white balance set on Auto. It’s not quite right. In this case, the photo was taken in a hazy, partially cloudy day, so it’s a little blue. We’ll start by fixing the color balance.
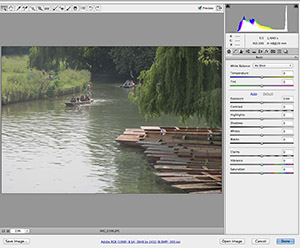 3. Note a great thing about Camera Raw in Bridge is that all your adjustments are right there in a handy slider toolbox at the right. White Balance is at the top of the list. Apparently Adobe developers considered that to be the first thing you’d want to correct, because if you have a photo that’s not color corrected, it’s more difficult to get a good read on exposure (darkness/lightness). While I don’t instinctively jump to white balance as Job One, perhaps I should. So let’s.
4. You might begin by wondering if the Camera Raw software is smarter than your eye. Depends; photo adjustment is an art, really, and what looks good to you may not look good to the next shooter. But you can use technology to aid art.
The histogram at top shows distribution of colors and tones. The dark triangle icons at top can be toggled on to warn us of clipping in either the highlight and shadow areas. “Clipping” in digital photography is what we used to call blown highlights or blocked-up shadows. That is, paper white or ink black with no detail, no ability to see anything in the light and dark areas.
The ideal photograph contains detail in both highlight and shadow areas, with the exception of a few spectral highlights—the glint off chrome, for example—and black shadows—the keyhole in the door. We do need a little jet black and paper white to give the photo snap. But not too much. Note the example below, showing the clipping (blown out highlights) in the background. We want to try to minimize this. Most photographers do it by sight, though, without so much need to consult a histogram.
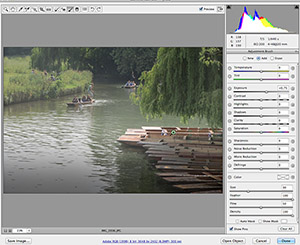
 But let’s correct the color first. You can do this most easily by letting Camera Raw figure it out: Choose Auto from the White Balance flyout menu. Actually, that’s pretty good. But it is a bit magenta to me. I’m going to move the Color Temperature slider down just a little to cool it off slightly. Perfect! Note: Raw files give you several Auto options.
Slider note: You can go back to the default setting by double-clicking on the slider. To Undo an action, choose the Command + z keystroke combination.
5. Let’s move on to Exposure. We can use Exposure to lighten or darken the entire scene. I first try the Auto adjust, but I often find it is a little too light for me. So instead I slide the exposure a bit to the left (or right) as needed. It improved the photo of the punts (boats) on the Cam River above, but I still have a large area of blown out highlight in foreground water.
6. How to adjust? You can try to darken it a bit with the Highlights or the Whites slider. The shadow areas can be deepened using the Blacks slider. Dragging to the right seems to make the color more saturated—a principle also used in color printing. We add black to snap up (saturate) the other colors. This can improve a flat photo. But we still have a problem with those blown highlights, and the Highlights or Whites slider acts on the whole image instead of just that part.
 7.Another way to do this is to use the Graduated Filter tool. This brings a sort of window shade (filter) over the part of your image to gradually adjust. It usually defaults to an exposure of -2 (darkening), but you can adjust the sliders at right. Choose the Hand tool or go back to the basic set of sliders (left icon on slider panel) to accept.
8. So I think that looks better on the water, but now it's darkened the punts (those boats in the foreground). Another, more precise way to adjust exposure is to choose the Adjustment Brush tool and paint the area you want to adjust. Use the bracket keys to change brush size. I changed the exposure to lighten, adjusted the Flow and Size settings, then just dragged or clicked over the areas I wanted to fix. Choose the hand icon at top left to accept. This brush works a bit like Photoshop's dodge/burn tools, but more precise, I think.
You cana also adjust the Exposure or other sliders after you've dragged to get a more precise result. And if there's an area you'd like to avoid painting, toggle on the Eraser mode and return that area to the original.
8. Clarity is one cool slider, man. It’s kind of like Photoshop's Unsharp Mask, except it doesn’t work in the same way, so you don’t have the possibility of sharpening to annoying graininess. You can use it to sharpen or remove haze, as I did in this image. I find it particularly handy to remove the haze of shooting through window glass. You actually can drag the slider the other way to soften—this is helpful for people’s faces, on which you don’t want to emphasize every little fine wrinkle the way the new HD TVs cruelly tend to do.
 9. I'm not a big fan of the Saturation slider, as I think it too easily gives you artificial-looking colors, but Vibrance can really snap up a dull image like this one.
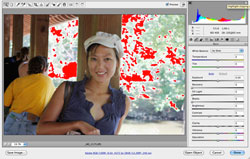
10. I'd just like to make that guy in the blue shirt pop out a bit more. One way to do that is to choose the HSL/grayscale icon from the slider box. In the ensuing slider set, choose the Luminance tab. The blue slider's values should help brighten up that shirt. You can try a combination to achieve the effect you're looking for, either brighter or darker. I also toned down the orange just a bit to add some wood detail in the punts. Try the Saturation tab and sliders to enhance those colors even more. (Note: You can also turn your photo into black-and-white from the Convert to Grayscale icon.)
11. You can reduce the noise (grain) in photos taken in dim light at high ISO settings by choosing the Detail icon, and under Noise Reduction sliding Luminance. But note it also softens the image. The Sharpening sliders work in a way similar to the Unsharp Mask in Photoshop. To better see the effect, You can zoom in on the image by choosing the Zoom tool at upper left (magnifying glass icon) and dragging a marquee around the area you want to zoom to.
12. Contrast.
Contrast is the difference between the dark and light areas of a photo. A contrasty photo is normally taken in sunlight or strong spotlight. A flat photo is normally taken on a cloudy day or under florescent light. (See Ross’s Qualities of Light tutorial). While I don't so often work with contrast after dealing with the aspects above, you just might want a contrastier (or less likely, a flatter) photo.
The Contrast slider is one way to achieve that, although not as persnickety as the Tone Curve tool, that second icon from the left next to the camera iris. You can choose the curve and either adjust contrast on your own with the Parametric option and the sliders, or you can use the Point option and drag the curve around as you’d to in Photoshop’s Curves adjustment.
Or! You can choose the Tone Curve icon, Point tab, and on the curve flyout choose a contrast: Medium or Strong. As often is the case, Photoshop may well be smarter than its users.
Final touches.
You also can crop and straighten in Camera Raw, fairly straightforward. To accept the crop, click on the Hand or another tool. To clear a crop, go back to Crop tool, choose Clear Crop.
After you’re done, you can choose Open Image to open image in Photoshop, or Done to save changes without opening image. If you want to save changes but keep your original, choose Save Image… and save with a new filename. Note the DNG (Digital Negative) file extension option saves the image in raw form, but in a non-proprietary and widely supported format for storing raw data. It's recommended for achival preservation, as a manufacturer may drop support for a proprietary format.
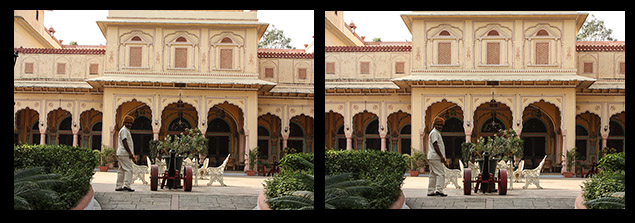
Scale and straighten in Bridge Camera Raw.
Photos of buildings or those taken with a wider-angle lens often show distortion: the building appears to be leaning backwards (if you point the camera up) or sideways. As well, a horizon line may not be straight. We can fix the horizon line in Photoshop using the tutorial link below. Or we can do it in Bridge Raw. To use Bridge, choose the Lens Corrections icon, and Manual tab. Choose the sliders to straighten the image as necessary, the rotate slider for the horizon line. You'll have to Scale the image after, meaning some cropping, but the image will be in more correct perspective, as illustrated below.
Quick tip! Straighten a horizon line in Photoshop.
Assignment.
Choose two of your own photos. Go through the workflow as described above in Bridge. Saving a before and after copy each with a different filename. Submit two before and two after photos for grading.