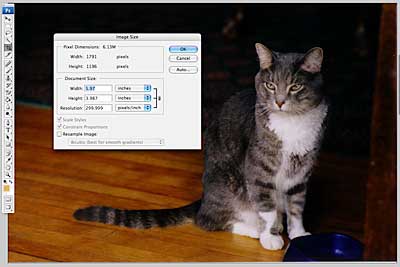
 2. Choose Image Size from the Image pulldown menu. The Image Size dialogue box will pop up (see illustration at right).
COMM 313: Editorial Processes
Image size and photo manipulation for editors
Thanks to journalist and NDSU comm alumnus Mark Chamberlain for contributing to this lesson on digital resolution for editors!
Images arrive at your publication in a wide variety of resolutions and formats. The format is the manner in which the photo or illustration is saved. Common image formats are:
Common resolutions are:
Tiff files are designed for high-quality publications, and therefore normally are saved at higher resolutions, usually 150-300 ppi. Jpg files are designed for the internet, and therefore saved at lower resolutions, usually 72 ppi. Many lower-priced digital cameras automatically save photos as jpgs, using low resolution but large images. JPG files are smaller. High-end equipment may use the RAW format, which allows photographers more control. Editors generally use jpgs or tifs.
Editors normally are not expected to know Photoshop photo manipulation software, nor are they expected to be photographers. But they are expected to produce high-quality publications, and they do work with photos. Therefore, they have to understand a little bit about digital photo resolutions, and how it affects their work.
Note: For a full self-guided tutorial of Photoshop, see Photojournalism Class Resources.
Image resolution and editors
Photos from digital cameras, or scanned, digitized photos, are saved at a certain resolution, and a certain size. That combination breaks up the image into picture elements, or pixels, corresponding to tiny dots (well, squares, actually) representing the image. The fewer dots you have, the lower the quality of your image. So a 72-ppi photo is lower quality than a 200-ppi photo.
The 72-ppi picture, the most common jpg resolution, is web standard. This is because the lower the resolution, the fewer the pixels, and therefore the smaller the file size. Small file sizes download faster on the net. As well, photos using projected color (that is, computer monitors) look all right at a low resolution. But 72 ppi printed prints at poor quality. The standard for printing: at least 200 ppi, for lower-quality newsprint. At least 250 ppi, or 300, for magazines.
As you may know, you can make your picture bigger or smaller by merely dragging on its handlebars (scaling) in InDesign (computerized pagination software), or choosing a new image size in Photoshop. But keep in mind: you only have so many pixels there. The bigger you make it, the lower the quality. So if you start out with a 4-inch photo at 72 ppi in InDesign and scale it up to an 8-inch photo, what are you going to get? A "grainy" picture, that is, jagged edges of the pixels showing. Sort of like a jar of beans: you can pour them into a bigger jar, but you only have so many beans.
This means that you are constrained by the original scan or original digital photo. If the original scan was big, say 8 by 10 inches at 1,000 ppi, well, you have oodles of pixels to work with--but also a huge, multi-megabite file. If you scan a 35 mm slide at 72 ppi, you have much fewer pixels to work with. You can make that image bigger, but your quality will go down, presuming you choose not to resample your image (see below).
The general rule, then, is to scan with the anticipation of the largest possible image you plan to make from your photo, but don't waste megs with larger images.
But editors don't do their own scans or digital photography, generally. They deal with other people's work. So how do you decide whether an image is of sufficient quality to print at the size you wish to print it, and in your publication? You might be able to tweak it a little in InDesign using the scale tool, but it's risky--Indesign doesn't really tell you if your image is going to be good enough. You need to deal with image size in Photoshop.
Photoshop image size exercise
1. Download this image to your desktop for practice.
To download in Macintosh, save by clicking while holding down the Control key. Choose Save as... and save to desktop.
Open an image in Photoshop. Presumption is that a photographer or graphic artist has already maximized the image quality. You need to deal with the image size.
2. Choose Image Size from the Image pulldown menu. The Image Size dialogue box will pop up (see illustration at right).
3. Toggle off Resample Image.
Note: Resample Image actually creates new pixels if you resample up, and thereby increases the image size. Usually this reduces quality of an image, making it fuzzy, although the resample option is improving. Still, you can clean it up somewhat using Photoshop's Unsharp Mask, but it's better not to resample, and instead to rescan if your image resolution is too low for the size in which you wish to print.
4. In the Resolution box, type the resolution you need:
5. Note the size of the printed image may change, depending on how it was saved. If it was saved at 300 ppi, and you type 72, the image will get much larger. If you saved at 72 and now need 250, the image will get much smaller.
6. Note the Image Size. This is the maximum size you can print the image without sacrificing quality. You can make it smaller. But not larger. If the maximum size is sufficient for your publication...
7. Recheck the Resample Image toggle. This locks the resolution you need.
8. Type the desired width or height (usually width, in columns converted to inches of your publication) in the appropriate box.
Note: You may wish to change the default inches measure to picas.
9. Okay and save. Now you can import your image into InDesign at the right size without worrying about quality loss. You can tweak slightly using the Scale Tool, maybe 10 percent.
![]() 10. If your image will not be big enough at the resolution you specify, you have two choices: choose a lower resolution and possibly a pixellated image, see cat's eye example on right. Or print the photo smaller.
10. If your image will not be big enough at the resolution you specify, you have two choices: choose a lower resolution and possibly a pixellated image, see cat's eye example on right. Or print the photo smaller.
Now for some practice. Download (Control + click) and save these photos to your desktop:
Answer the questions below based on your evaluation in Photoshop, using instructions above.
1. Cat photo:
You need a 3-col photo (38p), at 200 ppi.
Will this be possible at the resolution you specify?
What is the maximum possible width of the image at 200 ppi resolution?
How deep (height box) will your resized image be (if applicable)?
2. Boat photo:
You need a 2-col photo (25p) at 100 ppi for a company newsletter.
Will this be possible at the resolution you specify?
What is the maximum possible width of the image at 100 ppi resolution?
How deep (height box) will your resized image be (if applicable)?
3. Sun photo:
You need a 2-col photo (25p) at 200 ppi.
Will this be possible at the resolution you specify?
What is the maximum possible width of the image at 200 ppi resolution?
How deep (height box) will your resized image be (if applicable)?
4. Workers photo
You edit a 3-col magazine, each column 13p wide. You need a 1-col photo at 250 ppi.
Will this be possible at the resolution you specify?
What is the maximum possible width of the image at 250 ppi resolution?
How deep (height box) will your resized image be (if applicable)?