Learning ![]() Software (Version 2021 and 2022 for Macintosh)
Software (Version 2021 and 2022 for Macintosh)
Beginning tutorial for photo and design students by Ross F. Collins, North Dakota State University
Lesson One: using Bridge, tools, sizing, cropping, file formats, selecting
Introduction
Photoshop is the print industry-standard picture editing software. For photographers and graphic artists, Macintosh computers dominate as hardware, although Photoshop operations are similar on a PC. I offer a basic grounding in this class, but you will probably need to practice on your own. You also may wish to know more of the software's capabilities: Photoshop is a "deep" program. You may need to learn some of this working on your own. Becoming comfortable teaching yourself computer software
really is the only long-term solution to keeping up with this rapidly changing
industry; you just won't be able to enroll in another class every time a new
program or software version comes out.
If you want to become a true Photoshop
expert, you will have to learn more from a Photoshop textbook. And, to answer
a common question, Photoshop CC for Dummies (IDG Books) isn't a
bad start. Alternatively, the web and YouTube offers tutorials, although you need to make sure they cover the software version you're using. Photoshop has changed quite a bit over the years.
Before you start: getting your, um, stuff together.
Graphic artists and photographers usually have a ready collection of photos and illustrations to work with. But how do your organize those dozens (or more) of pictures? Without some way to claim order from the chaos on your hard drive, you can never be sure which image really is best, or even which is which. Beginning with CS2 Photoshop had the answer: Bridge, the companion program for organizing your photos. You can use Bridge to organize your work in any of the Adobe Suite, including Photoshop, InDesign, Illustrator, and Dreamweaver. Bridge also can edit your photos. Some designers and photographers sometimes don't even bother to separately open another program (like me, for instance). So let's get started.
1. Save some practice photos in their own folder on the hard drive, a cloud-based remote folder, or on a flash/jump drive. Collect your photos from your own files, or choose some of my practice photos from the COMM 362 Class Resources or COMM 242 Class Resources pages. To edit in Bridge, Open Adobe Bridge directly, or open Photoshop, and choose Browse in Bridge from the Photoshop File pulldown to sort through your images.
On the left side of Bridge you'll see a tabbed menu, Favorites and Folders. Navigate down to the folder with your photos, and choose one. The photo will appear on the Bridge preview screen at right for you to review. Double click the smaller image to open in Photoshop. To add to your favorites, drag them to the folder.
Note that every other document appears as well. Bridge offers a master control to regulate workflow for photographers and graphic artists working on several kinds of documents. When you double click, each document will be opened in the correct program.
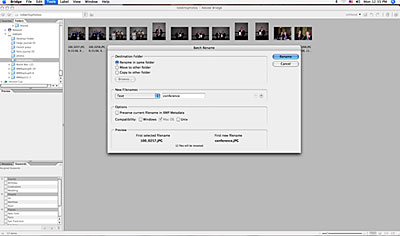
If you have not renamed images captured by a digital camera, each will be identified by meaningless default names like 100643.jpg. A first step is to change these to names that make sense using Batch Rename.
 2. Highlight the photos you want to rename; hold down the Shift key while clicking to choose multiple images.
From the Tools pull-down, choose Batch Rename.... The dialogue box gives you several options. You can put your photos in a new folder, but why not Rename in Same Folder? For names, you can choose Text and type a name that makes sense to you. This will rename all your photos and include numbers in order. Now when you later want to find a photo in Photoshop, you can call up "basketball6.jpg" instead of "100643," like you'd remember what that is.
3. Further organizing: The Keyword tab at lower right (next to Metadata, technical information about your photo) gives you the option of tagging photos you want to work with later. Presuming not every photo you take is super-duper ready for publication, you can set up your own key words in the default categories (choose the flyout menu using the tiny right-facing triangle at top right) or set up your own categories and keywords.
4. From the Edit pulldown, choose Find, and keyword, to gather together the images based on your tagging. Finally we're gaining some order out of that digital chaos from your photo memory card! So let's begin considering an image in Photoshop.
5. You can also organize by filter at bottom left, choosing organizing themes such as Date Created, or from the Sort By pulldown. Another in the embarrassment of choice that defines Photoshop.
Assemble a slide show using Bridge. (I leave theis tutorial because it includes a link to slide show creation possibilities, but alas, Adobe removed this feature from CC2020 and later Bridge versions.)
Lesson One: big and small, controlling it all
1. From Bridge you can just double-click an image to open in Photoshop. Or, if you're not using Bridge, open Photoshop by double-clicking on its icon, the blue Ps. Where is it? On a Macintosh, you may need to double click on the Hard Drive icon. Look in the applications folder. Should be there, although it seems to change every year in the student clusters. Mouse around, or simply choose Spotlight or application search and enter Adobe Photoshop.
Macintosh note: Before opening, drag the Photoshop icon to the Dock, bottom of screen, and it will be waiting for you for next time, no mousing around.
Open a photo, if you haven't already from Bridge.
Note that Photoshop is different from most other programs: you seldom choose Create New document. Why? Because, unless you're really feeling creative today, or you're working on a website design, you seldom begin drawing things from scratch in Photoshop. Normally you start with an existing image, hence the New pulldown choice just sits under the File pulldown, or Create New on the splash screen, sad and lonely.
2. Phool around with the Photoshop Tool Box at left. Hover the arrow cursor over a tool for a moment, and a window pops up telling you the tool's name. Holding down the mouse button over some tools produces a flyout menu, showing other tools hiding in that particular tool drawer. Clicking a tool drawer changes your cursor to that tool. Some of these tools probably look like things familiar to you from grade school art days: paintbrush, pencil, eraser, paint can, airbrush (if you learned at a wealthy private school), even a rubber stamp for you stampers out there. Other tools look rather strange for a grade school art class: lollipop (dodge tool), funny square (marquee tool), water drop (blur tool; you may have to choose a flyout menu to see some of these). Generally, however, the guiding rule is this: as a photographer or designer you'll use none of these tools in a way remotely resembling their use in grade school--except you can still make a real pixellated mess. Awright!
3. Phool around with the Photoshop panels (also called palettes). These provide options that affect the tools. Roll them in and out from the dock using the double arrow at upper right. Click on a tab at the top to bring up that file (Layers, Channels or Paths, for instance). As you may note, some of the options are "dimmed," indicating they are not available until you open a file to work on, or choose part of a photo to work on. The Brush panel (Open from the Window pulldown if not already) is somewhat handy--it changes the size and nature of the mark you make with some tools. (Keystroke shortcut: left or right bracket keys.) To choose the type options similar to what is available in InDesign, from the Window pulldown choose Character or Paragraph.
Photoshop gives you a seemingly overwhelming number of options. Can we ever have too much choice? (I'm thinking yes, particularly when I'm shopping for paint.)
Alternatively, Photoshop has a contextual menu bar at the top of the workspace based on selection from the toolbox. When you choose something needing the brush panel, for example, the options will appear. This is a shortcut which often is faster than laboring in the panels.
As a general rule, a new version of Photoshop adds new features without removing the old ones to appease digital geezers resistant to change. This means we now have two or more ways to do almost everything, take your pick. It also makes the program more confusing, I think, but hey, who am I to argue with the 1 percenters who run Adobe?
Under the Photoshop pulldown (in Macintosh), Preferences, and Cursors, you can change the look of a tool on-screen from something cute like a li'l paintbrush, to a circle, or a no-nonsense crosshair. (This change won't show up until you have a photo open to work on, however.) Photoshop may start out looking phun and phamiliar, but if that insults your digital maturity, okay, no more Mr. Nice Guy.... A variety of other Preferences are available. We'll cover them as necessary throughout the course.
4. We really need photos to work on. Did you download some for the Bridge practice above? If not, for exercise one, let's mutilate some of my photos. In subsequent exercises you can mutilate your own pics. Presuming you have some already in your folder, as you chose them using Bridge. If you don't, download some now.
5. You may now have a wonderful ©Ross photo in front of you. (Should you decide later to sell this photo to National Geographic for $10,000, I reserve the right to 10%.) Note the Image Window in which it rests. You can Zoom using the View pull-down menu. Or you can zoom using the Zoom Tool at left bottom (little magifying glass icon; hold down Option key to zoom back out). Or choose a percentage view from the bottom left corner of the workspace. Or choose the slider from the Navigator panel at right (Choose Window pulldown and Navigator if you don't see it). See what I mean about options? Sheesh.
You can move the window itself around by dragging on its handle bar at top. If only part of your photo is showing in the window, you can move it around the window with the scroll bars, drag with the Hand Tool, from the Tool Box, or drag at lower right to make it bigger. Tired of those distracting icons in the background? Choose the Full Screen mode from View and Screen Mode options (Escape key to return to previous mode).
Note the possibly crappy quality of the zoomed image. That's because I saved some of these practice photos as low-resolution .jpg files for the internet. Hm. Maybe you won't be able to sell one for $10,000 after all....
But what do I mean by "low-res?"
6. If the photo was scanned, it may be a fairly high resolution. But if a digital photo from a point-and-shoot or possibly smartphone camera, often the image comes to Photoshop as a large, low-resolution file. Note you can magnify or reduce the screen view, but the print size will still be the same, unless you manipulate the pixels.
Pixels, short for "Picture Elements," are the wee building blocks of your image. Actually they are little squares (see left photo), either partially or totally filled with color on a grid pattern, and measured in pixels per inch (ppi). Photoshop merely manhandles (person-handles?) pixels--pushes 'em around, changes their color, and shows the result on your screen. Because screen resolution is traditionally about 72 ppi, the pixels measure about 1/72 of an inch. Many of us can't see them easily at normal screen magnification. In Photoshop try zooming to about 500 percent. Now you see the telltale pixel jaggies we call "pixellated."
About resolution
7. What does this have to do with anything? Something. Open the Image Size dialogue box under Image pulldown. The pixel count is listed under Dimensions. Pixel Dimension is based on width by height in pixels. Resolution is in pixels per inch, ppi. The higher the resolution, the higher quality your image will print (given limits of your printer), but also the larger your file size, because you have more of those little guys per inch. (You can find the total file size in Bridge, from the Metadata tabbed panel at right.)
How should you choose resolution? General guidelines:
Photos are resolution-dependent. This means resolution (quality) changes depending on how large or small your photo needs to be, compared with its original scanned or digital resolution. If you wish to make your image larger, the pixels will have to be pulled farther apart, and so bigger, and therefore the image quality will be lower. If you want to make it smaller, they will get smaller to scrunch together, and your image quality will be higher, usually. So the general rule is that you can make a picture smaller without sacrificing quality, but not (much) bigger, unless your original is ultra-high resolution to begin with (1000 ppi-ish), or you don't need a particularly high quality image anyway (say, for the web).
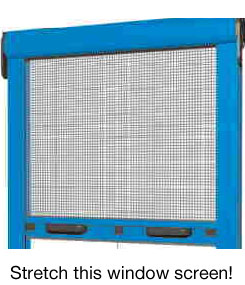 When imagining resolution, I like the window-screen analogy. You stretch a window screen, the squares ("pixels") get bigger. You squeeze it together, they get smaller.
The general rule is to begin with a high-res(olution) scan or digital original, or a very large, lower-res original, as most lower-end cameras provide. That, of course, uses a lot of memory, because the more pixels, the more megs. (Hi, Meg. You're famous.) Modern computers have lots of space, though, so it may not be a problem. It may pose a problem if you plan to attach photos to emails, or plan to have lots of photos on a website. But so much in graphic arts and photography requires a trade-off.
8. Okay, so let's assume you want to change the size of your image in print, a common wish of editors, graphic designers and photographers. Yeah, graphic artists can do it in InDesign, using the scale tool. But particularly if you want to enlarge, the results won't be acceptable in many publications. Instead, we need to manipulate image size and resolution in Photoshop.
Look again at that Image Size dialogue box. Under Print Size, you'll see how big the picture will be in printed form. It defaults to pixel measurement, but you can change that to inches. Looks darned easy to just change that by dragging over a size, and introducing a new figure. The problem is that if you make your image smaller, Photoshop merely throws away all the extra pixels that no longer fit on your dinkier image. Making it larger is worse--Photoshop dreams up new pixels based on what's already there, called "resampling," but like many of us, it's not always so good at creating something from nothing.
Okay I'll admit that Photoshop is getting better at resampling for acceptable results. But we generally want to avoid resampling. Try this: open the Image dialogue box for a photo. For Width and Height, change the inches to a larger number. Note in Dimensions that the number of pixels also goes up, meaning Photoshop is planning to conjure up (resample) pixels to fill in the difference. Now try entering a smaller number in Document Size. The number of pixels also goes down, meaning Photoshop is planning to throw pixels right down the old digital drain.
A better way to hold the quality of your image while changing side is instead is to change the size and manipulate the resolution. Here's a procedure:
It's obvious that depending on the original resolution, you may be unable to get to the size you want at the chosen resolution, particularly if it's much bigger, without major resampling. In that case, if scanned, you have to rescan the photo at a higher resolution, if possible, or go to the original digital file. Or settle for a compromise, if it's a digital image originally made at a low resolution. Or see how that fancy-schmancy resampling really works for quality photo reproduction. You may get lucky.
One reason professional photographers choose expensive DSLR cameras is to take advantage of the large files they provide, meaning they can print big photos at high quality, something pretty much impossible with smartphone files.
Resolution can be misleading, because a photo that may look all right on a computer screen (projected color) at 72 ppi won't look good in printed form (ink on paper) at that low resolution. Try it, if you don't believe me.
Still want to resample? Learn more.
Oh,
by the way: clicking off the chain link icon that Constrains Proportions makes it possible for you to distort
an image, stretching or squashing as necessary to make short people look tall,
fat people look thin. If you like that hall of mirrors at the county fair, you'll like
working with  this, though it doesn't appear very useful in professional life. Or
maybe so. Check out Mr. Plump Guy at right.
this, though it doesn't appear very useful in professional life. Or
maybe so. Check out Mr. Plump Guy at right.
Warning for graphic artists: InDesign's scale tool gives you the option of distorting a photo so it fits a space. Generally this is an amateurish way of filling space, and who wants to see a distorted image of themselves? Hardly flattering. Photos should be kept in proportion.
Lesson Two: Cropping
Graphic artists and photographers often need to crop pictures. While you can over-crop, most of the time beginning photo communicators
don't crop enough. Fortunately Photoshop stands ready to help out.
1. Choose Crop Tool, the overlapping L's in the toolbox. If you wish to crop to a standard ratio, choose one from contextual menu at top.
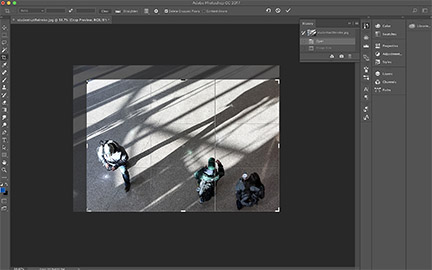 2. Drag borders to crop as necessary (see photo on left).
3. Choose Crop from the Image pulldown, or the Return/Enter key. To cancel, press the Esc key.
4. Oops, Cropped too much? Choose Step Backward or Undo Crop (Apple-z) from Edit pulldown, or from the History panel.
5. Note that Photoshop actually throws away those cropped pixels. So if you don't Undo Crop, you lose the cropped area. Unless, of course, you've saved the original first. Oh, okay, you're right. There's the History panel, better check that out:
1. Choose History from the Window pulldown, if not already docked at right.
2. Click on the panel icon to go back to any of the former states your photo was in, before you started mucking around. If only we could go back this easily in real life...sigh!
However, once you Close/Save the cropped or otherwise altered version of the photo, your history options are gone. What you see the next time you open is what you get. (Presumably you saved your original file separately?)
Lesson Three: File Formats
Note I saved these practice images in the JPEG (pronounced "J-peg," short for
Joint Photographer Experts Group) file format, to save space. JPEG (.jpg file extension) is
the most common file format for photographs destined for the web, because files
are smaller and download more quickly. Other formats save pixels in a different structure,
either to be read by a specific piece of software (Photoshop's native format, .psd,
for instance), to be read by other kinds of software, and/or to save space.
Photoshop will open any graphic format (including pdfs), and save to any other format. Common formats:
1. TIFF ("tiff," Tag Image File Format, file extension .tif) is standard for photos to be used in publications. Usually we save as a tiff file if we plan to import into a pagination program such as InDesign. The dialogue box will ask for Byte Order (Mac unless you plan to move to a PC). Toggle on LZW Compression: it saves space but loses no data ("lossless compression").
Note on tiff files: Some publishers still require .tif files, as they contain more data and so work better for published material. But many cameras shoot only the automatically compressed .jpg files. DSLR cameras can shoot RAW format, but these do produce large files, and need to be converted in Photoshop. You can save .jpgs as .tifs in Photoshop, but as .jpgs already are compressed, resaving as .tifs doesn't really produce higher quality files. Ask a printer if it's all right to use .jpgs in your document.
2. JPEG is a "lossy" compression, meaning it kills off pixels, like a night at Herd & Horns kills off brain cells (purportedy). In both cases, however, you probably won't notice the difference. It's still best for published image quality to stick to TIFF unless you're space-poor or web-bound.
3. GIF ("Jif" or "Gif," Graphic Interchange Format, .gif file extension) is a .jpg alternative usually used for crisper line shots, drawings, logos, and other illustrations. It works best for solid colors (spot colors), not well for continuous tone ("contone") photographs.
4. EPS (Encapsulated PostScript file, .eps file extension) offers high-end quality for graphic designers making color separations. It's space-hungry, but necessary for high-end art work. Adobe Illustrator saves as EPS. It's not often used for photographs.
5. Photoshop (.psd file extension) format saves layers and other Photoshop-specific features, while other formats "flatten" them. So if you may want to work on your layers later, you'll need to save in Photoshop. Also, if you have no interest in saving space, or in importing your file to some other use, save as a Photoshop file. It's usually a good idea to save one Photoshop format as a backup.
6. PNG (Portable Network Graphics, .png file extension) was designed as an alternative for .jpg on the web. It's becoming more common.
Last note on RAW files. DSLR and some hybrid cameras will save in either RAW or jpg format. Serious photographers often prefer RAW. It stores what the sensor actually recorded, without processing for color balance, noise reduction, compression, etc. This gives you the opportunity to pull more detail and to better control adjustments yourself in Photoshop. You then can convert it to .jpg yourself. Drawback is it's a little more time-consuming, and produces larger files. Some computers may slow down working with Raw files. The .jpg format offers a shortcut for photographers in a hurry, but at the sacrifice of some image control. Photoshop offers advanced tools to process RAW images, but with CS5 and later most photographers do it in Bridge (see Photoshop tutorial 2b). Note: Camera companies have proprietory ways to save in RAW format, and so different Raw file extensions. You may need to download the software for Bridge to open your camera's version.
My recommendation to serious photographers: Always save in RAW, unless you plan to upload to the internet directly from your camera without adjusting the image in Photoshop. While RAW gives you more to work with, it also needs work. Right out of the digital box the quality of RAWs is not as good as the automatically improved .jpgs. And RAW files usually can't be uploaded directly to most internet sites. Note that most DSLRs offer a Raw+.jpg option, saving one photo in two formats. It does require quite a bit more space on your memory card.
(Many people with iPhones ask about Apple's new High Efficiency Image Format (HEIC). This format gives smaller files and, supposedly, at the same time higher quality than JPG. Photoshop converts them to JPG on opening.)
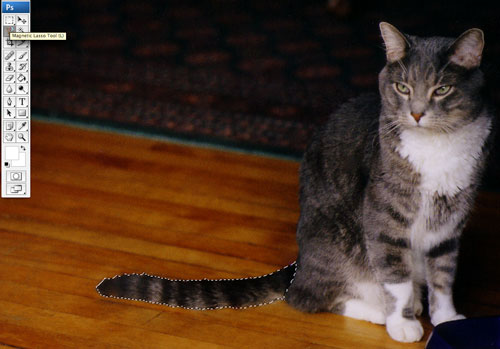
Much of the time you'll want to deal with parts of images, to make adjustments, move around, change color, add an effect, etc. To work with part of an image, you need to choose it first. That might be easy if, say, it's a square or rectangle. Just choose that with the Marquee Tool, upper left of toolbox. Drag around to select. Command + d keystroke cancels the selection.
 Add to your choice by dragging while holding down the Shift key.
Marqueeing an object works fine, as long as it's nice and square. Not likely. For irregular shapes, Photoshop offers a plethora (gotta love that word) of selection tools to help you with this sometimes challenging task.
Practice these tools for future projects. And now move to Exercise One, linked below. Submit, and choose Quit from the File menu to say Pharewell to Photoshop.
Exercise One to hand in for credit: photo resolution.