Learning ![]() Software (Version CS6 for Macintosh)
Software (Version CS6 for Macintosh)
A self-guided tutorial by Ross Collins, North Dakota State University.
Lesson Three: Selecting, cutting, cloning, sharpening, gaussian blur, image modes, content aware fill
 We're ready to take on some serious business using Photoshop: subtracting things you don't like from an image. Skin blemishes we've already covered: using the Healing Brush tool, simply click the blemish away! Available by prescription! (If only.) We'll put the Healing Brush to another good use here. And then we'll go further. Much further. Recall that photojournalists believe it unethical to remove objects from photos. And graphic artists? Depends, and I'm not opening a discussion on ethics here. I merely supply you with tools. It's your choice what to do with them. Just sayin'.
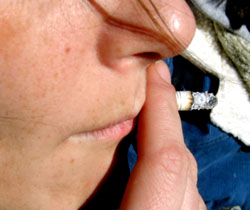
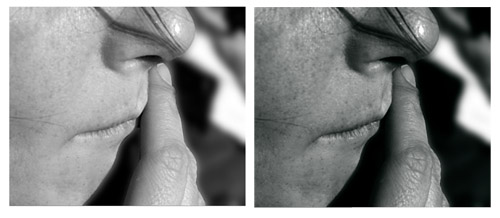
Save this photo to your desktop. A photojournalism student took this photo of an NDSU outdoor concert observer a few years ago. Today, of course, we don't allow smokers on campus! Do we? Well, Photoshop gives us an opportunity to change history. Here's what we'll do:
I. Remove cigarette.
1. Choose cigarette using a selection tool. (Review Selection tool overview from Photoshop Lesson One.) I used the Quick Selection tool: just drag over to select. If the selection needs slight tweaking, hold down the Option key to subtract. Adjust the brush size for more precise selection. Alternatively, try choosing the Lasso tool, hold down the Shift key to add or the Option key to subtract, and drag small circles around affected pixels. You may need to zoom in.
One more zoom alternative: hold down Command key, choose + to zoom in, or - to zoom out.
 2. When you've selected the cigarette, Choose Cut from the Edit pulldown (or Command + x keystroke combo). You're left with whatever Photoshop's background color is set to, defaulting to white.You could paste this cigarette somewhere else. (Onto your lesser-favorite comm professor's nose? Dont even think about it.) but, really, we want to ditch the smokes nowadays, so I'd just skip the paste.
3. Now the hardish part: clone the background into the white blob where the cigarette used to be.
4. Perfect the boundary between the face and the cloned area by running the Blur tool, Sharpen tool or Smudge tool on the edge.
The Clone tool does take a little practice, but it's well worth it (see illustration at right). Intricate patterns are more difficult, as you might imagine. We introduce an alternative below, Content Aware Fill.
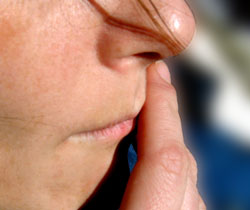 II. Remove freckles: while I don't think freckles are so bad, some people hate them. So to avoid offending anyone, let's just get rid of 'em.
1. Choose the Healing Brush or Spot Healing Brush tool.
2. Sample an area of skin by a freckle (Option-click). If using the Spot Healing brush, you don't have to sample, but the Healing Brush gives you more accuracy.
3. Click on freckles as necessary to remove (see right illustration). Note that you can also drag the Spot Healing Brush tool to clone away larger parts of the image.
Other clone tools: The Patch tool is an alternative to the Clone Stamp tool. Choose an area you want to delete, drag away with the Patch tool, and it will replace area with content-aware fill. Sometimes works, but I think the Content-Aware Fill under the Edit pulldown (see Quick Tip below) works better.
The new (to CS6) Content Aware Move tool gives you the option to choose parts of a scene, move to other parts, and see them automatically fill with background. Give it a try with this photo: move the water droplet up the leaf. Try dragging the Spot Healing Brush tool to mask obvious jagged edges around the move.
III. Blur background.
This background in the smoker photo is distracting. If the photographer had used a longer zoom, a larger aperture, or dimmer light, he or she could have blurred the background in camera, but no matter; we can take care of it now. (You also may wish to darken the distracting white area, see Lesson Two.)
1. Choose background area with Quick Selection or other tool. Don't forget the area between finger and chin.
2. Choose Blur, and Gaussian Blur from Filters pulldown.
3. Change the pixel radius to obtain the effect you want (see ilustration at right). After OKing, from the Edit pulldown choose Fade Gaussian Blur to get a more subtle effect. You can use this Fade option for many of these tools. (For an alternative to Guassian Blur, you can add "bokeh." Check out the quick tip below.)
4. Soften boundary between blur and face using Blur or Smudge tool. You may have to lighten the strength from the default 50%.
IV. Sharpen rest of image: The face is slightly fuzzy. You can snap it up fairly well, though, using the Sharpen filter.
1. Choose face area with appropriate tool. Or shortcut: if you still have the background area selected, from the Select pulldown, choose Inverse. Selects the opposite, which is just what we want.
2. Choose Filter, and Unsharp Mask.
3. Sharpen as necessary, based on instructions from Lesson Two.
Random history: Just who was Carl Friedrich Gauss? You ought to know, as he's the only Photoshop tool named after a person.
Content-Aware Fill
 Photoshop CS5 and above added a new feature to make easier the process of removing objects and filling in backgrounds. Instead of time-consuming work with a selection tool and clone tool, let Photoshop figure it all out for you! Try this:
 1. Choose generally the area you'd like to remove using the Lasso tool. It sometimes works better if you include a little background in your choice.
2. From the Edit pulldown, choose Fill. Select Content-Aware in the dialogue box, and OK.
3. Tah-dah! You may have to work a bit to get this right, adding to chosen areas to give the Content Aware option a hint on what you want the fill to be. But it's still faster than the old way for many images.
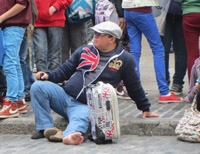
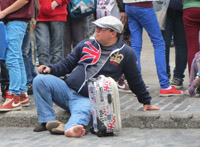
In the example photos (Covent Garden, London), I removed the purse on the right using Content-Aware fill. Nearly perfect and so easy! Or insidious--I think this tool works way too well....
More on Modes
Most of the time you'll be working in RGB mode, the default for images from scanners and digital cameras. This is the mode that gives you access to all Photoshop options. But sometimes you'll need something else. Described below are other options.
Grayscale (Choose Mode and Grayscale from the Image pulldown) gives you a black-and-white photo with shades of gray. If your photos will be published in black and white, this is how they'll end up. We noted black and white is much cheaper to print than color, so it's still a popular alternative. Note: If you prefer to make your original image black and white, this is not the best way to do it. In Photoshop choose Image, Adjustments, and Black & White. Tutorial 10 discusses how to do this in Bridge.
 Duotone adds a spot color to a black and white picture, with a toning effect. This is one good option to snap up black-and-white photos while still avoiding the cost of process color, see right. Making a duotone with a dark second color gives an impression of a deeper, richer black and white.
To make a duotone (or mono, or tri, or quad) you need to first Grayscale your photo. Then
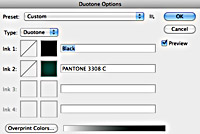 Note: Duotones must be saved as Photoshop or EPS files to use the spot colors. Otherwise they may default to CMYK.
CMYK is necessary for final adjustments before printing, as printers use these inks (Cyan-Magenta-Yellow-Black) to print full color photos. (Computers and televisions use the RGB, Red-Green-Blue, color generation process.) Graphic artists normally do all their work in the RGB mode, then convert to CMYK just before sending to a printer. Usually you need to ask the printer first for specifications she needs for the conversion.
 Seldom-used modes
Index color reduces the range of possible colors to 256 based on a Color Look-Up Table. This optimizes the image for faster web display, but is seldom an issue for graphic artists.
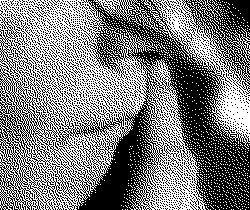
Bitmap (see illustration at right) reduces the image to only black or white (line art), so few of Photoshop tools can be applied (Choose Grayscale before Bitmap).
LAB color (Lightness, A channel, B channel) is significant to high-end printers, but not usually part of everyday printing.
Multichannel mode supports spot colors.
Exercise to submit for grading: two photos, an original, and one using cloning, healing brush, blur and sharpen as suitable.
Quick tip! Straightening a horizon line.