Learning ![]() Software (Version CS6 and CC 2020, and Bridge CC 2023)
Software (Version CS6 and CC 2020, and Bridge CC 2023)
A self-guided tutorial by Ross Collins, professor of communication, North Dakota State University
One word: Why?
The world of photography is awash in color, and has been for quite a few years. Digital imaging makes it easy to both photograph and display color photos. Desktop printers can produce high-quality color as easily as black and white--maybe even easier. We live in a colored world. Why choose something as antiquated as black and white, produced at a time when film-based color was either impossible, or at least somewhat difficult and expensive?
The answer the graphic artists will give you is technical: High-quality publications requiring large print runs are still produced using offset presses. It is much cheaper to print photographs as black-and-white halftones instead of color separations. We still see quite a few black-and-white photos in newspapers, for example. But newsprint (and paper generally) as a medium for media is clearly shrinking in popularity. Nowadays many people prefer to look at a screen on a computer or other device.
 Yet black-and-white photography still maintains a hold on the imaginations of not only many serious photographers, but many who love photographic images with a certain simple austerity that only black and white can provide. The routine black-and-white print for many of us who grew up in film days now has become something special, an art form. In fact, it is in art departments where you still see most film-based photography nowadays, and the power of black-and-white hasn't really diminished just because the great photos of the past usually lacked color.
You can still pick up a black-and-white film, shoot with a standard SLR, process and print in a darkroom. In a video tutorial, I show you how to do that. But digital imaging software has become so sophisticated that it's prefectly feasible to produce black-and-white of equivalent (or better) quality in your digital darkroom.
What works in black and white?
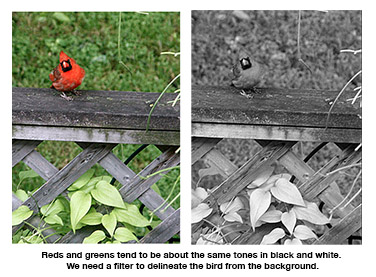
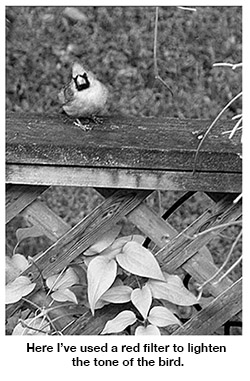
We consider, first, that black-and-white photography can offer us three visual tools: line, shape, and tone. The colors of our photos become tones, that is, shades of gray. The differences between these shades of gray define contrast, and that is a critical aspect of black and white, because dramatically different colors may exhibit nearly the same shades of gray. To delineate parts of an image, we can adjust shades of gray by controlling how the colors strike the camera sensor. In the old days (and sometimes still, actually) we controlled how colors appeared as shades of gray by using filters. These colored pieces of glass dramatically lightened or darkened certain tones, giving us tonal separation or delineation in our black-and-white print. For example, if we wanted to darken a sky that often became white or nearly white in B & W, we placed a yellow or red filter over our camera. Most film photographers had a kit of standard filters and knew what they would do--they had to, because there was no way to see the photo until you developed the film. If you made a mistake, you'd have to reshoot, sometimes impossible to do.
Today we still have to consider the equivalent of filters in digital imaging, but tools in Photoshop and Bridge make it both easier and more precise. Other digital tools help us to regain contrast. Contrast is the difference between gray tones. Too few gray tones between pure black and pure white produce a usually objectionable contrasty photo. Too many, often without any true blacks, produce a usually objectionable flat image. We look for a happy medium that will show off the photo in the way we want it to look.
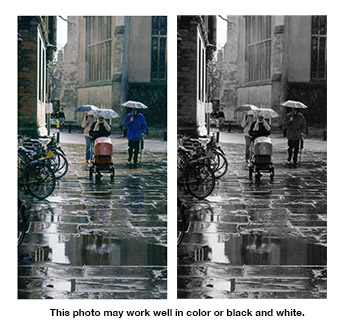
Many photographers, even advanced ones, have a hard time deciding what images will look good in black and white. Of course, if you are photographing landscapes in a North Dakota winter, black and white would be obvious because that's basically what the landscape looks like anyway. On the other hand, a sunset becomes pretty blah in black and white--the color defines the image. Some photo editors publish documentary photography in black and white, especially urban scenes, as it seems to better reflect the gritty mood of life of the streets. Perhaps, however, that's because we're just used to seeing documentary photography in black and white. It really does often come down to personal taste. My general rule is that if color does not add anything to the image I'll consider black and white. Conversely, if a splash of color somewhere in the background distracts, black and white often will make it less obtrusive. Try it. See what you like.
This suggests that you should begin all your images in color. Many DSLRs have black-and-white modes, but I don't see any reason why you would want to throw away the color information at the camera. It's hard to say when you're shooting whether the image will end up looking better in black and white. Why make that decision right away? Shoot everything in color, in Camera Raw, when feasible. This gives you the most digital information you can get, and unless you are cramped for storage in your camera or computer, why not keep it?
 Two basic techniques.
Back at the digital darkroom, you now can choose the option of turning your work into black and white. How? I've heard of probably a half dozen ways. Most people see the obvious one: Choose Mode from the Image pulldown, and Grayscale. That surely gives you a black and white image. But I think it usually gives you a pretty flat one, and what's more, you don't have any easy way to control total values of certain colors, as you could do with camera filters. Recent versions of Photoshop now give you a hint: when you choose grayscale it replies with a message saying, in effect, "Are you sure you don't want to go about this in another way?" The other way it recommends is Image, Adjustments, and Black & White. This offers you a set of sliders to control color tonal values, and an Auto option. That is a good way to go, and it's become more flexible..
Note I prefer to do this on a separate adjustment layer, instead of mucking about on the actual image: choose Layer, New Adjustment Layer, and Black & White.
Another way to gain more control over this process is to use good ol' Bridge and Camera Raw. It also is not "destructive," because you can always bring your image back up to revert to color. Here is a simple Camera Raw process I like to use:
1. Open your photo in Bridge using Camera Raw. (You can download this image for practice, or use one of your own.)
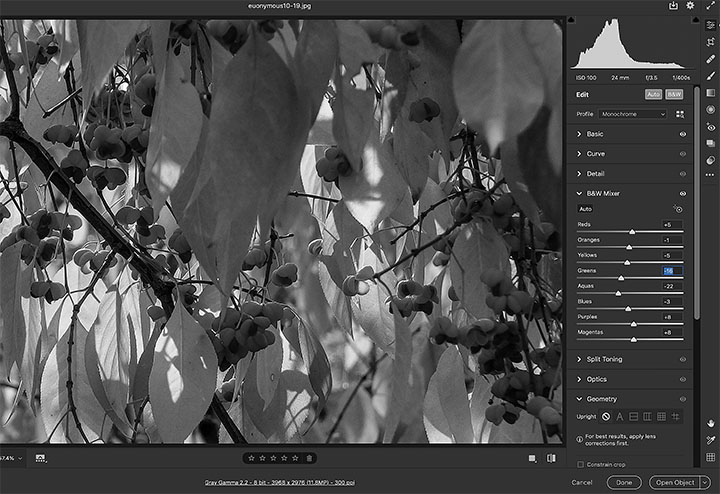
2. Choose the HSL/Grayscale icon from the menu at right (fourth icon from left). Update for Bridge CC 2022: The black-and-white toggle is under Edit at the top, and B&W at the right of Auto.
 3. Toggle on B&W.
4. Bridge will give you a basic black and white translation. You can choose to adjust tones for each color yourself by selecting the B&W Mixer and adjusting color sliders to your preference. Or you can choose Auto and see how smart the software is. (See Bridge sliders at right.) If you want more choices, under Profile: Monochrome choose Browse. OMG, who needs all these choices? In any case, try one you think best matches your ideal.
5. Open the image in Photoshop for more work, choose Done if you want to work on it later.
 Controlling tone and effects.
Camera Raw in Bridge gives you a variety of other options, some of them pretty sneaky. (I'll get to that later.) Control contrast, that is, delineation between tones, with the second option, Curve. Choose the Point tab, and either a medium or strong contrast preset, or click and drag points in the histogram for more precise contrast adjustments. Alternatively, choose Parametric tab, and the sliders to adjust.
If you're working in Photoshop instead of Camera Raw, control contrast from the Image pulldown, Adjustments, and Brightness/Contrast. (Also can be done from a separate adjustment layer.)
Often some areas of your black-and-white image will be too light or too dark. In the old days photographers "exposed for the shadows"; that is, they overexposed a little when taking the picture to add detail in shadow areas, even if that meant the highlights were slightly blown (too light or pure white). Under a darkroom enlarger it was usually easier to pull detail out of highlights than out of shadows. But digital photography has made it better to "expose for the highlights," that is, underexpose a little bit so that we can capture more detail in the highlight areas. In any case, if this sounds confusing, don't fret. Fix it later in Photoshop.
Bridge using Camera Raw used to have a slider called "Fill," which would add light to areas that were too dark, just as a fill flash might do. But CS6 and later no longer have that slider, to my consternation. In any case, now to lighten or darken parts of an image in Photoshop, one way is to use the Dodge and Burn tools, as we learned about in Tutorial Two. These are instinctive for older photographers, as that's the way it was done in the darkroom. But an alternative is to add a Curves New Adjustment Layer from the Layers pulldown. As noted earlier, adding an Adjustment Layer is a way to avoid changing the pixels of your photo; you don't like it, just throw away the layer. Steps:
1. In Photoshop select the area you want to lighten or darken.
2. Choose New Adjustment Layer, and Curves.
3. Click on the straight-line histogram and drag down to darken, or vice versa. Use the arrow keys for precise changes.
Here's the sneaky part. One of my old complaints about digital black and white was that it didn't look realistic: it didn't have the grain pattern of film-based black and white. Well, heh-heh, Bridge Camera Raw can even fake one of those for you. Choose Effects and slide the grain Amount to the right. Increase Size and Roughness, and pretty soon it looks like one of those old black-and-white Tri-X film photos I took of night football games, push processed to ISO 1600 in a super-strength dilution of HC110. (Never mind. You won't be doing this. Just humor us geezers.) Note that Vignetting will give you a white fluff on the edges of your photo. Old lenses sometimes would do this when stopped down. It was considered a flaw, and we tried to correct it in the darkroom. And now you can proudly present your flawed image? Sheesh.
Well, that was easy. Wait. There's more. (Isn't there always in Photoshop?) You may remember Photoshop Tutorial Three, in which we could chose to make duotones out of our images, that is, usually one color plus black. You can do something similar in a more controlled way using Bridge in Camera Raw. It used to be called Split Toning, but in CC 2022 it has been changed to Color Grading. But it does the same thing, just more options for the detail-obsessed:
1. Choose The fifth Camera Raw icon, Color Grading.
2. You'll see color wheels for highlight, midtone and shadow. Choose as desired, and use the Hue slider to select a color you wish to produce. Alternatively, you can choose points on the wheel or pull on the dot next to it to adjust.
3. Move the slider to reach the desired color.
4. Choose the Balance slider to adjust relative contrasting of highlights, midtones and shadows.
Other color/black-and-white combinations.
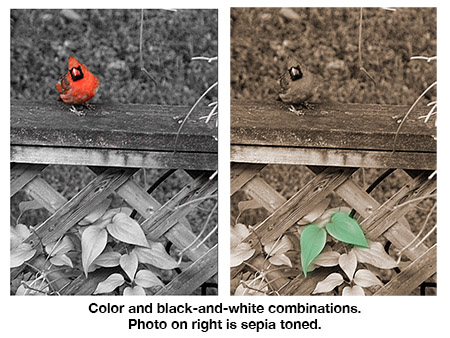 Black-and-white was the only kind of photo anyone could make for most of the first century of photography. But that doesnt mean people didn't see color photos. Hand-coloring photos goes just about all the way back to the beginning in 1839. Often if you pick up an old tintype at the flea market it will have a little color in it, perhaps a blush on the subject's cheeks. Today we can recreate this in Photoshop, an interesting technique that I guess gives us the best of both formats. Use one of your own photos, or download this one for practice.
Painting color.
One easy way to keep one color in a photo while turning the others to black and white is to make a conversion in Photoshop with a Hue/Saturation Adjustment Layer:
1. Open a color photo in Photoshop.
2. Choose New Adjustment Layer, and Hue/Saturation.
3. From the dialogue box, note first that with the Preset option you have a couple of ye olde style B & W toning possibilities, Sepia and Cyanotype. Adjust saturation as necessary. These try to match historic chemical processes from more than a century ago that gave us a blue-toned or warm-brown toned print.
4. Otherwise, Choose Default under Preset. From Master options leave the color of the slider you want unchanged. Choose other colors. Move the Saturation slider for each to the left, to -100, to drain away the color.
If this doesn't quite get you where you want to be, you can also choose to actually paint on a layer, just like those old tintype artists. Often this looks best if you first add a little toning to your black and white. Create a black-and-white photo with Adjustment layer and Black-and-white. Perhaps try adding a little sepia using the technique above. You can dial down saturation for a more subtle effect. Then:
1. Choose New Layer from the Layer pulldown. You'll be painting on that layer.
2. Choose the Brush tool, a foreground color, and dial down the opacity/flow so that the black and white photo shows through.
3. Paint as necessary. Use the eraser tool to fix mistakes.
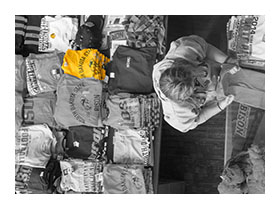
Erasing to color.
If you would like some color to show through on your black-and-white image, one method I like is to add a B & W adjustment layer, then erase part of it:
1.Open color photo. From the Layer pulldown, choose Duplicate Layer.
2. Working on the Background Copy layer, choose Image pulldown, Adjustments, and Black & White.
3. Choose the Eraser Tool. Erase those areas in which you want to retain the color.
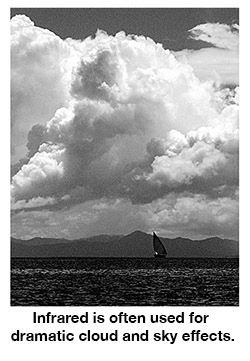 Infrared.
Infrared film captures only that part of the electromagnetic spectrum. In the past it was often used in landscape photography, to capture dramatic skies. That's because it darkens a blue sky to nearly black, making the clouds stand out, and also lightens green foliage. In film it also generally added grain to a black-and-white image.
We can recreate this effect so easily. In Photoshop Choose Adjustment Layer, Black & White, and in the Properties panel (where you found sepia), choose Infrared.
Assignment: Choose a photo for a black-and-white conversion. Add color to your black and white by painting or erasing as described above. Submit to Blackboard for grading.