A Guide to Plugging Abandoned Wells
(AE966, Revised August 2021)The publication provides details and examples on how to plug abandoned wells.
Contact your county NDSU Extension office to request a printed copy.
NDSU staff can order copies online (login required).
Introduction

Although an actual survey has not been conducted, North Dakota probably has approximately 100,000 abandoned wells.
Sand and gravel, native clay, commercial sodium bentonite and neat cement grout are the most common materials used for plugging wells. Use of one or more of these materials will plug many types of abandoned wells effectively.
How many abandoned wells does North Dakota have?
Farm numbers in North Dakota peaked at 85,000 in the 1930s. Today the state has about 32,000 farms. That means approximately 53,000 farmsteads have been abandoned during the last 70 years. Assuming that each of those farmsteads had at least one well, an extremely conservative estimate of abandoned wells in North Dakota would be 53,000. The total number in North Dakota is much higher if abandoned wells on active farmsteads and in towns are added. Although an actual survey has not been conducted, North Dakota probably has approximately 100,000 abandoned wells.
What are the hazards associated with abandoned wells?
SAFETY HAZARD – This hazard is obvious to anyone who has encountered an unmarked and uncovered large-diameter well. Accidents involving abandoned wells have occurred. The liability associated with abandoned wells has not really been tested in North Dakota. A good question for a landowner with an abandoned well to ask is, “Do I want to be the first legal test case?”
GROUNDWATER CONTAMINATION – An abandoned well is a direct conduit from the surface to the aquifer below. Contaminants that enter the well are introduced directly into the aquifer with no opportunity for natural filtration by soils or geologic materials. If a contamination incident occurs with a concentrated chemical, the potential for health-threatening levels in the surrounding aquifer is high. This puts other wells in the aquifer at risk, particularly those wells on the same farmstead that are close to the abandoned well. Just 1 gallon of 2,4-D herbicide can contaminate about 7,000,000 gallons of water. In terms of groundwater, approximately that much water would be held in the upper 3 feet of an aquifer in a 20-acre area.
COMINGLING OF GROUNDWATER – A well open to more than one aquifer will allow water from an aquifer with higher pressure head to enter an aquifer with lower pressure head. In many areas of North Dakota, deep aquifers under high pressures are extremely salty. In the early years of settlement, people utilized high-pressure aquifers to avoid pumping. In many cases, shallow aquifers with less salt were drilled through in the process of reaching the high-pressure aquifers. When the casing from a flowing well deteriorates and the well is abandoned without proper plugging, continual upward flow of salty water will cause contamination of the shallower fresh aquifer.
LOSS OF AQUIFER PRESSURE HEAD – Pressure head in artesian aquifers is depleted as water discharges either at land surface or to less pressurized aquifers. Unplugged abandoned wells contribute to the regional depletion of pressure head within an aquifer. Eventually the decline in pressure head causes flowing wells to stop flowing and the water level in nearby wells placed in the same aquifer to decline.
General well-plugging recommendations
Before the well-plugging procedure begins, decisions must be made regarding the level of health and safety protection desired. Well plugging will provide two levels of protection. Primary protection covers personal injury from falling or unintentional dumping of concentrated contaminants into an unplugged well. Filling an abandoned well with any of the materials listed above effectively will provide the landowner with primary protection. However, techniques that avoid subsequent
settling or slumping must be used. This generally can be accomplished with little financial input other than the landowner’s time.
Secondary protection covers future health problems that may occur due to accidental spillage over the abandoned well site and percolation of contaminants through the fill materials into the aquifer. Justification for this type of protection will depend on the location of the abandoned well site in relation to possible contaminants.
Secondary protection is accomplished by filling all or part of the well with materials that are impermeable to water flow. A layer of impermeable material, such as bentonite, may be combined with a permeable layer, such as sand and gravel, for secondary protection. The degree of secondary protection from contamination depends on the thickness of the bentonite layer.
Watertable fluctuations play an important role in determining whether a bentonite layer will be an effective deterrent to aquifer contamination. If the watertable rises above the bentonite plug, the deterrent is lost. Therefore, if bentonite is used to prevent secondary contamination, it must be thick enough to account for the normal fluctuations of the watertable. Under most conditions in North Dakota, a 10-foot plug should be adequate.
Native clay is not as impermeable as a layer of hydrated bentonite, but it does slow the movement of water significantly, compared with sand and gravel. A 15-foot layer of native clay provides secondary protection from contamination.
Neat cement grout that has hardened provides a nearly impermeable layer. Capping more permeable materials with three feet of neat cement grout is an alternative that provides secondary protection. An advantage of neat cement grout is its relative stability, compared with other materials. Disadvantages include the need to adhere strictly to mixing and grouting techniques.
Compared with 10 feet of bentonite or three feet of neat cement grout in a large-diameter well, 15 feet of native clay is the most economical option. Under some circumstances, the landowner may desire more than one form of secondary protection, such as a 10-foot bentonite layer capped with 15 feet of native clay. The landowner always should weigh the benefits of different types of secondary protection against their cost. The landowner considering well plugging also should keep in mind that primary protection is the most important benefit gained.
Well-plugging steps
The list of well-plugging equipment and tools in Appendix I should be reviewed. Making sure that the proper equipment and materials are on hand will make the job much easier, quicker and effective.
Step 1. Measure the dimensions of the well.
Measurements must be taken of the well diameter, depth and water level. Accurate measurements (not estimates) will allow the correct calculation of the total well volume and the volume of water in the well. This information is needed to determine the amount of materials needed for plugging. Remember that volume calculations depend on the shape of the well. Most wells are cylindrical; however, some have other shapes that must be considered for accurate calculation of volume. Refer to Appendix II, Area Formulas, and Appendix III, Table of Volumes.
Step 2. Remove all obstructing materials from the well.
Making sure that fill materials do not slump or settle is critical; therefore, obstructions that may cause incomplete filling of the voids must be removed. Remove the pump, rods, pipes and any other equipment from the well. Floating debris, such as wood staves, also should be removed. One method used to accomplish debris removal is flushing. If water is pumped into the well, floating debris will move to the top as the well fills with water. Flushing may not be possible with larger diameter wells due to the volume of water required. In any event, as much debris as possible must be removed from the well before plugging.
Step 3. Disinfect the well by adding household bleach.
All wells containing standing water must be disinfected to kill existing microorganisms. This can be accomplished by adding chlorine bleach at the rate of 1 gallon of bleach for every 500 gallons of water and is equivalent to a “shock” chlorination concentration of 100 parts per million of chlorine. The chlorination process ensures that disease-causing microorganisms are not sealed in the aquifer.
Step 4. Fill the well with plugging materials.
Plugging always starts from the bottom of the well. The exact procedure for plugging will depend on well construction, depth, diameter, aquifer type, availability of materials and the level of protection required.
Step 5. Remove the upper 3 feet of the well casing.
This step never should be done before the fill material is within 3 feet of the surface. Upper casing removal is particularly important if the abandoned well site is farmed. Removing the upper 3 feet of casing eliminates potential damage to tillage equipment.
Step 6. Fill the final 3 feet with topsoil and mound.
Shaping the site is necessary to prevent ponding of water over the plugged well. Topsoil should be packed into the well and mounded up to 1½ feet over the site. Mounding will help direct surface water away from the site and also will help absorb any settling of fill materials.
Large-diameter wells (10 inches or greater in diameter)
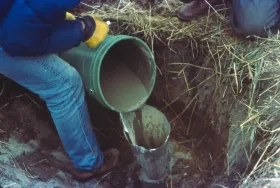
Abandoned wells with diameters of 10 inches or greater usually are plugged with a combination of materials, such as sand gravel and native clay. These materials always should be shoveled into the well, as opposed to being dumped rapidly in large quantities.
For both primary and secondary protection, most large-diameter wells can be plugged effectively by filling with a combination of sand and gravel, native clay and topsoil (Figure 1A in Appendix IV). A mixture of sand and gravel is shoveled into the well up to a depth of 15 feet below the surface. Native clay then is shoveled and tamped into the well up to 3 feet below the surface. Tamping often is started with a 16-foot 2-by-4 and finished with an 8-foot length. If more than 2 or 3 feet of standing water remains on top of the sand and gravel, it should be pumped from the well prior to the addition of native clay.
If the water is not removed, the addition of native clay creates a muddy slurry that cannot be tamped.
Warning: Adding materials such as sand and gravel or native clay at excessively rapid rates will cause bridging of the materials and inadequate plugging. Dumping directly into the well from a loader bucket or dump-truck box is not acceptable.
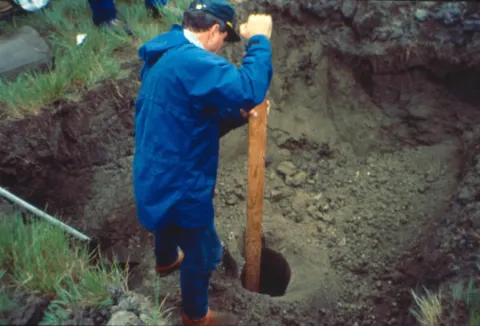
Tamping native clay as it is shoveled into the well is an important step to ensure that all voids are filled and minimal settling will occur.
If additional secondary protection is desired for a large-diameter well, the most common combination of materials is a mixture of sand and gravel, bentonite, native clay and topsoil (Figure 2A in Appendix IV). A mixture of sand and gravel is shoveled into the well up to a point 5 feet below the measured water table. Ten feet of bentonite chips is poured into the well on top of the sand and gravel. Placing the bentonite near the watertable so that it remains wetted and expanded is critical. Dry bentonite does not provide secondary protection from contamination. If the top of the bentonite is within 15 feet of the surface, then native clay is shoveled and tamped on top of the bentonite up to 3 feet below the surface. However, if the top of the bentonite is not within 15 feet of the surface, sand and gravel must be added until the 15-foot depth is reached.
A less common well-plugging method that provides both primary and secondary protection involves placing a 3-foot layer of neat cement grout on top of the sand and gravel. The neat cement layer is placed 3 to 6 feet below the surface.
Small-diameter wells (less than 10 inches in diameter)
Fewer options are available for filling small-diameter wells because sand and gravel and native clay tend to bridge in a small-diameter casing and leave unfilled spaces. Both primary and secondary protection is provided by filling small-diameter wells with medium (¼-inch) to coarse (¾-inch) bentonite chips (Figure 3A in Appendix IV). Both medium and coarse chips are recommended for well diameters from 4 to 10 inches in size. Only medium chips are recommended for well diameters less than 4 inches.
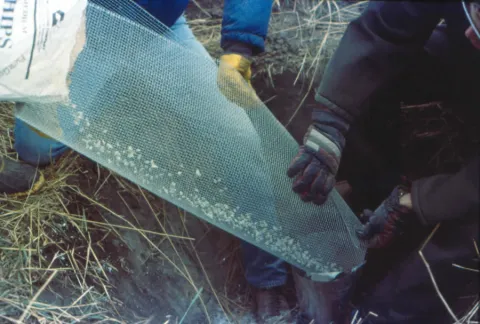
When pouring bentonite chips into small-diameter wells, the chips should be poured over a ¼-inch screen to allow the fines to drop out before the bentonite reaches the well opening. The rate of pouring should be no greater than one 50-pound bag every three minutes. Following this technique will eliminate bentonite bridging over unfilled voids. The bentonite always should be poured into standing water. If insufficient water is in the well, water should be added at appropriate intervals during the filling process. No more than 2 or 3 feet of dry bentonite chips ever should be in the well during the filling process. Wetting dry bentonite after the entire well has been filled is not recommended.
Fill the well with bentonite chips to a depth of 6 feet below the surface. Three feet of neat cement grout then should be added above the bentonite. The plug of neat cement grout over the bentonite will ensure that the bentonite will not dry out and lose its seal.
Most small-diameter wells that have been plugged in North Dakota using bentonite chips have had diameters from 4 to 10 inches and were less than 250 feet deep. Although this technique is untested for wells of diameters less than 4 inches or greater than 250 feet deep, it appears that it should work for some of these wells. The smaller the diameter of the well or the deeper the well, the greater the chance for bridging and inadequate filling of the entire well. Therefore, if plugging wells of diameters less than 4 inches or greater than 250 feet deep with bentonite chips is attempted, making sure the chips are screened and poured very slowly is extremely critical. If the situation dictates that complete filling of the voids is absolutely necessary, experts recommend that bentonite chips not be used. Instead, a certified professional water well contractor should be employed to fill the well using a grouting method.
Grouting
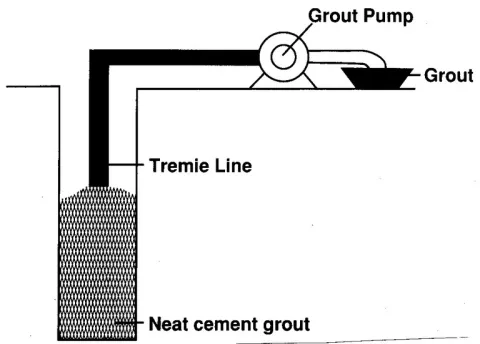
Plugging wells with neat cement grout is always an effective option for primary and secondary protection no matter what the size of the well. However, it is rarely the most economical method. Proper plugging of the entire well with neat cement grout requires specialized equipment (Figure 1) and trained professional help. The grout is pumped down the well through a tremie line or grout pipe.
Well pits
If the abandoned well is in a pit, proceed with the appropriate plugging process described above. To properly abandon the pit after the well is sealed, knock in at least one wall and then fill the pit with compacted native clay, followed by topsoil.
Sand point wells
If the well casing can be pulled, the hole should fill naturally with native material, and no further work is required. However, if the casing cannot be pulled, a certified professional water well contractor’s services will be required to grout the well properly. After grouting is complete, the casing should be cut off 3 feet below the surface.
Well-plugging records
Make and keep a record of any plugged well. You may want to recall something about the procedure at a later date. Exact recollection of the site may be useful to avoid interference with future building construction. The record should include: well location, well depth, well diameter, static water level, date work performed, personnel on hand, equipment removed from the well, plugging procedure used, type of material used, volumes of material used and the method of placement.
Consider all your alternatives before plugging
The well-plugging recommendations in this publication are based on field experience with abandoned wells throughout North Dakota during four years. The suggestions for materials and methods are not standards or requirements. North Dakota regulations governing the plugging of most abandoned wells have been interpreted very broadly and allow considerable flexibility regarding plugging techniques and materials.
As with many environmental issues, no consensus has been reached on the level of benefits for certain types of protection or the techniques to attain that protection. Except for those special cases where state agencies have jurisdiction, decisions regarding abandoned well plugging rest with the landowner.
Some of the techniques presented have been adopted or may be adopted by other agencies that do set standards. Further, some of the recommendations made in this document may not agree with standards set by other agencies. Presently, adherence to strict well-plugging standards established by other agencies is not required unless cost-share funds are involved. The landowner must consider that participating in cost-share programs means some of the flexibility to choose alternative well-plugging methods and materials will be forfeited. A much stricter adherence to standards for secondary contamination prevention likely is to be required.
The recommendations made in this publication place the greatest importance on primary protection and practical field methods to accomplish that goal. The task of plugging a significant percentage of the existing abandoned wells in North Dakota is huge. We hope the information and recommendations in this publication will help landowners recognize the problem and implement solutions. A measurable reduction in the number of abandoned wells cannot occur without active public support.
APPENDIX IV. Well-plugging Examples
Two examples of abandoned wells that are representative of large- and small-diameter wells found in North Dakota are shown. The well-plugging methods also represent commonly used techniques that would be effective for these types of wells. These are not the only recommended methods to plug these types of wells, but likely are to be the methods most often selected. These examples are intended to provide the reader with a guide to the general thought process that occurs prior to and during abandoned well plugging.
Example: Large-diameter well-plugging (Figure 1A)
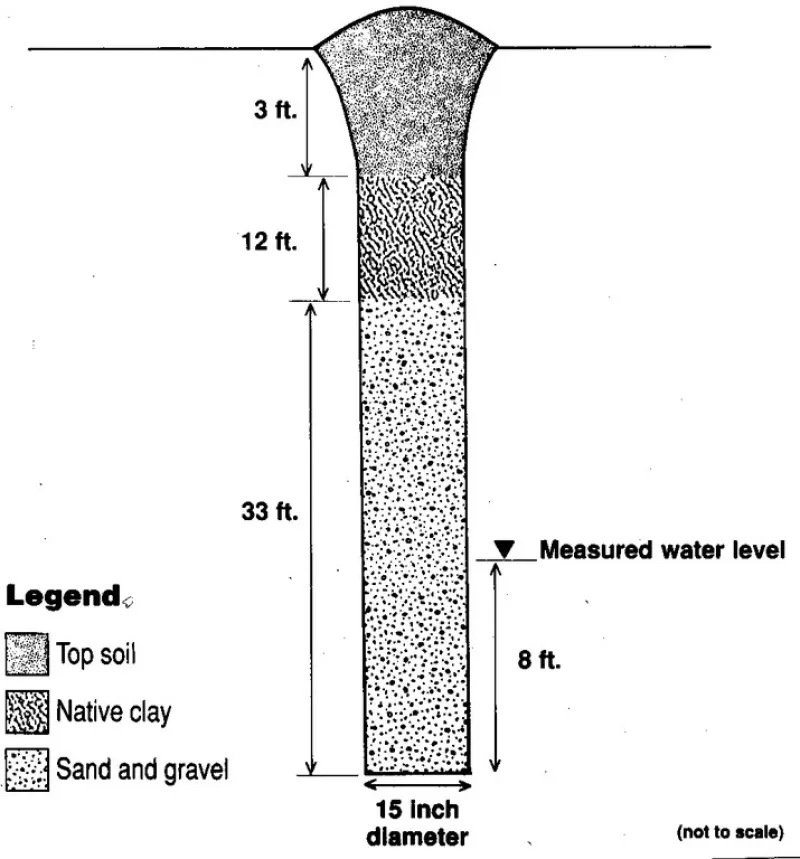
Well Dimensions
15 inch diameter
48 feet deep
40 feet to the water table
Volume calculations
π r2 = area of a circle
π = 3.14
r = radius of the circle
r = ½ d = 0.5 X d
d = diameter of the circle
r = 0.5 X 15 in = 7.5 in
radius in ft = r X (1 ft/12 in)
7.5 in X 1 ft/12 in = 0.62 ft
3.14 X (0.62) X (0.62) ft = 1.2 ft2
The volume in cubic feet (ft3) now can be calculated for a given length of well casing by multiplying by the area or 1.2 ft2.
Calculations for chlorine
Depth of well – Depth to water table = Depth of water
48 ft – 40 ft = 8 ft of water
8 ft X 1.2 ft2 = 9.6 ft3 of water
1 ft3 = 7.5 gal
9.6 ft3 X 7.5 gal = 72 gal water
Need 1 gal of chlorine for 500 gal water
therefore
72/500 = 0.14 gal chlorine to disinfect well.
Calculations for sand and gravel
Depth of well – 15 feet = Thickness of sand and gravel
48 ft – 15 ft = 33 ft of sand and gravel
33 ft X 1.2 ft2 = 39.6 ft3
27 ft3 = 1 cubic yard (yd3)
therefore
39.6 ft3/27 ft3 = 1.5 yd3 of sand and gravel needed
Calculations for native clay
15 feet – 3 feet for topsoil = 12 feet of native clay
12 ft X 1.2 ft2 = 14.4 ft3 of native clay
27 ft3 = 1 cubic yard (yd3)
therefore
14.4 ft3/27 ft3 = 0.5 yd3 of native clay needed
Example: Large-diameter well alternative (Figure 2A)
(includes a 10-foot bentonite plug for additional secondary protection from contamination)

Calculations for bentonite chips
10 ft X 1.2 ft2 = 12 ft3 of bentonite needed
50 lb bag of bentonite chips = 0.7 ft3
therefore
12 ft3/0.7 ft3 = 17.1 bags of chipped bentonite
Calculations for water required to wet bentonite chips
4 gal of water is required to hydrate one 50 lb bag of bentonite chips 17 bags of bentonite chips are needed
therefore
4 gals X 17 = 68 gals needed
Assume 40% porosity and 60% solids for sand and gravel
therefore
3 ft X 0.6 = 1.8 ft of water displaced by sand and gravel
First layer of sand and gravel ends 5 ft below the measured water table
therefore
displaced water + 5 ft = total water available in well for bentonite wetting
1.8 ft + 5 ft = 6.8 ft of water
6.8 ft X 1.2 ft2 = 8.2 ft3 of water
1 ft3 = 7.5 gal
therefore
8.2 X 7.5 gal = 62 gal of water available
Water needed – water available = additional water required
68 gal – 62 gal = 4 gal of additional water is required
Sand and gravel recalculation
12 ft3 of bentonite will replace the same amount of sand and gravel used in the first alternative (Figure 1A)
12 ft3/27 ft3 = 0.4 yd3 less sand and gravel needed
therefore
Original sand and gravel calculation – 0.4 yd3 = sand and gravel needed
1.5 yd3 - 0.4 yd3 = 1.1 yd3 sand and gravel needed
Example: Small-diameter well-plugging (Figure 3A)
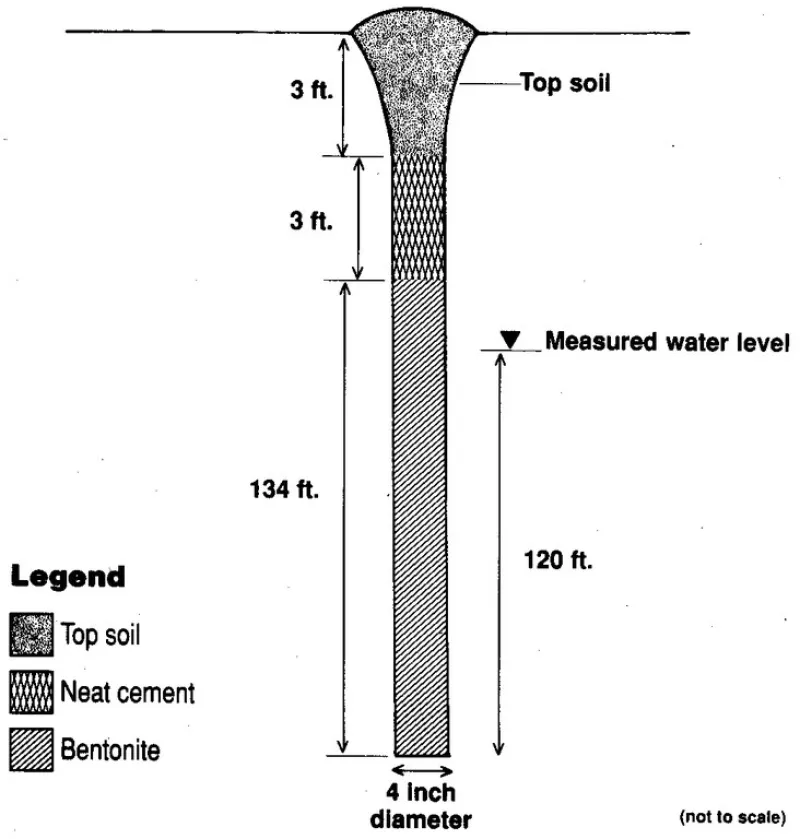
Well dimensions
4 inch diameter
140 feet in depth
20 feet to the water table
Volume calculations
π r2 = area of a circle
π = 3.14
r = radius in ft = .17
3.14 X (.17) X (.17) = 0.09 ft2
The volume in cubic feet (ft3) now can be calculated for a given length of well casing by multiplying the area or 0.09 ft2.
Calculations for chlorine
Depth of well – Depth to water table = Depth of water
140 ft – 20 ft = 120 ft of water
120 ft X 0.09 ft2 = 10.8 ft3 of water
1 ft3 = 7.5 gal
10.8 ft3 X 7.5 gal = 81 gal water
Need 1 gal chlorine for 500 gal water
therefore
81/500 = 0.16 gal chlorine needed to disinfect well
Calculations for bentonite chips
134 ft X 0.09 ft2 = 12.1 ft3 of bentonite needed
50 lb bag of bentonite chips = 0.7 ft3
therefore
12.1 ft3/0.7 ft3 = 17.3 bags of chipped bentonite
Calculations for water required to wet bentonite chips
4 gal of water is required to hydrate one 50 lb bag of bentonite chips
17 bags of bentonite chips are needed
therefore
4 gals X 17 = 68 gals needed
Water needed – water available = additional water required
68 gal – 81 gal = 0 gal of additional water is required
Calculations for neat cement
3 ft X 0.09 ft2 = 0.27 ft3 of neat cement needed
94 lb bag Portland cement = 1 ft3 neat cement grout
therefore
0.27 ft3/1 ft3 = 0.27 bags of Portland cement needed
Calculations for water required to make neat cement
94 lb bag of Portland cement requires 6 gals of water
therefore
0.27 X 6 gals = 1.6 gals of water needed for neat cement