Tables, Figures, Schemes, etc.

Tables, figures, schemes, and other non-text items should be integrated into the text of your disquisition rather than grouped at the end of a chapter. All non-text items should be inserted at the first natural break point (between paragraphs or at the top or bottom of the page) after the first in-text reference; ideally, a non-text item should appear on the same page with its first in-text reference, but this is frequently not possible. All tables, figures, schemes, and other non-text items must have a label, number, and title, must fit within the page margins, and must have consistent styling across all occurrences of that type of item in the disquisition.

Our guidelines outline the general requirements for non-text items in your disquisition. Beyond these general requirements, we strongly recommend that non-text items in your disquisition follow the requirements of the style manual of your discipline (with respect to titles, borders, alignment, and so forth). For example, if your citations are formatted in APA style, then your table and figure titles and notes should also follow APA style. For more information about how to format tables, figures, schemes, and non-text items, refer to the style manual for your discipline.

Guidelines: Tables, Figures, Schemes, Etc.

  • Location - When you insert a table, figure, or non-text item into the text, try to do so as close to the first in-text reference as possible, and at a natural break on the page (at the top or bottom of a page, between pages, or between paragraphs). In other words, as much as possible, body paragraph text should not be interrupted by an item. If a non-text item cannot fit on the same page where it is mentioned, then move it to the next page.
  • Splitting items - If a table or figure can feasibly fit onto a single page (including its title and any notes), it should not be broken across two pages (some white space at the bottom of a page is acceptable to allow for this).
  • Multi-page items - Sometimes a non-text item simply cannot fit on a single page. When a table must extend for multiple pages, the header row of the table should appear at the top of the table on all subsequent pages and the title should appear on all pages of the item. On the subsequent pages, add the phrase “(continued)” to the end of the first sentence of the title. Figures should fit onto a single page; if it is necessary to fit the image on a page, the caption may extend onto a subsequent page--add the phrase “(continued)” to the end of the first sentence of the title on the subsequent page.
  • Portrait vs landscape orientation Tables, figures, and non-text items should appear in portrait orientation unless they are too large to fit within the required margins; then they can be converted to landscape orientation. However, the page numbers for such landscape items must appear in portrait orientation (on the landscape page, page numbers should appear in the left margin, centered vertically, and rotated 90 degrees). For an example of a landscaped figure, see Figure 3.
    • Note: If a table or figure appears in landscape orientation, only that table or figure (and its title/notes) may appear on the landscape-oriented page. Headings or paragraph text should not appear on a landscape page.
  • Numbering – All tables, figures, schemes, and non-text items must be labeled and numbered sequentially based on the type of item (such as “Table 1” and “Figure 1”). For example, you can have a “Table 1” and a “Figure 1”, but you cannot have two tables named “Table 1”.
    • There are two numbering scheme options. You can number the items sequentially according to the chapter in which they appear (such as 1.1, 1.2, 1.3, 2.1, 2.2, 2.3, and so on). Alternatively, you can number the items in the order that they appear, regardless of chapter or section (such as 1, 2, 3, 4, 5, and so on). Whichever option is chosen, it should be used in all item types (i.e., a disquisition should not contain both a Table 1 and a Figure 1.1).
  • Titles – All tables, figures, schemes, and non-text items must have a label, number, and title (such as “Figure 1. Diagram of scientific method”) and must be included in the appropriate lists in the prefatory material. See the section on lists for how to format item titles within the appropriate list.
    • Long titles – When the title for a table, figure, scheme, or other non-text item is longer than one line, set it to be single spaced.
  • Font The font used in item titles must be same type as the rest of your disquisition.
    • The titles of tables, figures, schemes, etc. should use the same font as your paragraph text.
    • Within tables, the font should be the same as your paragraph text. The size can be reduced, if necessary, to fit the table onto a single page. Text within tables should be easily readable at 100% zoom/print size, and may be no smaller than 4 pts less than the paragraph font.
    • Within images, such as figures or schemes, the font may be different from the rest of your disquisition, though we recommend using the same typeface and size as the paragraph font. Text within images should be easily readable at 100% zoom/print size, and may be no smaller than 4 pts less than the paragraph font.
  • Formatting of item titles – The titles of tables and figures should follow the formatting rules for the style of your discipline. This includes capitalization (title case or sentence case), special formatting (like bold or italics), punctuation (after the item number and in the rest of the title), and location relative to the item being described (above or below). Note that the formatting must be consistent for all items of the same type throughout the disquisition. Refer to the style manual of your discipline for more information about how to format the titles of tables, figures, schemes, etc.
  • Alt-text– If your document contains images (such as figures, schemes, etc.), every image must have alt-text. Automatically generated alt-text is not sufficient to meet this requirement.
  • Margins – Tables, figures, schemes, and non-text items must fit in the required 1 inch margins. Non-text items that are too wide to fit in the margins of the page in portrait orientation can be placed on their own page in landscape orientation. However, the page numbers must still appear in portrait orientation. (This requirement ensures that when your disquisition is printed, all the page numbers will appear consistently and correctly.)
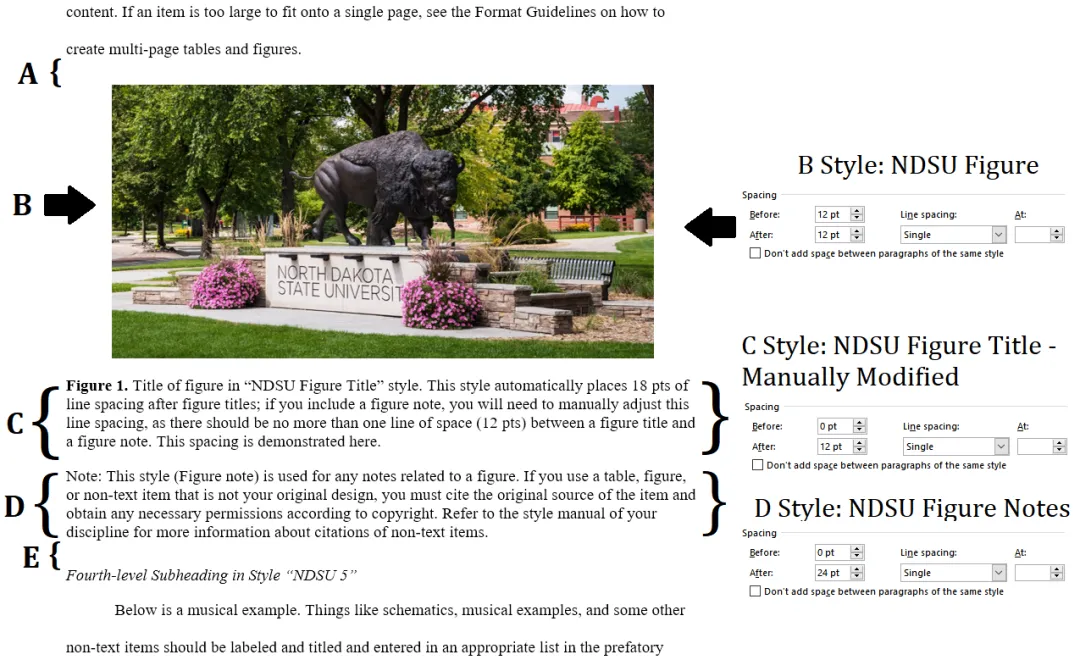
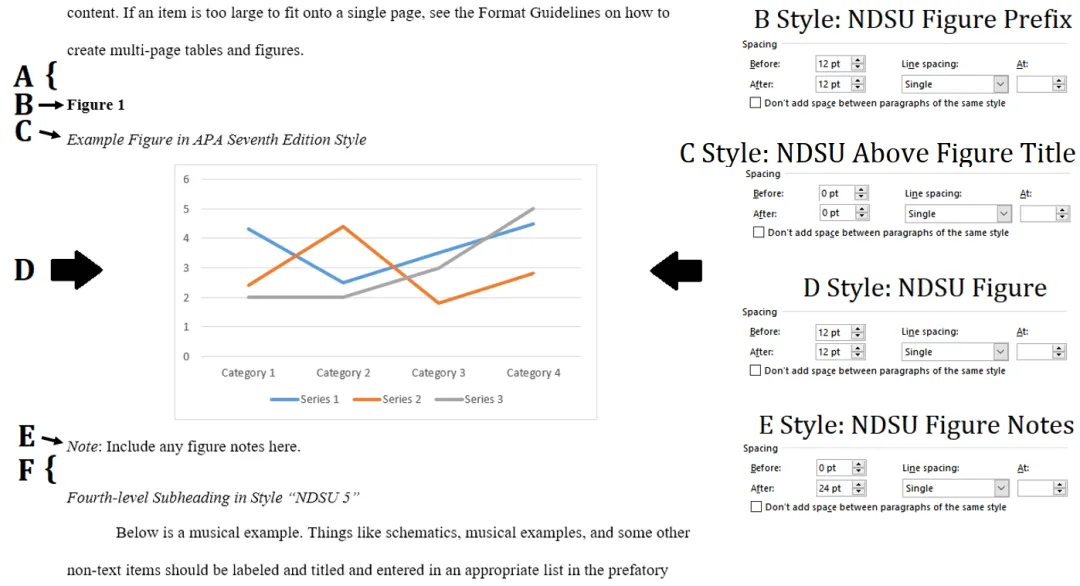
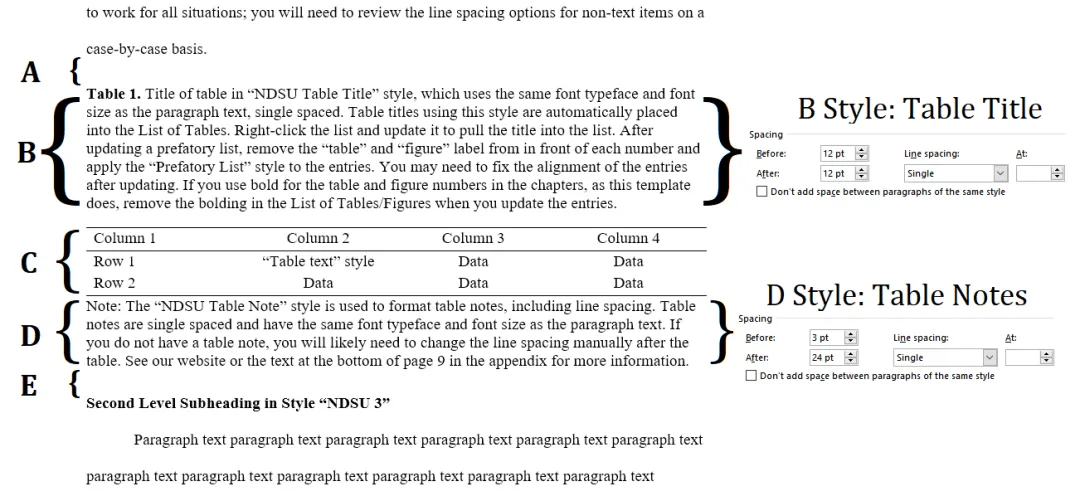
  • Spacing – The line spacing before and after non-text items like tables, figures, schemes, and other non-text elements should be consistent and minimal throughout the document. These items should be clearly distinguishable from the paragraph text.
  • Citations – Academic honesty is essential in all disquisitions. If you use a table, figure, or non-text item that is not your original design, you must cite the original source of the item, and ensure the appropriate copyright permissions to use the item have been obtained (if necessary). You may use an in-text citation in the text of the title or caption of the item, or you may include the citation as a footnote under the item. Refer to the style manual of your discipline for more information about citations of non-text items.
    • If you have adapted the design of a figure or non-text item from another source’s original design, then you must include the citation of the original source in the title or caption of the image and ensure the appropriate permissions to use the item have been obtained (if necessary). You must also state that your figure or image has been adapted from the original source.

Requirements:

  1. Table headers and data cells are appropriately tagged. (WCAG 4.1.1)
  2. Table scope is set correctly for rows, columns, and headers. (WCAG 1.3.1)
  3. Text within tables should be in the same font as the paragraph text.
    1. If an table must be scaled to fit onto a page, the text cannot be made smaller than Times New Roman size 8, even if your paragraph text is in a different font.

Resolution:

Tables in your disquisition should have headers, those headers should correspond to one or more rows or columns of content, and the headers should be tagged <TH>. Creating a header is more than just putting text into the first cell in a column or row--in Word, you need to set headers in the table's properties. The relationship between a header and its columns or rows is called its scope--"how much of this table is covered by this header?" If you have complex tables, where headers may span multiple columns, or if you use nested headers, the scope of those headers may not translate into your PDF and you will need to edit the table's scope in a PDF editor.

Issues with table headers and scope will most commonly show up in the PDF Accessibility Checker under section 1.3.1. After running PAC on your document, use the guide and videos below to remediate your document. Issues with tags are most often a symptom of a larger problem and do not have a common root.

Tutorials:

  1. Video: Table Tags
  2. Video: Table Scope
  3. Text: Setting Table Headers

Requirements:

  1. Images, such as figures or schemes, have alternative text that describes its purpose/function.
  2. Captions describe the purpose/function of associated images/objects.
  3. Descriptive text conveys the purpose and/or function of images/objects.
  4. Text within images should be at least as large as the paragraph text; if an image must be scaled to fit on the page, the text should not be smaller than 4 pts smaller than your paragraph text (or Times New Roman size 8, whichever is larger).
    1. This requirement can be waived if: 1) the text is not essential to understanding the information in the image, and 2) the text suffers little to no loss of quality when zoomed to an effective print size.

Resolution:

  1. Add alt-text to the tags of all images in a PDF editor. In Word, alt-text can be added by opening an image's context menu (right-click) and selecting Edit Alt Text.
  2. Write purposeful captions and descriptive body text for images.
  3. Use lossless scaling or high-resolution images (e.g., SVG) to avoid pixelation. Optimize for image quality when exporting to PDF from Word.
    1. We recommend scaling images to fit margin-to-margin where possible. Wide-aspect images should be placed on landscape pages.

We recommend making text in images at least as large as the text in your body paragraphs, but images frequently contain smaller-than-normal text in order to fit onto a page. If you must reduce the size of an image to fit it onto a page, the text in that image must still meet the minimum size for all text in your document, which is no less than 4 pts smaller than the paragraph text. Therefore, be mindful of how the image will fit onto a page when creating it, and whether the text within that image will still meet these requirements.

If an image with text is smaller than the width of the page, we generally recommend scaling it to fit margin-to-margin unless doing so would cause other issues. If an image is wider than it is tall, consider placing the image on a landscape page instead. If a figure is composed of subfigures, consider breaking the subfigures out into individual figures that could be scaled larger.

See our knowledge base entry on digital accessibility for additional requirements on the minimum contrast of text within images.

Tutorials:

  1. Video: Adding Alt-Text in a PDF
  2. Text: Add Alt-text to Images in Word

Quick Answers

Yes. If you are reproducing content that is not from a government source, it is almost certainly copyrighted. You can reproduce copyrighted material in your document by acquiring permission to reproduce that content from the copyright holder. For journal articles or books, this is commonly an automated process.

See our policies page entry on copyright for more information.

Tables longer than one page can continue across multiple pages, whereas figures must fit onto a single page. See guidelines, above, and the respective issue entries further on this page for more information on how to format multipage tables and figures.

Tables, figures, or other non-text items should be placed as close to their first in-text reference as possible (but not before) and at a natural break on the page; natural breaks are the top or bottom of a page, between pages, or between paragraphs. As such, non-text items should not immediately follow after a heading, as the item would not have been referenced yet.

If you refer to an appendix item within the chapters, you need not (and should not) reproduce that item in both the chapters and the appendix--simply include the reference to the appendix item.

Issue: Line Spacing

Requirements:

  • There should be no less than one and no more than two (12-24 pts) lines of space before or after a non-text item, including its title or notes, to help separate it from the surrounding content.
  • The amount of space before and after an item should be equal, and it should be consistent for all non-text items in your document.
  • There should be between 0-1 lines of space between the title and/or notes of an item and the item itself.

  • Crop images to remove extraneous whitespace.
  • Apply an appropriate style to each part of an item--the title, notes, and item itself. If you document does not have our styles, copy them into your document from one of our templates, then edit the style settings to suit if necessary.

Our template styles default to 24 pts of line spacing before and after non-text items (including their title or notes), and these styles may require adjustment to suit the style manual of your discipline. Do not include line spacing between non-text items and the top or bottom page margins; see the DQKB entry below for settings to automatically suppress line spacing at the edge of pages.

Line spacing issues are easily resolved by cropping out extraneous whitespace from figures and using consistent style settings. Crop an image by right-clicking it, selecting Crop from the pop-up tool, and then dragging the black edge markers to remove extraneous whitespace around the image. The Crop tool is also available in the Picture Format tab. This doesn't need to be a pixel-perfect operation--simply remove the bulk of any dead whitespace around your images.

Line spacing is a more complex issue that relies on different components of your document to work together; therefore, the default line spacing settings in our templates, shown in the images below, cannot be taken as "one-size-fits-all" and may require some modification to fit the style manual of your discipline. For example, if you use figure titles above your figures rather below, if you have tables on landscaped pages, or if you have notes included with your non-text items, you will need to make adjustments to the template default line spacing.

Issue: Content Does Not Begin Flush with Top Page Margin

Requirements:

  • All content in the disquisition should begin flush with the top 1” page margin.
  • Remove extraneous line breaks and carriage returns.
  • Enable page break before in the paragraph settings for headings or other content that must appear at the top of a new page, such as major headings.
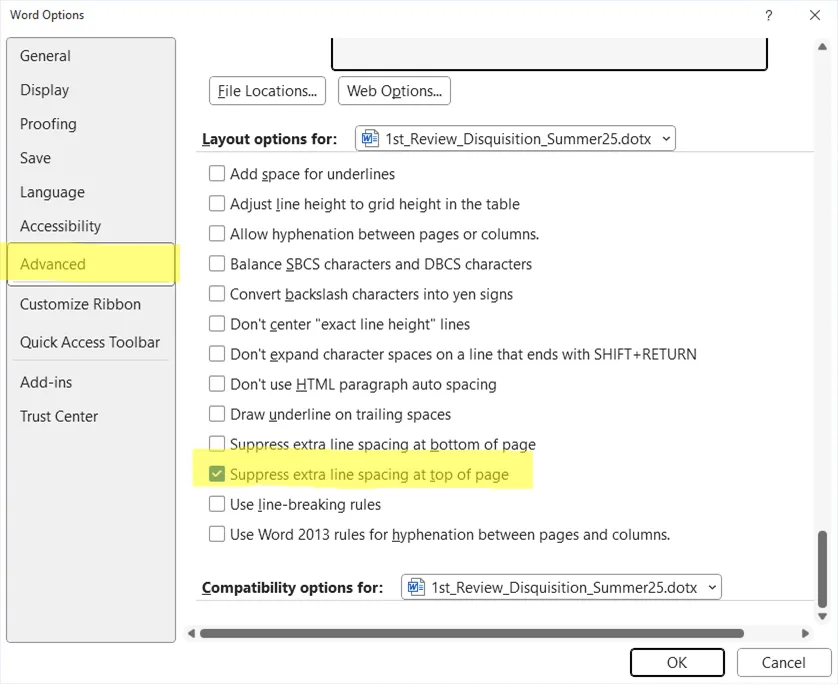
  • Enable suppress extra line spacing at top of page in Word's advanced options, as shown in the image below.

Line breaks and carriage returns are commonly used to space content onto new pages, which creates new problems when revisions cause content to shift around. We recommend removing all line breaks and carriage returns that were created to space out content, and instead use paragraph settings to space content or force it onto a new page when necessary. First, enable formatting marks by clicking the pilcrow icon (¶) from the Home tab -> Paragraph menu (hotkey CTRL+SHIFT+8); once enabled, line breaks and carriage returns appear as pilcrows (¶) in your text. Then, remove for any ¶ alone on their lines or other extraneous line breaks and carriage returns. To force content onto a new page, enable page break before in the paragraph settings.

Another common issue is that extra line spacing has been added to non-text items. Open the paragraph settings for non-text items, their titles, and their notes and ensure they're set according to your line spacing scheme. See the section on line spacing issues (above) for examples of these settings. Our template styles use these settings, but the conventions of your discipline may require you to edit them to suit.

Additionally, you may need to enable "suppress extra line spacing at top of page" if you are using an old template from before July 2025. This is unlikely to affect headings, however it may resolve other issues. The image below shows this setting.

  1. Go to File on the ribbon.
  2. Click Options, near the bottom left.
  3. Click Advanced.
  4. Scroll down to the bottom and enable suppress extra line spacing at top of page.

The setting above for automatic suppression does not work for some text. Sometimes, table titles that are above tables on landscaped pages do not always have their line spacing automatically suppressed, and may require manual adjustment. In these cases, set the line spacing to 0 pts before" in the paragraph settings for that title.

Suppress line spacing at the top of pages
Enable line spacing suppression at the top and bottom of pages from File tab -> Options -> Advanced, then scroll down to the bottom.

Issue: Images Missing Alt-text

  • All images, such as figures or schemes, have alternative text that describes its purpose/function.
  • All captions describe the purpose/function of associated images/objects.
  • Descriptive text conveys the purpose and/or function of images/objects.
  • Decorative images should be tagged as artifacts.

  • Add descriptive alt-text to non-decorative images.

You can add alt-text to an image in Word by right-clicking the image and selecting Edit Alt Text from the context menu. For instructions on adding alt-text to a PDF, see this video demonstration and page 20 of the 2019 PDF Testing and Remediation Guide on the Section 508 website. AI-generated alt-text is not sufficient to meet this requirement, such as alt-text automatically generated by Word.

Use alt-text to concisely describe the information conveyed by an image. We recommend using 150 words or less, and you should avoid reproducing descriptions already present in the body text or captions or using phrases like "figure of" or "equation of", as screen readers announce the type of content automatically. Since the images in a disquisition often convey complex and sundry information, a critical focus on the purpose of this data and its relationship to your accompanying textual content will be necessary to concisely abbreviate the contents of your images.

You have likely seen alt-text in images before--it's the text that pops up when you mouse over an image. Since images, equations, and other objects cannot be parsed by a screen reader, alt-text is read aloud to help those with visual impairments understand your content. If your discipline places titles/captions below figures, screen readers will parse the alt-text before the title/caption.

If a figure is composed of multiple images, they must be labeled as subfigures and each image should have alt-text that sufficiently describes the subfigure. If you have disparate images you would like to present as a a singular figure, you should either divide the figure into subfigures or combine the images using an image editor, such as GIMP or MS Paint. See our our requirements at the top of this page for more information on subfigures.

Decorative images, such as logos or icons, do not require alt-text and should be marked as "decorative". While decorative images should not be included in your chapters, you may wish to include them with your appendix material in order to faithfully reproduce certain types of content, like surveys or permission documents. In word, images can be marked decorative from the Edit Alt Text menu; in a PDF editor, you can either tag them as artifacts manually or mark them as decorative using the editor's alt-text wizard, if available.

Example:

You are writing the results section of a chapter about utilizing UAVs to identify iron-deficiency chlorosis. You include a side-by-side comparison of a raw image from the UAV's camera alongside an scatter plot constructed from color-corrected spectral data captioned "Figure 5. Soybean experimental field plots for various cultivars and replications showing various levels of IDC symptoms, including standard calibration board, and accompanying scatterplot of corrected DGCI and SPAD meter readings using RCM."

The image's alt-text should include a description of all the data you want readers to take away from the image to understand your subsequent analysis and discussion, such as the placement and purpose of the calibration board, the arrangement of soybean crops, the shape of the scatterplot data, or the regression data present in the scatterplot.

In your disquisition, there should be few if any decorative images, though decorative images like logos or icons are sometimes included in appendix material, such as compliance documents.

In Word, images can be marked as decorative under the Edit Alt Text menu; access it by right-clicking an image and selecting Edit Alt Text.

Issue: Item Unnecessarily Split Across Pages

  • If a table or figure can feasibly fit on a single page alongside its title and any accompanying notes, then do not break up that content across two pages.
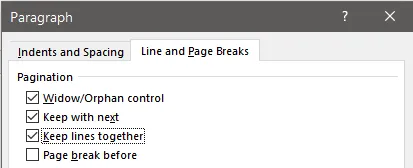
  • Set keep lines together or keep with next in paragraph settings for each part of a non-text item, as appropriate.

To keep the parts of a non-text item together on a page, select the entire item, including its title and notes, and set keep lines together within the Line and Page Breaks tab of the paragraph settings. If your table or figure is too large to fit onto a single page, see the entry on this page for alternatives.

Additionally, set keep with next for any accompanying text above the item, such as a title. If your table or figure has content below it, such as a figure title or table notes, enable "keep with next" for the table or figure itself to anchor it to the text. Enable keep with next for all but the last part of a non-text item, as this will anchor the item to the subsequent content.

Paragraph settings to anchor content together
Enable "keep with next" and "keep lines together" as appropriate for each part of a table, figure, etc. to keep the item together on the same page.

Issue: Table Extends Across Multiple Pages

Requirements:

  • When a table continues over multiple pages, the title of the item should appear on all pages with the item. On subsequent pages, add the phrase “(continued)” to the end of the first sentence of the table title. This helps the reader to remember what information they are looking at, and that it is all part of the same table.
  • When a table must extend for multiple pages, the header row of the table should appear at the top of the table on the subsequent pages. This helps the reader remember what the columns of data represent.

  • Split the table, then add a continued title and repeat the header row on each subsequent page.
  • Add the table to its respective prefatory list only once.

This process is best undertaken late in your drafting process. It is reversible--you can remerge your table back together--but small shifts in content above your table may cause it to move on the page, forcing you to re-split your table. Use the steps below to split a multi-page table. Despite having multiple continued titles, the table should only be listed once in the List of Tables, and the page number should point to the first page of the table.

  1. Do not place a page break before the table, unless doing so would reduce the number of pages the table spans across, would avoid fragmenting the table with widowed rows, or would improve the coherence of the table.
  2. Locate a good row at which to split the table. Ideal rows are ones that give you enough room for your title and don't cut off information awkwardly within your table. Next, place your cursor within that row, and navigate to the Table Tools -> Layout tab -> click Split Table button. Your table will continue onto the next page.
  3. Insert the continued title. Place your cursor above the table but not within the table, then type (or copy) your title into this space. Add the parenthetical phrase "(continued)" to the end of the first sentence of the title. For example: "Table 3.1. Yield data from FY2024-2025. (continued). Corn was significantly ..."
  4. Add the header row to the continued table. You cannot use the "Repeat header row" function within Word, and should add the header row manually by copying the header row from the first page of the table.
  5. If the table extends onto further pages, repeat steps 1-3.

The method above is the most straightforward method to split tables. There are alternative methods to split tables, such as by altering cell buffer size and borders, but these methods generally create irregular tables. You're welcome to use whatever method you prefer as long as your tables remain consistent with our Publication Guidelines.

Issue: Figure Extends Across Multiple Pages

Requirements:

  • Figure titles should appear on the same page with the figure.

  • If the figure is one large image, resize the image to accommodate the figure title being on the same page; additional captions or notes may "spill over" onto a following page.
  • If the figure has a wide aspect ratio, try placing it on a landscape page.

Unlike tables, figures cannot be extended across pages. We recommend making figures as large as possible (or necessary), but the figure's number and first sentence of the figure caption (the figure title) must appear on the same page as the figure. If the figure has additional sentences within its caption/notes, they may continue onto a subsequent page with the following requirements. If the figure is composed of subfigures, see below for additional guidance.

  • On the page with the figure – The figure number and title of the figure must appear with the figure itself. Reduce the size of the figure as necessary to meet this requirement.
    • If the style manual of your discipline places the figure number and title below the figure, and if your figure title is more than one sentence, only the first sentence must be included. If the style manual of your discipline places the figure number and title above the the figure, conventionally the title is a single sentence already, and additional information is placed within the figure notes; if this is not the case, please contact the Disquisition Coordinator.
  • On the page after the figure – The figure number and title of the figure should be repeated, so your reader can identify that the subsequent text is continued from the preceding figure. Additional figure caption/notes may be appended or added after the continued title.
    • Repeat the figure number and title in full and add the parenthetical "(continued)" to the end of the first sentence of the title.
      • If your style manual places the figure number and title on separate lines, such as APA, you may elect to repeat the figure number, the figure title, or both on the same line. Do not repeat the figure number and title on separate lines.

  • If a large figure is composed of subfigures, break up subfigures into individual figures that can each fit onto a page. The new figures will require their own numbers and titles/captions.

If your large figure--one that is unable to fit its title on the same page as itself--is composed of subfigures, we recommend breaking those subfigures up to create new, individual figures. This will also improve the readability of your disquisition, as larger figures are easier to read and parse. If the figure could be resized to fit its title onto the same page and still meet our minimum size requirements for text within images, you may resize it instead; see the issue entry on this page about managing the minimum size of text within images for more information.

If your large figure is composed of subfigures and these subfigures extend across multiple pages, you must break them up into new, distinct figures that can each at least fit onto a single page; unlike tables, figures may not be subdivided across pages--only their caption text may extend across pages, as described above.

Guidelines for splitting a title across pages can be found in the accordion entry above.

Issue: Small Text Within Tables

  • The titles and notes of tables, figures, schemes, etc. should be in the same font as your paragraph text.
  • Table text should be the same as your paragraph text.
    • Table text may be reduced, if necessary, to fit the table onto a single page. Table text should be easily readable at 100% zoom/print size, and may be no smaller than 4 pts less than the paragraph font (or Times New Roman size 8, whichever is larger).

  • Set all table titles to be in the same font as the paragraph text.
  • Set all table notes to be in the same font as the paragraph text, unless doing so would cause the note to appear on a different page from the last row of the table.
  • Set table text to be in the same font as the paragraph text; if it is necessary to reduce the text to fit the table onto a single page, reduce the font as little as possible.

Our guidelines are intended to be flexible so you can maximize the readability and clarity of your tables. However, you should also recognize that large data tables are inherently difficult for readers to parse and they are rigidly constrained by the size of the page. Furthermore, your readers may be better served by breaking up large tables into smaller pieces, even if some of the data is repeated across tables--organizing information to improve clarity is one of an author's primary responsibilities. If a large table simply cannot fit on a page without compromising its fidelity, consider including it as a supplementary file with your disquisition.

Table Titles

Without exception, table titles should be in the same font as the paragraph text. Title text may be bold, italicized, etc. in full or in part according to the style manual of your discipline.

Table Notes

Similarly, table notes should almost always be in the same font as the paragraph text. However, in cases where reducing the size of a table's notes would allow it to fit on the same page with the end of the table, you generally should do so. Reduce the font size as little as possible, and no more than our minimum allowable size.

Table Text

Table text should generally be in the same font as the paragraph text, but table text can be reduced if doing so allows the table to fit onto a single page. Reduce the font size as little as possible, and no more than our minimum allowable size. Before reducing the font size, check the following:

  1. Does the table fill the page, margin-to-margin? If not, try scaling the table up to run margin-to-margin.
  2. Is there whitespace within the table that could be reduced without comprising the clarity of the table? If so, try scaling row heights and column widths or reducing cell padding.
  3. Is the table too wide to fit on a portrait page? If so, try placing the table on a landscape page.
  4. Are long headers causing columns or rows to be disproportionately sized compared to their data? If so, try abbreviating long headers and including a reference for the abbreviation in the table title or notes. Alternatively, try changing column headers to be vertical.

Issue: Small Text Within Images

Requirements:

  • Text within images should be at least as large as the paragraph text; if an image must be scaled to fit on the page, the text cannot be smaller than our minimum allowable size.

  1. Recreate the image in a different format, with a higher resolution, or with larger text. Ensure "optimize for image quality" is enabled when exporting your document to PDF.
  2. Resize the image; images on portrait pages can be up to 6.5" wide.
  3. Relocate the image to a landscape page; images on landscape pages can be up to 9" wide.
  4. If a figure is composed of subfigures, reorganize the subfigures into multiple, distinct figures that can be scaled larger.
  5. Recreate the image with larger text.

Text in images should be as large as your paragraph text, but this requirement can be waived if the text has little to no loss of quality when magnified. This can be achieved by using high resolution images or file formats that support lossless scaling, such as SVG. We strongly recommend the latter over the former, as large image sizes often degrade the performance of your document and can potentially cause a loss of data.

If an image must be reduced, the text should be no smaller than our minimum allowable size. You can spot-check text in images by creating a text box near the image, copying some text from the image into a text box near the image, setting that text to be in Times New Roman size 8, and comparing the relative text size between the image and the text box. If text is too small, resize, relocate, reorganize, or recreate the figure.

We recommend making images large as possible, ideally as wide as their page. See the entry on this page for cases where doing so would push the title off the same page. Images can be resized in Word by dragging from their corners or editing their properties, such as in the Picture Format tab.

If the image is wider than it is tall, place it on a landscape page--see our DQKB entry on landscape pages for step-by-step instructions.

If the figure is made up of multiple subfigures, break them apart into individual figures so they can be scaled up. While there is value in having images appear adjacent to one another for comparison, "stuffing" a page with subfigures generally reduces clarity. Conversely, page limits and space constraints are not a factor in your disquisition, so there is little value in having multiple images stacked together simply to have "all the data in one place."

If the image is simply too large to fit on a page and meet the minimum text requirements, it will need to be recreated. Alternatively, you can remove the image from your disquisition and include it as a supplementary file in your ETD. See the File Format section of our policies page for more information about supplementary files.