Headings
Numbered and non-numbered headings are both acceptable styles, though they cannot be used together--you must choose one style and apply it to all the headings in your disquisition.
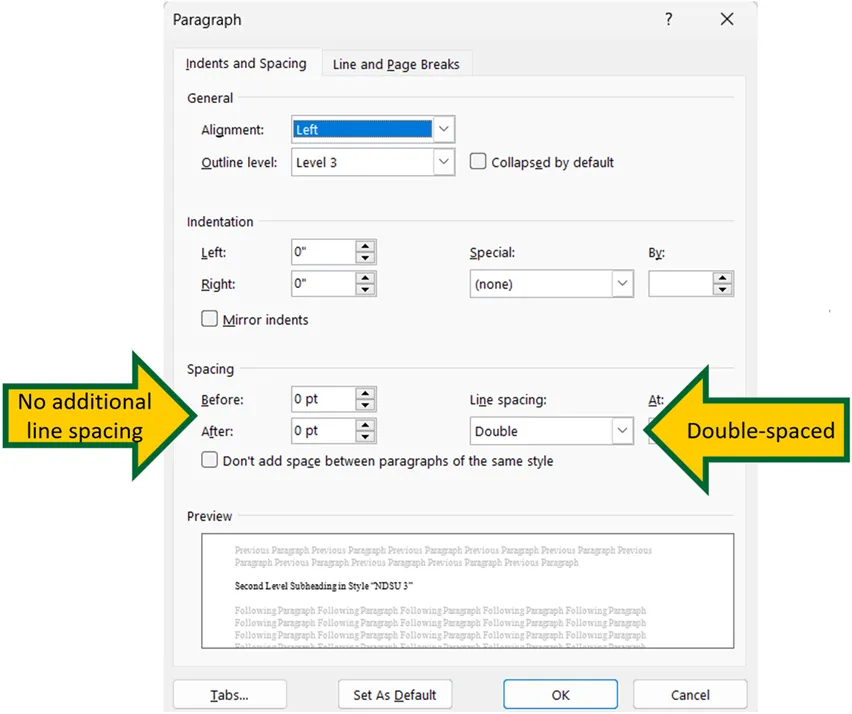
The most common issues with headings are inconsistent line spacing. Headings, like the paragraph text, should be double-spaced with no additional line spacing above or below the heading.
Guidelines: Headings
Headings identify new sections of your disquisition and should be visually distinct from your paragraph text. If you use several levels of headings, each level should be easily identifiable from its unique formatting. Levels can be established by their alignment, their font style (bold, underline, italics), or their number. Examples are provided in this section.
Page Contents
- Format Guidelines
- Frequently Asked Questions
- Troubleshooting
- Line Spacing
- Major Headings
- Alignment
- Chapter Labels
- Resources
Related Pages
Quick Answers
Examples of numbered and non-numbered headings
Note the differences in the examples below. For numbered headings, it is acceptable for the second and third level subheadings to both be bolded and left-aligned with no other distinguishing features because numbered subheadings are employed. If you elect to use non-numbered headings, all heading levels must be visually distinct.


Issue: Line Spacing
Requirements:
- Headings should be double-spaced, with no extra line spacing or blank lines above or below them.
Resolution:
- Remove all extraneous line breaks and carriage returns.
- Set the heading's paragraph settings to be double-spaced, with no additional line spacing before or after.
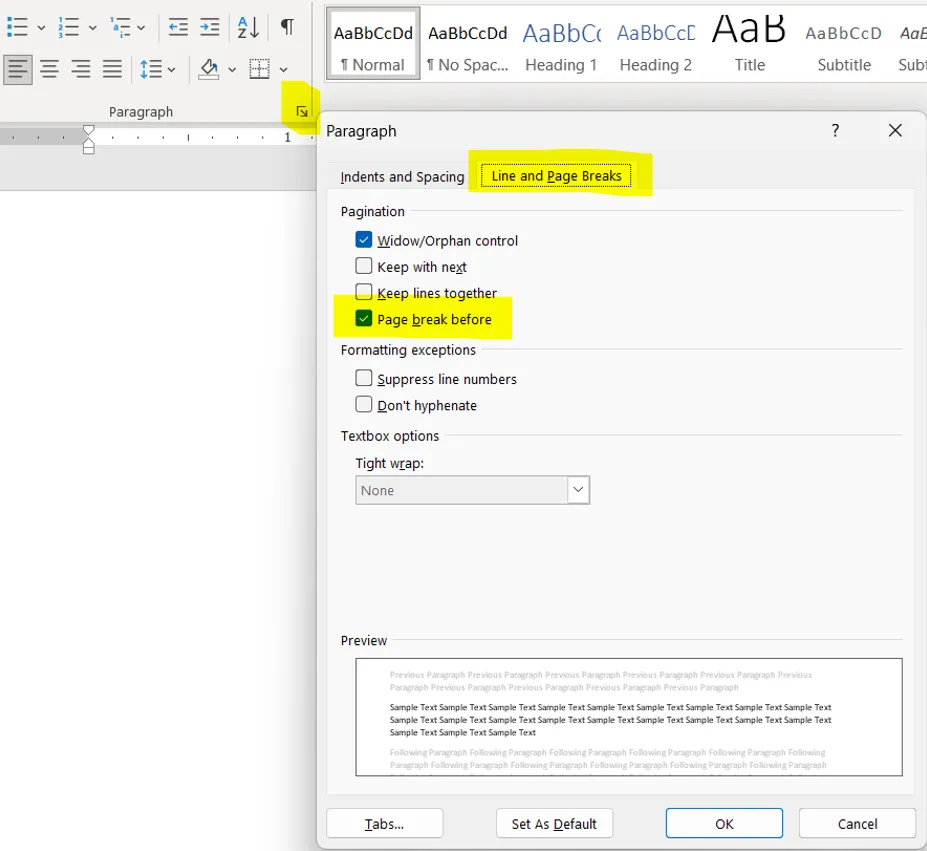
- Enable page break before in the paragraph settings for headings that should always appear at the top of a new page, such as all major headings.
Commonly, line breaks and carriage returns are used to space content onto new pages, which creates new problems when revisions cause content to shift around. We recommend removing all carriage returns that were created to space out content, and instead use paragraph settings to space content or force it onto a new page when necessary. To remove carriage returns, enable formatting marks by clicking the pilcrow icon (¶) from the Home tab -> Paragraph menu, or using the hotkey CTRL+SHIFT+8. Once enabled, remove any extraneous carriage returns and line breaks throughout the document. To force content onto a new page, enable page break before in the paragraph settings; we recommend using this setting for major headings in your document to avoid future issues.
Additionally, check the paragraph settings of your headings: they should be double-spaced, with no additional line spacing before or after. If you are using styles, check the style's paragraph settings by right-clicking the style, selecting Modify from the context menu, and selecting Paragraph from the dropdown menu in the bottom-left of the style settings dialog box. If you changed any style settings, the style should automatically update all your headings with that style, but you should check all headings to ensure it applied correctly; reapply the style to a heading if necessary.
You can modify the line spacing of a heading directly in its paragraph settings. The paragraph settings dialog box can be accessed by right-clicking the heading and selecting Paragraph from the context menu or by clicking the dialog box launcher arrow in the bottom-right corner of the Paragraph section of the Home tab on the ribbon.

We recommend using styles to apply consistent formatting across similar elements in your document. Each heading level should have its own style, and styles can be changed by right-clicking the appropriate style in the style pane on the Home tab then selecting Modify... from the context menu. In the modify style dialog box, click the Format button in the bottom left, then choose Paragraph... from the context menu. Change the line spacing options to be double-spaced with 0 pts before and after. See our template guide on the Formatting Guidelines, Templates, and Forms page for more information on using styles.
Issue: Headings at the Top of New Pages Are Not Flush with Page Margin
Requirements:
- All content should begin flush with the top 1" page margin.
Resolution:
- Remove all extraneous line breaks and carriage returns and enable page break before in the paragraph settings for headings that must appear at the top of a new page, such as all major headings.
- Set the heading's paragraph settings to be double-spaced, with no additional line spacing before or after.
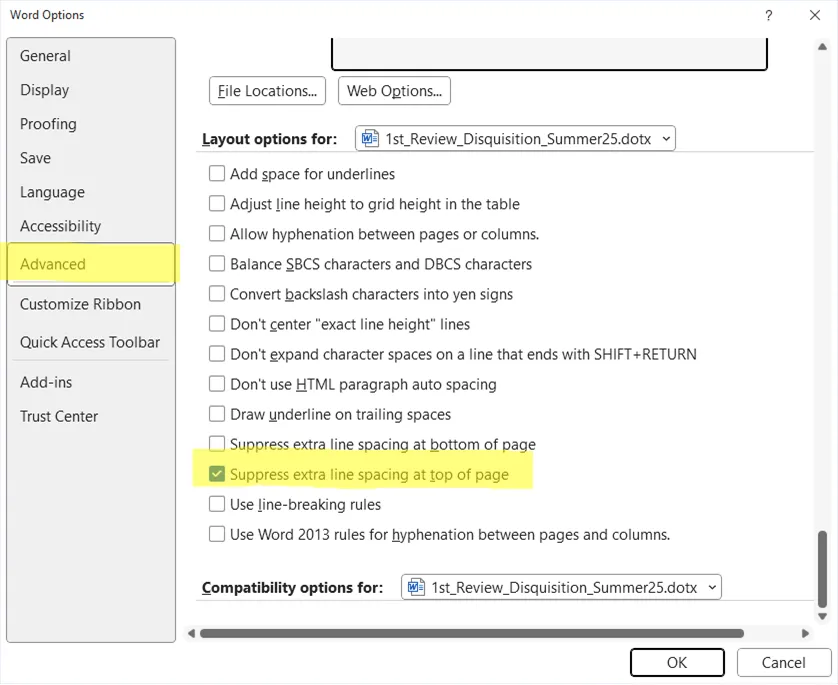
- Enable suppress extra line spacing at top of page in Word's advanced options.
Commonly, line breaks and carriage returns are used to space content onto new pages, which creates new problems when revisions cause content to shift around. We recommend removing all carriage returns that were created to space out content, and instead use paragraph settings to space content or force it onto a new page when necessary. To remove carriage returns, enable formatting marks by clicking the pilcrow icon (¶) from the Home tab -> Paragraph menu, or using the hotkey CTRL+SHIFT+8. Once enabled, remove any extraneous carriage returns and line breaks throughout the document. To force content onto a new page, enable page break before in the paragraph settings; we recommend using this setting for major headings in your document to avoid future issues.
Another common issue is that line spacing has been added to the paragraph settings for headings. Open the paragraph settings for your heading and ensure it's set to be double-spaced with 0 pts of line spacing before or after. See the section on line spacing issues (above) for examples of these settings.
Additionally, you may need to enable "suppress extra line spacing at top of page" if you are using an old template from before July 2025. This is unlikely to affect headings, however it may resolve other issues.
- Go to File on the ribbon.
- Click Options, near the bottom left.
- Click Advanced.
- Scroll down to the bottom and enable suppress extra line spacing at top of page.
Issue: Major Heading Appears in the Middle of Page
Requirements:
- Major headings should be in bold font, aligned center to the page, use ALL CAPS, and appear at the top of a new page.
Resolution:
- Enable page break before in paragraph settings.
You can force major headings to always appear at the top of new pages by selecting the major heading and enabling the page break before option on the Line and Page Breaks tab of the paragraph settings dialog box. If your major heading uses a style, this setting can be enabled within the style by right-clicking the style within the style pane, then navigating to the setting from Modify -> Format (bottom left) -> Paragraph -> Line and Page Break tab.
We recommend setting page break before because adding blank lines or forcing page breaks to space out content often results in blank lines or blank pages appearing when content shifts due to formatting changes. The page break before setting ensures your major headings stay pinned to the top of whatever page it appears on, even if content above it shifts.
Issue: Heading Alignment
Requirements:
- Centered headings should be fully centered. Do not add spaces or tab spaces before these headings, which causes them to appear off-center.
- Left-aligned headings should be flush with the left 1" page margin. Do not add spaces or tab spaces before these headings, which causes them to be indented.
Resolution:
- Remove indents from the paragraph settings of headings.
- Remove tab spaces and tab stops from headings.
Notes:
If your centered headings are off-center, check for tab stops or tab spaces in the heading. Tab stops can be edited from the document ruler (enabled from the View tab) or the tabs settings found in the bottom-left of paragraph settings. Tab stops on the ruler appear as black marks, shaped to indicate what alignment the tab stop has. If tab stops are present on the line with the heading, Word may attempt to align the heading around that tab mark rather than centering it on the page. In this case, remove the tab stops.
If a tab space is causing the heading to be out of alignment, remove it. You can view formatting marks by clicking the pilcrow icon (¶) on the Home tab -> Paragraph group, or using hotkey CTRL+SHIFT+8. Tab spaces appear as arrows: "->". If there are tab spaces within headings, such as between a section number and the heading title, remove these as well.
Issue: Chapter Label Formatted Incorrectly for Numbered Headings
Requirements:
- When using numbered headings, major headings for chapters should be numbered.
- Major headings for prefatory material, references/works cited sections, and appendices should not be numbered. (If you have more than one appendix, it should be lettered, regardless of whether your chapter headings are numbered.)
- The chapter numbers of major headings may be preceded with an optional label; for example, both "CHAPTER 1. INTRODUCTION" and "1. INTRODUCTION" are acceptable styles for a major heading. Subheadings should not be labeled.
Resolution:
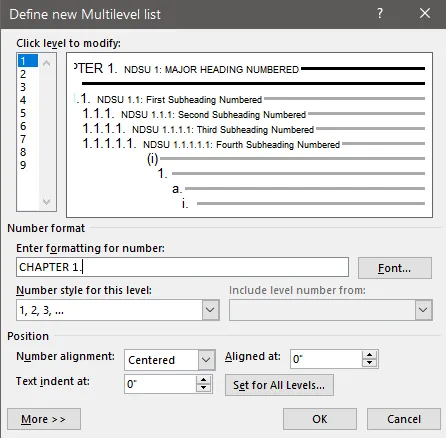
- Adjust the list settings for numbered headings to format the major heading label.
- Remove section numbers from major headings outside the chapters.
Notes:
Our templates default to using unlabeled major headings, such as "1. INTRODUCTION". A label can easily be added by right-clicking any section number and selecting adjust list indents from the context menu. To add or remove a label, select the heading level it should apply to, then edit the field under "Enter formatting for number:". For example, if you would like to add chapter labels to your major headings, you can use these settings:
|
|
Disquisition Site Map |
|
|---|---|---|
Preparing to Graduate |
Graduate School Policies • Templates & Forms • Pre-submission Requirements • Submit Your Disquisition | |
DQKB |
General Requirements | Accessibility • Section Order • Font • Headings • Page Numbers |
| Prefatory Material | Title Page • Approval Page • Table of Contents • List of Tables, Figures, Etc. • List of Abbreviations/Symbols • List of Appendix Tables, Figures, Etc. | |
| Disquisition Body | Paragraph Text • Equations • Tables, Figures, Etc. • References / Citations • Appendices • Landscape Pages | |