Tables, Figures, Schemes, etc.
Tables, figures, schemes, and other non-text items should be integrated into the text of your disquisition rather than grouped at the end of a chapter. All non-text items should be inserted at the first natural break point (between paragraphs or at the top or bottom of the page) after the first in-text reference; ideally, a non-text item should appear on the same page with its first in-text reference, but this is frequently not possible. All tables, figures, schemes, and other non-text items must have a label, number, and title, must fit within the page margins, and must have consistent styling across all occurrences of that type of item in the disquisition.
Our guidelines outline the general requirements for non-text items in your disquisition. Beyond these general requirements, we strongly recommend that non-text items in your disquisition follow the requirements of the style manual of your discipline (with respect to titles, borders, alignment, and so forth). For example, if your citations are formatted in APA style, then your table and figure titles and notes should also follow APA style. For more information about how to format tables, figures, schemes, and non-text items, refer to the style manual for your discipline.
Guidelines: Tables, Figures, Schemes, Etc.
Page Contents
- Guidelines
- Frequently Asked Questions
- Troubleshooting
- Line Spacing and Extraneous Whitespace
- Missing Alt-text
- Multipage Tables
- Multipage Figures
Related Pages
Quick Answers
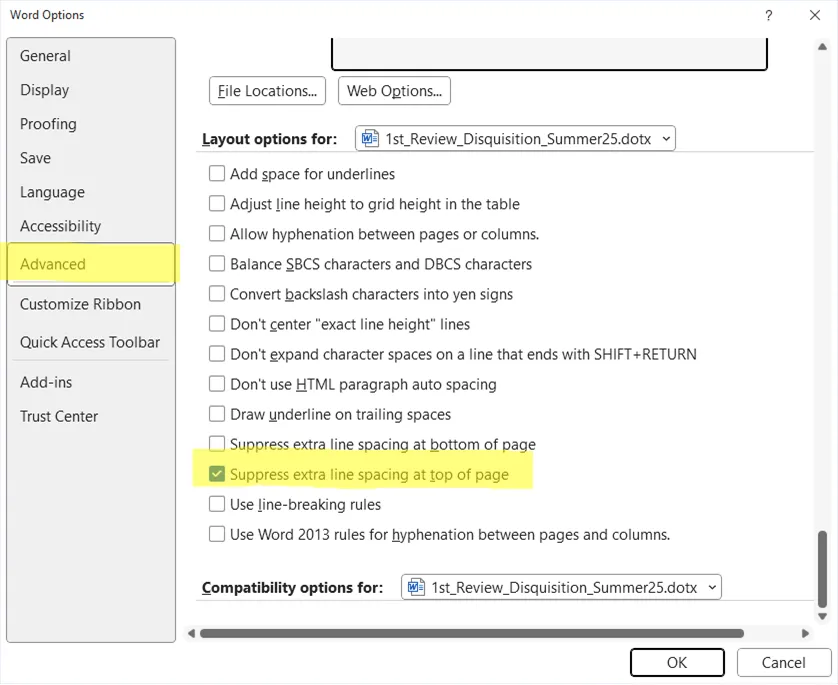
Issue: Line Spacing
- There should be no less than one and no more than two (12-24 pts) lines of space before or after a non-text item, including its title or notes, to help separate it from the surrounding content.
- The amount of space before and after an item should be the same, and consistent for all non-text items in your document.
- There should be between 0-1 lines of space between the title and/or notes of an item and the item itself.
Figure Line Spacing Examples


Table Line Spacing Examples


Issue: Content Does Not Begin Flush with Top Page Margin
Requirements:
- All content in the disquisition should begin flush with the top 1” page margin.
Issue: Images Missing Alt-text
- All images, such as figures or schemes, have alternative text that describes its purpose/function.
- All captions describe the purpose/function of associated images/objects.
- Descriptive text conveys the purpose and/or function of images/objects.
- Decorative images should be tagged as artifacts.
Issue: Item Unnecessarily Split Across Pages
- If a table or figure can feasibly fit on a single page alongside its title and any accompanying notes, then do not break up that content across two pages.

Issue: Table Extends Across Multiple Pages
Requirements:
- When a table continues over multiple pages, the title of the item should appear on all pages with the item. On subsequent pages, add the phrase “(continued)” to the end of the first sentence of the table title. This helps the reader to remember what information they are looking at, and that it is all part of the same table.
- When a table must extend for multiple pages, the header row of the table should appear at the top of the table on the subsequent pages. This helps the reader remember what the columns of data represent.
Issue: Figure Extends Across Multiple Pages
Requirements:
- Figure titles should appear on the same page with the figure.
Issue: Small Text Within Images
Requirements:
- Text within images should be at least as large as the paragraph text; if an image must be scaled to fit on the page, the text cannot be smaller than 4 pts smaller than your paragraph text (or Times New Roman size 8, whichever is larger).
|
|
Disquisition Site Map |
|
|---|---|---|
Preparing to Graduate |
Graduate School Policies • Templates & Forms • Pre-submission Requirements • Submit Your Disquisition | |
DQKB |
General Requirements | Accessibility • Section Order • Font • Headings • Page Numbers |
| Prefatory Material | Title Page • Approval Page • Table of Contents • List of Tables, Figures, Etc. • List of Abbreviations/Symbols • List of Appendix Tables, Figures, Etc. | |
| Disquisition Body | Paragraph Text • Equations • Tables, Figures, Etc. • References / Citations • Appendices • Landscape Pages | |