Grain Stream Sampling and Sampler Construction
(AE1044, Reviewed Feb. 2019)
Accurate grain sampling is equally important to both the producer and the buyer of grain. A grain sample is important because information from the sample is used to establish the quality characteristics and the value of the grain. Therefore, it is important that proper thought and attention be given to the method of collection, sample size, and frequency of sample collection per unit volume of grain.
Reviewed by Dr. Kenneth J. Hellevang, PE, Extension Agricultural Engineer, Professor
Availability: Web only
Sampling should be done at the farm as well as the elevator to determine the quality of the grain going into storage. Knowing the grain quality permits marketing grain based on both quality and quantity, and having a representative sample permits taking the sample to several buyers for analysis and a price quote.
Sampling is also necessary for proper grain storage management. Information from the samples, such as grain moisture content and the amount of foreign material, can be used to determine appropriate action to maintain the quality of the stored product.
Sampling
Sampling is defined as the process of removing an appropriate quantity for testing from a larger bulk, in such a way that the proportion and distribution of the factors being tested are the same in both the whole (lot) and the part removed (sample).
Distribution of constituents, such as broken kernels or foreign material, is generally not uniform throughout the load. As grain is loaded into a container (truck, wagon, railcar, or storage), constituents of the grain mass stratify and segregate. The constituents separate depending on size, density, and shape. Fine particles tend to concentrate in a region near the center of the container and coarse particles in the outer perimeter. This causes variations in the physical characteristics within the load. As the amount of foreign material in a lot of grain increases, so does the segregation of the foreign material. This makes the method of sampling extremely important to ensure that the sample is truly representative of the whole grain mass.
People collecting grain samples can influence how well the sample represents the lot of grain by sampling only a portion of the grain stream. Also, if only a portion of the grain stream is sampled, the person loading the vehicle has an opportunity to influence how well the sample represents the load. For this reason, the Federal Grain Inspection Service does not allow certain types of sampling for official inspections (Figure 1). Using a proper grain stream sampler is no more difficult than these alternatives and will provide a more representative sample.
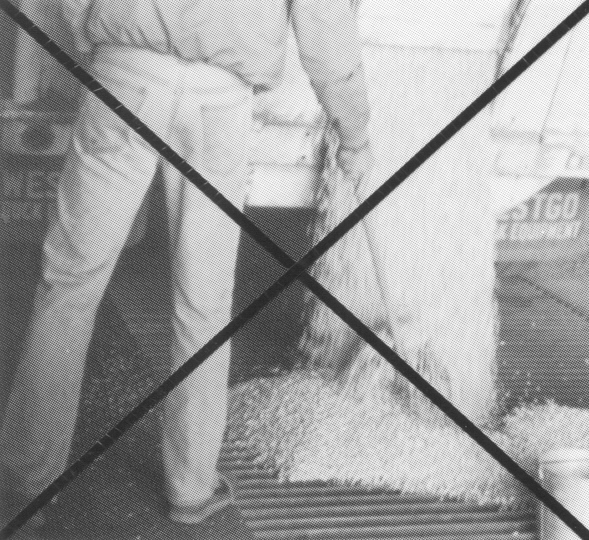
Scoop sampling
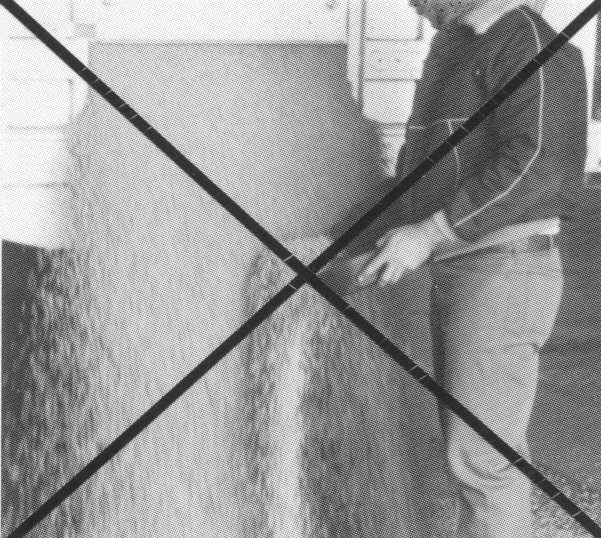
Hand-grab sampling
Figure 1. A scoop or hand-grab sample may not be accurate.
Correct Sampling Procedure
A representative sample can be obtained from the grain stream falling from the endgate of a truck or wagon if proper procedures are used. Tests have shown that the following requirements must be met if an endgate sample of grain is to be representative:
1. Use an appropriate sampling device that will collect grain from the entire grain stream without overflowing. The grain stream may need to be controlled to allow the sampler to pass through the stream without overflowing.
2. Make sure the sampling container does not contain seeds or other material before sampling.
3. Samples should not be taken from the first or the last portions of a load since these areas do not provide a representative cross-section.
4. Samples should be collected from the grain stream where the stream is established; about 12 inches below the endgate.
5. The entire stream must be cut (sampled) with a side to side sweep of the sampler, cutting the full thickness of the stream – front to back (Figure 2). Hold the sampler in a horizontal position while passing it through the grain stream to facilitate even filling of the sampler.
6. Take at least two, preferably more, samples at random intervals. Sampling intervals should be selected so the entire lot of grain is equally represented; for example, three samples taken in the middle of each third of the load. FGIS, for official inspection, requires sampling quantities of less than 500 bushels with a minimum of two separate passes of the sampling tool. Each additional 500 bushel of grain are to be sampled at least once.
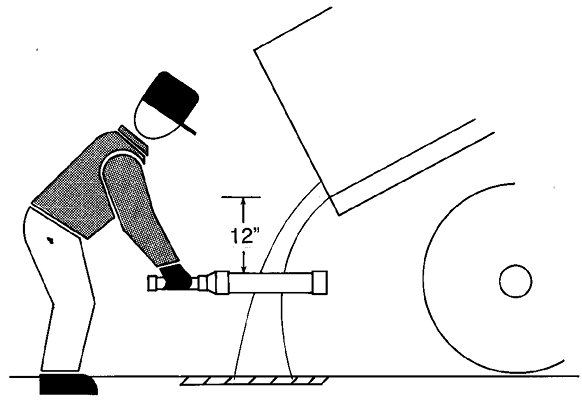
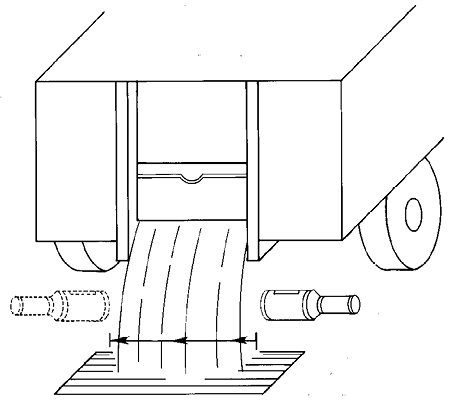
Figure 2. Sampling grain stream.
The quantity of the sample used for analysis will only be about 2½ quarts. Care must be used if only a portion of the sample collected will be used for analysis. A Boerner divider should be used, if available, to reduce the quantity of the sample to an amount appropriate for analysis.
If a Boerner divider is not available, the portion used for analysis must be divided in a manner so it is representative of the whole sample. Hand mixing tends to cause fines to settle to the bottom of a container, so this method should only be used for shallow containers with a cross-section of the mixed sample used for analysis.
Segregation occurs in the receiving container when pouring from container to container, so grain used for analysis needs to come from a cross-section of the sample as it is being poured. Place a container on the unloading grate or a tarp. Then with a sweeping motion, pour the grain from the sample while allowing the stream to move across the stationary container (Figure 3). Pour the grain from the sample container at a rate so that after several passes the sample container is empty at the time the desired quantity for analysis is collected.
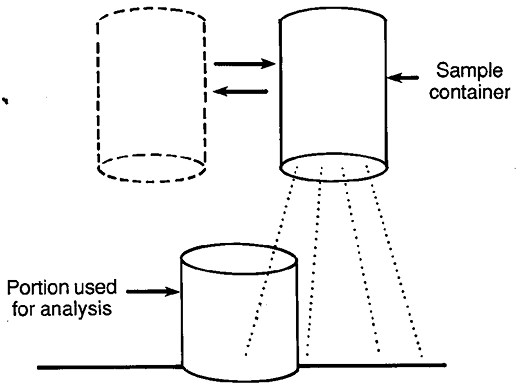
Figure 3. Dividing a sample for analysis.
7. The sample must be handled in a manner that does not allow the condition of the sample to change from when it was collected. For example, if the sample is to be stored for any length of time, it should be stored in a moisture proof container so it will not change moisture content.
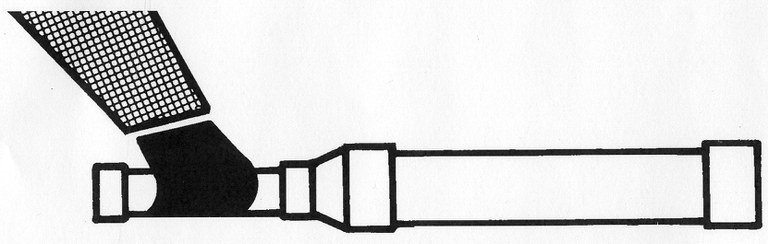
Available Sampling Tools
The pelican sampler is the only tool authorized for official Federal Grain Inspection Service (FGIS) endgate sampling (Figure 4). A pelican sampler is a leather pouch, approximately 7 inches deep, 2 inches wide and 18 inches long, that is attached to a long pole. A metal band along the edge of the pouch holds it open. The pelican sampler costs about $85 and is considered by some to be awkward to use. The cost and clumsiness of the tool limit its use on the farm and at country elevators.
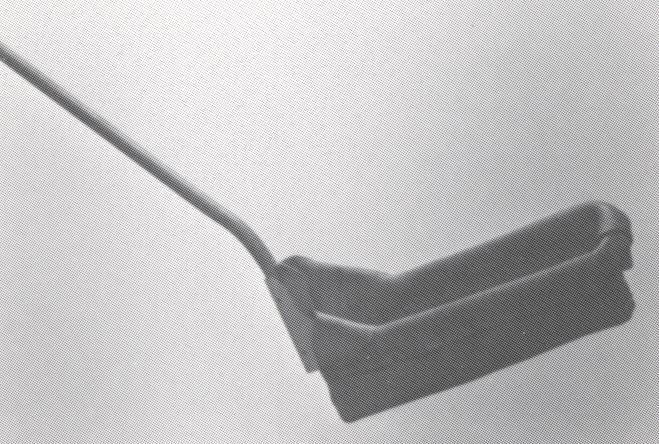
Figure 4. Pelican sampler.
Research at NDSU has shown that samples collected with other samplers, using the previously described procedures, represent the total load as well as those collected with the pelican sampler. The types of grain included in the research were hard red spring and durum wheat, corn, barley and soybeans.
A sampler built of PVC pipe and referred to as the “pipe” sampler, was designed at NDSU (Figure 5). The material cost is about $15, and the sampler can be made using ordinary hand and power tools. Instructions for constructing the pipe sampler are included in this publication.

Figure 5. Research pipe sampler.
Truck endgate samplers, such as the NDSU sampler, are acceptable for FGIS Official Commercial Inspections. The samplers are to be used following correct sampling procedures as described in this circular.
Instructions for Pipe Sample Construction
The length of the handle can be varied according to the preference of the user. The 24 inch length is specified in the material list and procedure, but it can be shortened if desired.
Handle diameter can also be varied. A larger diameter handle will permit more rapid emptying of the sampler. However, the diameter needs to be limited to allow for ease of grasping the handle. A 1.5-inch diameter handle worked well in the research. A 2-inch diameter handle is specified to permit more rapid emptying, but other sizes are appropriate. The rate of emptying must be limited to prevent spilling through the sampler slot.
Materials List

Tools Required
Saw with fine toothed blade, 12-16 teeth per inch. (An electric sabre saw works well.)
Drill with 1/8 and 1/4 inch bits
Flat file
Medium sized “C” clamp
Construction Procedure

Figure 6.
1. Smooth the ends of the 3 inch diameter PVC pipe and bevel the outside edge of one end to about 45 degrees with a file.
2. Clamp the 3-inch pipe horizontally to a work bench using the stationary jaw of the clamp inside the pipe. Do not over-tighten the clamp; the pipe may split.
3. Draw a 1 inch x 12 inch rectangle lengthwise on the pipe. The rectangle must be parallel to the centerline of the pipe and 3 inches from either end (Figure 7).
4. Drill 1/4 inch diameter holes just inside two opposite corners of the rectangle as shown in Figure 7.

Figure 7. Procedure for cutting slot opening in 3” diameter pipe.
5. Cut out the rectangle, preferably in one piece since that piece may be used later for foot pads if desired. Saw from each hole to the next corner as shown.
6. Remove any excess material in the corners and smooth any sharp edges of the slot with a file.
7. Square the ends of the 24-inch length of 2-inch pipe. Use the file to bevel the outside edge of one end of the pipe so the 2 inch cap will easily fit, but tightly enough so it doesn’t slip off without some effort.
8. Fasten the 3-inch x 2-inch pipe reducer to the beveled end of the 3 inch pipe following the instructions for the PVC pipe cleaner and glue. Be sure the reducer is pushed completely on so there are no inside seams to trap seeds. Next glue the 3-inch pipe cap to the other end of the 3-inch pipe. Again, be certain the pipe cap fits completely on the pipe.
9. Glue the non-beveled end of the 2-inch pipe into the reducer on the large pipe assembly. Be sure the pipe seats fully into the reducer.
10. (Optional) The sampler may be used without the 2 inch pipe cap. If the cap is used, a sash chain may be used to prevent the loss of the cap. If the sash chain is used, drill a 1/8 inch diameter pilot hole in the center of the back of the 2-inch pipe cap. Attach the sash chain to the pipe cap with a #12 self-tapping sheet metal screw. Fasten the other end of the sash chain to the top of the handle.
11. (Optional) Cut four foot-pads from the material removed from the slot, so the foot-pads are about 3/4 inch x 3/4 inch in size. Use the file to smooth the edges and corners of the foot-pads. Set the pipe assembly on a smooth, flat surface with the slot at the bottom. Block it in place so that it will not roll. Glue the four foot-pads to the assembly with two on the 3-inch pipe cap and two on the 3-inch section of the reducer. The foot-pads should be located so they prevent the sampler from rolling
References
Backer, Leslie F. and George G. Maher Jr. End-Gate Grain Sampling Tool Evaluation, Transactions of the ASAE Volume 30, No. 6, pp. 1848-1852. American Society of Agricultural Engineers, St. Joseph, Michigan. 1987
Inspecting Grain – Practical Procedures for Grain Handlers, MP-34. Federal Grain Inspection Service, United States Department of Agriculture, P.O. Box 96454, Washington, DC 20090-6454. 1991
Grain Sampling, Book I. Federal Grain Inspection Service, United States Department of Agriculture, Washington, DC 20250. 1989
Marshall, John W. Program Directive 918.55. FGIS, USDA, Washington, DC. 1992
This publication was authored by Kenneth J. Hellevang; Leslie F. Backer, Associate Professor, retired; and George G. Maher, Extension Ag Safety Specialist, retired; 1994.
George Maher conducted the sampler research described in this publication while a graduate student at NDSU. Leslie Backer was the research leader.
(Revised February 2019)