Injections
Injection Sites
- 1995 Beef Quality Audit reported 11 percent of carcasses had at least one injection site blemish
- The best site to give an injection isn't always the most convenient
- Keep all injections in front of the shoulder
- Injection technique for both SC and IM injections
- Never inject more than 10cc into one site
- Don't re-inject into injection sites
- Minimize the risk of injection site reactions
The 1995 National Beef Quality Audit revealed 11 percent of the carcasses surveyed had at least one injection site blemish. The beef industry loses about $7.05 for each fed heifer or steer marketed due to injection site lesions. Not only can the injection site leave visible lesions, but there are also significant tenderness problems associated with lesion-afflicted lean tissue.
The recommended site for injections is not always the most convenient or easiest site to reach. The best location for an injection is the site where the product is the most beneficial, without the risk of damaging the more expensive cuts of meat (upper rump and upper butt).
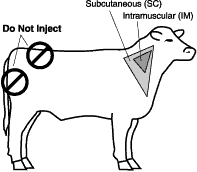
The 1995 National Beef Quality Audit suggests management changes to decrease the incidence of injection site lesions and reactions. First, producers should move the location of injection sites from the top butt and round to the neck, as shown in Figure 5, and use subcutaneous administration where the label allows. Producers should also discard burred or bent needles rather than reusing them.
Figure 5. Proper injection location.
Producers should pay particular attention to preparing their calves' immune systems through vaccinating. Programs that emphasize the importance of calf nutrition and timing of vaccinations can significantly reduce both the incidence of treatment (and usually injection) for respiratory disease and the incidence of excesses of multiple vaccinations, which can increase the incidence of injection site lesions.
To reduce lost value of the expensive cuts of meat, keep all injections in front of the shoulder. NEVER INJECT INTO THE TOP BUTT OR TOP OF THE RUMP!
For both vaccines and antibiotics, the triangular mass of neck muscle is the preferred site for both IM and SC injections. Be sure to inject straight in, not at an angle, when giving IM injections. Use the tenting method for SC injections.
Never inject more than 10 cc into one site. When making multiple injections, keep injection sites at least 5 inches apart, being careful not to reuse injection sites. To minimize the risk of infection and incidence of injection site lesions, avoid injecting into wet or manure covered areas.
Administering Injections Properly
Steps in Administering Injections Properly
- Select the right product
- Read the label
- Don't combine vaccines
- Use transfer needles
- Don't mix too many products
- Keep shaking
- Mark and separate syringes
- Don't use disinfectants with modified live vaccines
- Get air out of syringes
- Restrain animals properly
- Select best route of administration
- Choose best site of administration
- Choose the right needle
- Use proper injection technique
- Practice good sanitation
- Select the right product
When giving vaccinations; select the correct product for your need. This product should prevent futures infections or aid in stopping the current infection. Once a product is selected, follow the label instructions. - Read the label
The label of all health products will include 1) the dosage to be given, 2) the timing of administration, and 3) the route of administration. The most common routes of administration are intramuscular (IM), subcutaneous (SC), intravenous (IV), intranasal (IN), and topical. Other less common methods are intramammary (IM), intrauterine (IA), intrarumenal (IR), and oral. The label will list warnings, indications for use, and withdrawal times if any. The label will also include proper methods of storage and disposal and expiration date. - Don't combine vaccines
Mixing unlike vaccines could destroy the effectiveness and value of the individual products. Use only approved combinations. - Use transfer needles
Use transfer needles if a product needs to be reconstituted. The use of transfer needles should make the process easier and more sanitary. To use a transfer needle, place one end of the needle into the sterile liquid or dilutant; the other end goes into the freeze-dried cake of vaccine or bacterin. There should be a vacuum in the freeze-dried portion that immediately pulls the dilutent down. - Don't mix too much of a product at once
Modified live vaccines (MLV) begin to degrade, or lose effectiveness, after about an hour. Mixing too much product at one time may decrease effectiveness. For maximum effectiveness, mix enough vaccine for only one hour or less. Direct sunlight and extreme temperatures will also degrade the product, so it is best to keep it in a dark cool place, like a cooler. Don't save leftover vaccine for later use. It won't be effective and could be contaminated. Dispose of all vaccine bottles and equipment properly. - Keep shaking
When using large, multi-dose sizes of vaccine, such as a 200-dose bottle, mix thoroughly at first, and then stop from time to time and shake the bottle again. If you don't keep mixing, the vaccine may settle, giving an inconsistent amount of antigen in each injection. - Mark and separate syringes
Use and mark different syringes for bacterins or killed products. Mark the MLV syringes and keep them separate from the others. If traces of bacterin are left in a syringe that is later used for a modified live product, the bacterin could destroy the modified live vaccine, making it ineffective. - Don't use disinfectants with MLV
Don't clean syringes used for MLV with disinfectants. Use hot water to clean these syringes. Disinfectants can destroy MLV that you later put in the same syringe. A mild disinfectant can be used for cleaning bacterin syringes, but be sure to rinse thoroughly. - Get air out of syringes
To help get the right dose of vaccine in the animal, remove any air that may be trapped in the syringe by pumping the grip slightly before filling. After filling, pump it enough to move the vaccine up to the needle tip so there is no trapped air that might be injected with the vaccine. - Restrain animals properly
Restraining animals properly reduces the potential of hurting the animal or yourself. Proper restraint can reduce the level of bruising to the animal. Bruising alone costs the cattle industry $22 million per year. - Select the best route of administration
Selecting the best route of administration is crucial to effective vaccination. The two most common routes of administration are intramuscular (IM), which means injecting into the muscle, and subcutaneous (SC), which means injecting under the skin. Some products offer a choice, while others must be given in a specific way. The label will state the best method of administration. Generally, bacterins or killed products can be given SC. Modified live virus products are usually given intramuscularly, because this allows the virus to reproduce and reach the lymphatic system more easily. Whenever possible, use the subcutaneous route if allowed on the label. - Choose the best site of administration
Injection site lesions cost the industry about $7 per animal slaughtered. The best injection site is not necessarily the one that's the fastest or the easiest to get to. It is the site where the product will be the most effective, with the least possible risk of damage to valuable cuts of meat. Give all injections in the neck. Never inject into the top butt or top of the rump. - Use the correct needle
Choosing the correct needle may also lessen injection site lesions. When administering SC injections, use a 16 or 18-gauge needle, ½ to ¾ inch long. For IM injections, use a 16 or 18-gauge needle 1 to 1½ inch long, as shown in the table below. A 14-gauge needle isn't recommended - it is twice the diameter of a 16-gauge, which increases the risk of leakback and tissue damage.
If a needle is bent or broken, discard and replace with a new needle. Bent and broken needles increase the number of injection site lesions and increase the risk of broken needles entering the food supply.
- Use proper injection technique
When giving SubQ injections; tent the skin to get the product just under the skin and not into the muscle. Pull the skin away from the animal's body and insert the needle into the fold of skin. When giving multiple injections, keep injection sites several inches apart. Don't administer more than 10 cc of product into any one site. If a product must be given several times over a period of a few days, vary the injection site. - Proper sanitation is essential
Good sanitation practices reduce the risk of spreading infection from one animal to another, the chance of contaminating the vaccine, and injection site reactions. Some basic steps to good sanitation include not going back into the vaccine bottle with the same needle you use to vaccinate. Change needles frequently, at least every 10 to 15 animals, or every syringe of vaccine. When using killed vaccines, keep a saucer or sponge of alcohol or disinfectant nearby and wipe off the needle after each use. Do not disinfect needles between injections when using a modified live vaccine, as the disinfectant can destroy the vaccine. Injecting into a wet or muddy site can increase both the spread of disease and the incidence of injection site lesions. Make sure the injection site is clean. Clean transfer needles regularly to avoid contamination.
Correct Needle Size
|
Subcutaneous Intramuscular ½ to ¾ inch needle 1 to 1 ½ inch needle Cattle Weight Cattle weight Injection Viscosity <300 300-700 >700 <300 300-700 >700 Thin (needle gauge) 18 18-16 16 20-18 18-16 18-16 Ex: Saline Thick (needle gauge) 18-16 18-16 16 18 16 16 Ex: Oxytetracycline |